

Classic Jam Thumbprint Cookies: An Easy & Impressive Recipe
There’s something truly special about a classic cookie recipe, and these jam thumbprint cookies are no exception. Imagine a perfectly soft, buttery vanilla cookie, baked until golden brown, with a sweet indentation filled with luscious fruit jam. This is more than just a cookie; it’s a delightful bite of nostalgia, making it an ideal treat for any occasion. Whether you’re planning a holiday party, preparing after-school snacks, or simply craving a comforting homemade dessert, these easy and impressive cookies are always a hit.
As the holiday season approaches, my kitchen often transforms into a festive bakery. Amidst baking cherished Christmas recipes like traditional Italian cookies, fun Oreo stuffed cookies, aromatic eggnog cookies, and rich Nutella cookies, these beautiful little thumbprint cookies always find their way onto our dessert platters. Their charm lies in their simplicity and the endless possibilities for customization.

Why You’ll Love This Thumbprint Cookie Recipe
Thumbprint cookies have endured as a beloved classic for many excellent reasons. They strike the perfect balance between simple elegance and delightful flavor, making them suitable for both novice bakers and seasoned pros. Here’s why this recipe deserves a spot in your baking repertoire:
- Effortlessly Elegant: Despite their impressive appearance, these cookies are surprisingly easy to make. Their charm comes from the simple indentation and vibrant jam filling.
- Versatile & Customizable: With a basic vanilla cookie base, you can experiment with an array of jams, chocolates, or other fillings, allowing for endless flavor variations to suit any taste or season.
- Perfect for Any Occasion: From festive holiday spreads and cozy family gatherings to potlucks and bake sales, thumbprint cookies are always a welcome sight. They’re also fantastic as a thoughtful homemade gift.
- Irresistibly Delicious: The combination of a tender, buttery cookie and sweet, fruity jam creates a harmonious flavor profile that’s hard to resist. They’re a true comfort food in cookie form.
- Fun to Make: The process of rolling the dough, creating the “thumbprint,” and filling each cookie can be a wonderfully relaxing and enjoyable baking experience, especially with family.
Table of Contents
- Essential Ingredients for Thumbprint Cookies
- How to Bake Perfect Jam Thumbprint Cookies: Step-by-Step Guide
- Expert Tips for Flawless Thumbprint Cookies
- Frequently Asked Questions About Thumbprint Cookies
- Creative Flavor Variations & Customization Ideas
- Serving and Gifting Your Homemade Cookies
- More Delightful Cookie Recipes to Try
- Full Thumbprint Cookies Recipe Card
Essential Ingredients for Thumbprint Cookies
Creating these delightful cookies requires a handful of common pantry staples. Each ingredient plays a crucial role in achieving the perfect texture and flavor. Here’s what you’ll need to gather:
- Unsalted Butter: Ensure your butter is softened to room temperature. This is key for creating a light and fluffy cookie dough when creamed with sugar. Unsalted butter allows you to control the total salt content.
- Granulated Sugar: Provides sweetness and contributes to the cookie’s crisp edges and golden-brown finish. A little extra is used for rolling the cookie balls, adding a delightful sparkle and texture.
- Light Brown Sugar (packed): Adds a subtle molasses flavor and helps keep the cookies soft and chewy in the center. Make sure it’s firmly packed into your measuring cup.
- Large Egg: Acts as a binder, providing structure and moisture to the dough, ensuring your cookies don’t crumble.
- Vanilla Extract: A classic flavor enhancer that gives these cookies their signature warm and inviting aroma. Use pure vanilla extract for the best results.
- All-Purpose Flour: The primary structural component of the cookies. Measure it correctly by spooning it into the cup and then leveling it off to avoid dense cookies.
- Baking Soda: A leavening agent that helps the cookies spread slightly and achieve a tender crumb.
- Salt: Balances the sweetness and enhances all the other flavors in the cookie.
- Fruit Jam (your choice): The star of the show! Choose your favorite fruit jam or jelly. Raspberry, strawberry, apricot, and even blueberry are popular choices. Ensure it’s not too watery to prevent excessive bubbling during baking.
How to Bake Perfect Jam Thumbprint Cookies: Step-by-Step Guide
Crafting these classic cookies is a straightforward and enjoyable process. The key to success lies in a perfectly balanced dough that bakes up crisp on the outside yet remains wonderfully soft and tender on the inside. Follow these steps for delicious results:
- Cream the Wet Ingredients: In a large mixing bowl, combine the softened butter with both granulated sugar and light brown sugar. Beat them together using an electric mixer until the mixture is light, fluffy, and pale in color. This usually takes about 2-3 minutes. Proper creaming incorporates air, which contributes to the cookie’s tender texture.
- Add Egg and Vanilla: Beat in the large egg until fully incorporated, then stir in the vanilla extract. Continue mixing for another 1-2 minutes, scraping down the sides of the bowl as needed, until the mixture is smooth and well combined.
- Incorporate Dry Ingredients: Gradually add the all-purpose flour, baking soda, and salt to the wet mixture. Mix on low speed until just blended. Be careful not to overmix the dough, as this can lead to tough cookies. Stop mixing as soon as no dry streaks of flour are visible.
- Chill the Dough: This step is crucial for preventing the cookies from spreading too much during baking. Form the dough into a disk, wrap it tightly in plastic wrap, and refrigerate for at least one hour. For best results and easier handling, you can chill it for up to 3 days. This allows the butter to firm up and the flavors to meld.
- Prepare for Baking: About 10 minutes before you plan to bake, remove the chilled cookie dough from the refrigerator to let it soften slightly. Preheat your oven to 375°F (190°C). Line two baking sheets with parchment paper or silicone baking mats.
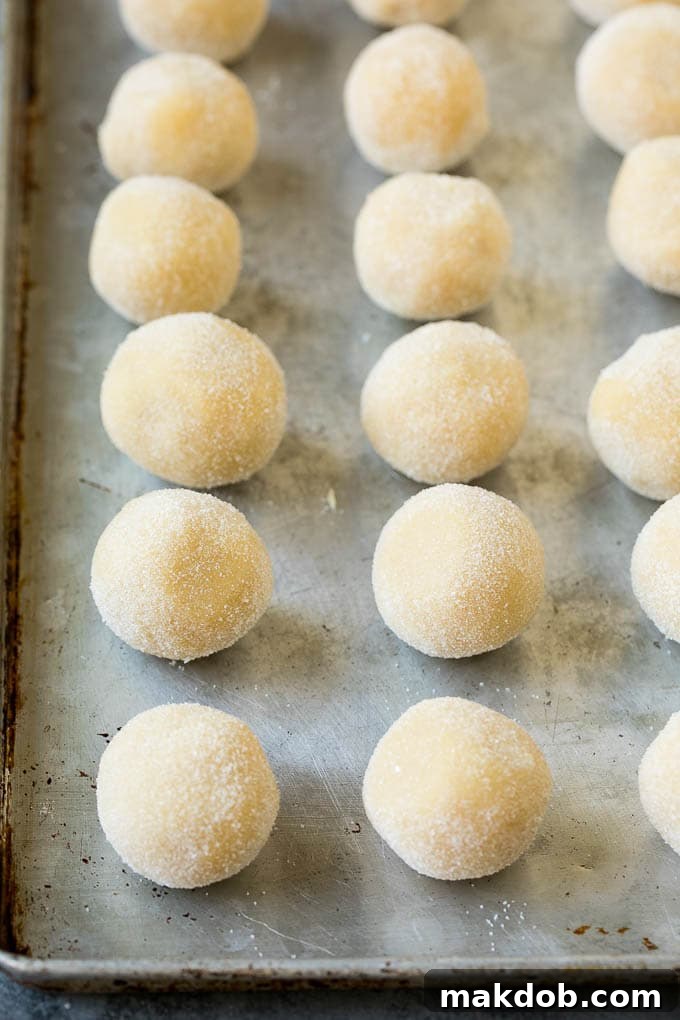
- Roll and Coat: Scoop out portions of dough, about 1 inch in diameter, and roll them into smooth balls. Roll each dough ball in granulated sugar to create a sparkling, slightly crisp exterior.
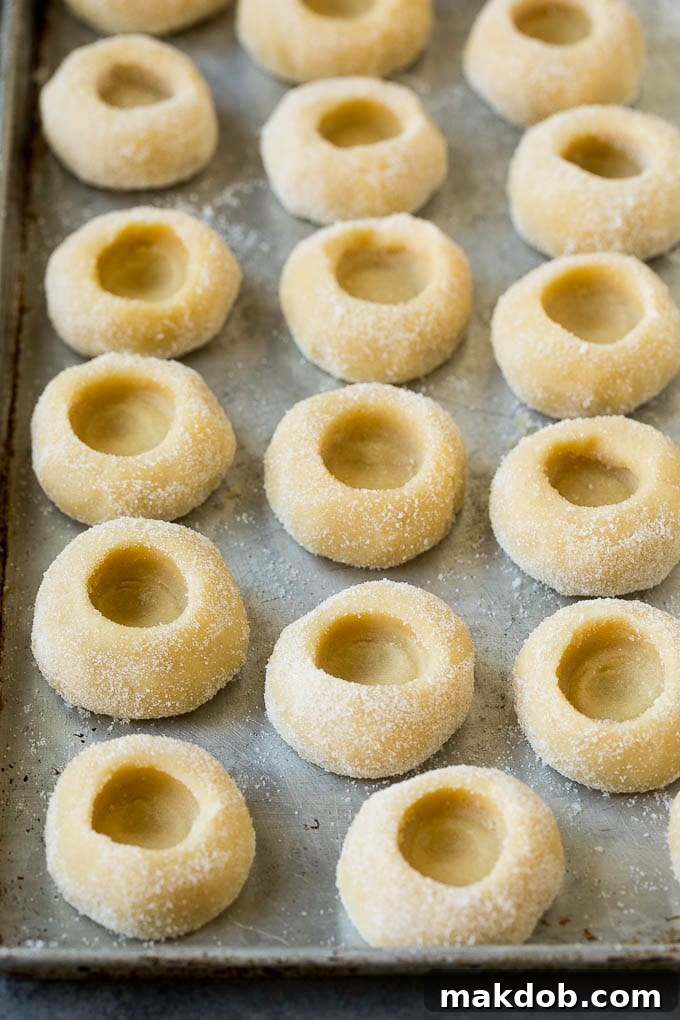
- Form the Indentation: Place the sugar-coated dough balls on the prepared baking sheets, ensuring they are about 3 inches apart to allow for spreading. Using your thumb, the back of a rounded teaspoon, or the round end of a pestle, gently press an indentation into the center of each cookie. Be gentle to avoid cracking the dough. If cracks appear, simply smooth them out with your fingers.
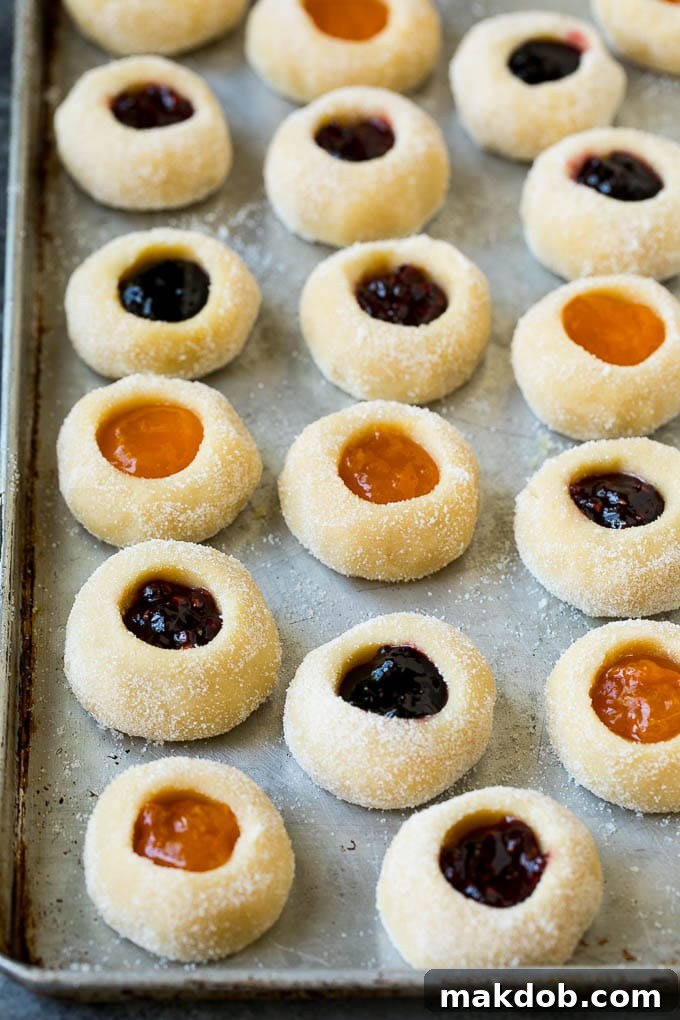
- Fill with Jam: Carefully spoon about 1/2 teaspoon of your chosen fruit jam into each indentation. Don’t overfill, or the jam may bubble over and run down the sides during baking.
- Chill Before Baking (Again!): For an extra measure against spreading, place the baking trays with the filled cookies into the freezer for 10-15 minutes, or until the cookies are firm. This quick chill helps the cookies maintain their shape in the hot oven.
- Bake to Perfection: Transfer the chilled baking sheets to the preheated oven. Bake for 10-11 minutes, or until the edges of the cookies are lightly golden brown. The centers should still be soft.
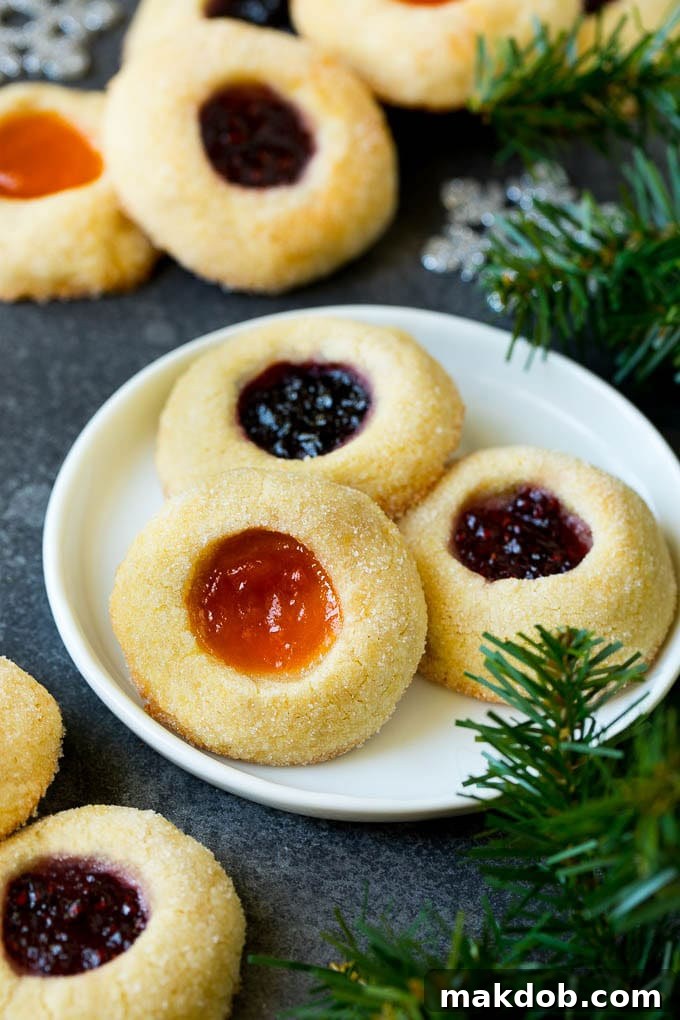
- Cool and Enjoy: Allow the baked cookies to cool on the baking sheets for about 5 minutes before carefully transferring them to a wire rack to cool completely. The jam will set as the cookies cool. Once fully cooled, they are ready to be savored!
Expert Tips for Flawless Thumbprint Cookies
Achieving the perfect batch of thumbprint cookies is simple with a few helpful tricks. These tips will ensure your cookies are tender, well-shaped, and visually appealing every time:
- Maintain Cold Dough: One of the most critical steps! Keep your cookie dough cold, especially when rolling it into balls. If the dough becomes too warm, it can get sticky and difficult to handle, resulting in rough rather than smooth cookie balls. If your dough starts to warm up, simply pop it back into the refrigerator or freezer for 10-15 minutes to chill before continuing.
- Pre-Bake Chill is Key: After you’ve placed the jam in the cookies and before baking, transfer the entire sheet pan of cookies to the freezer for about 10-15 minutes. This extra chill solidifies the butter in the dough, significantly preventing the cookies from spreading too much in the oven, ensuring they hold their charming thumbprint shape.
- Choose Your Jam Wisely: Be mindful of the color of your jam. Some dark jams and jellies, such as blackberry or grape, can “stain” the light-colored vanilla dough, potentially affecting the cookie’s appearance. For a cleaner look, I typically recommend using brighter, lighter-colored jams like raspberry, strawberry, or apricot jam. These vibrant colors also make for a more striking contrast.
- Don’t Overfill the Indentation: It’s tempting to load up on jam, but resist the urge! Make sure you don’t overfill the cookies, or the jam may bubble over and run down the sides during baking, creating a messy finish. About 1/2 teaspoon is usually plenty.
- Handle Cracks with Care: If your balls of dough crack slightly as you make the indentations in the middle, it could be a sign that your dough is overly cold and stiff. Don’t worry! You can easily patch any minor cracks with your fingers, gently pressing the dough back together to create a smooth surface before adding the jam.
- Grease Your Hands for Easier Rolling: If you find the dough too sticky or difficult to shape into smooth balls, try putting a tiny bit of cooking spray or butter on your hands. This will help prevent sticking and make the rolling process much smoother.
- Even Baking: For uniform baking, consider rotating your baking sheets halfway through the baking time, especially if your oven has hot spots. This ensures all cookies brown evenly.
- Proper Cooling: Let the cookies cool completely on a wire rack. The jam needs time to set fully, and the cookies will firm up as they cool, achieving that desirable tender-crisp texture.
Frequently Asked Questions About Thumbprint Cookies
Absolutely! You can easily freeze baked thumbprint cookies for future enjoyment. Once the cookies have completely cooled, arrange them in a single layer in an airtight container. If you need to stack them, place a piece of waxed paper, plastic wrap, or parchment paper between the layers to prevent sticking. Frozen cookies will stay fresh for about one month. When you’re ready to indulge, simply remove them from the container and let them thaw at room temperature on the counter.
There is typically no need to refrigerate baked thumbprint cookies. They will stay perfectly fresh at room temperature in an airtight container for up to 5 days. For longer storage, freezing is the better option.
The most important step to prevent spreading is to thoroughly chill your cookie dough before baking. A minimum of one hour in the refrigerator is recommended, but a quick 10-15 minute chill in the freezer right before they go into the oven can work wonders. Ensure your butter isn’t too soft when you start, and avoid overmixing the dough, as both can contribute to excessive spreading.
Yes, definitely! Thumbprint cookies are incredibly versatile. You can use lemon curd, chocolate ganache, Nutella, caramel sauce, or even a dollop of marshmallow fluff for creative variations. See our “Flavor Variations” section for more ideas!
If your dough seems too crumbly and won’t come together, it might be too cold or you might have added too much flour. Try letting it sit at room temperature for 5-10 minutes to soften slightly. If it’s still too dry, you can add a tiny bit (1/2 teaspoon at a time) of milk or water to help bind it, mixing just until it comes together. Conversely, if it’s too sticky, chilling it longer will help.
FOLLOW ME
Creative Flavor Variations & Customization Ideas
While the classic jam-filled thumbprint cookie is utterly delicious on its own, its beauty lies in its adaptability. You can easily customize these treats to suit any preference, season, or holiday. Don’t be afraid to get creative and experiment!
Beyond the Jam: Exciting Fillings
The indentation in the center of these cookies is a canvas for a myriad of flavors. Here are some ideas to inspire your next batch:
- Chocolate Delights:
- Nutella: A dollop of creamy Nutella for a rich hazelnut-chocolate experience.
- Chocolate Ganache: Melted chocolate mixed with a bit of cream, allowed to cool slightly before filling.
- Mini Chocolate Chips: Press a few mini chocolate chips into the warm indentations right after they come out of the oven.
- Creamy & Caramel:
- Caramel Sauce: A spoonful of thick, decadent caramel sauce. A sprinkle of sea salt on top makes it even better.
- Peanut Butter: A small amount of creamy peanut butter for a classic combination.
- Marshmallow Cream: For a gooey, sweet treat, especially when lightly toasted in the oven.
- Zesty & Fruity (Other than jam):
- Lemon Curd: Bright and tangy, perfect for a refreshing cookie.
- Key Lime Curd: A tropical twist for citrus lovers.
- Holiday-Inspired:
- Spiced Apple Butter: For a cozy, autumnal feel.
- Pumpkin Butter: A seasonal favorite, especially delicious with a dash of cinnamon.
Dough Coatings & Garnishes for Extra Flair
The exterior of the cookie offers another opportunity for customization. Before baking, try rolling your dough balls in different coatings for added texture and flavor:
- Sweet & Sparkling:
- Sprinkles: Colorful sprinkles (jimmies or nonpareils) for a festive look, especially fun for birthday parties.
- Cinnamon Sugar: A delightful blend of granulated sugar and ground cinnamon for a warm, spicy hint.
- Powdered Sugar: A light dusting after baking for an elegant finish.
- Nutty Textures:
- Finely Minced Nuts: Roll the dough in finely chopped almonds, pecans, or walnuts for a delightful crunch and nutty flavor. Toasting the nuts lightly beforehand can enhance their aroma.
- Shredded Coconut: For a tropical twist, use finely shredded or desiccated coconut.
- Chocolatey Coating:
- Cocoa Powder: Roll in a mix of cocoa powder and sugar for a subtle chocolate hint on the outside.
- Drizzled Chocolate: After baking and cooling, drizzle melted white or dark chocolate over the finished cookies for a gourmet touch.
This thumbprint cookie recipe is truly a joy to make, precisely because it allows for such wonderful experimentation. With so many different kinds of flavors and coatings to choose from, you can create a unique assortment every time. It’s a holiday classic that never goes out of style, and a delightful treat any time of year!
Serving and Gifting Your Homemade Cookies
Once your thumbprint cookies are baked and cooled, they are perfect for a variety of uses:
- Everyday Treat: Enjoy them with a cup of coffee or tea, or as a sweet ending to any meal.
- Party Platters: Their colorful centers and charming appearance make them a fantastic addition to any dessert platter, especially during holidays or celebrations.
- Edible Gifts: Arrange them in decorative tins or boxes tied with a ribbon for a thoughtful and much-appreciated homemade gift. They travel well and hold up beautifully for a few days. Layer them with parchment paper to prevent sticking.
- Bake Sales: These cookies are always popular at bake sales and fundraisers due to their classic appeal and eye-catching look.
More Delightful Cookie Recipes to Try
If you’ve enjoyed baking these thumbprint cookies, you might love exploring other fantastic cookie recipes from our collection:
S’mores Cookies
27 mins
Monster Cookies
25 mins
Cake Mix Cookies
20 mins
Snowball Cookies
50 mins
Chocolate Spritz Cookies
20 mins
Love This Recipe?
Please consider leaving a 5-star 🌟🌟🌟🌟🌟 rating in the recipe card below and a review in the comments section further down the page. Your feedback helps other bakers!
Thumbprint Cookies
Pin

Time
Ingredients
- 1 cup unsalted butter softened
- 1/2 cup granulated sugar plus more for rolling the cookies
- 1/4 cup light brown sugar packed
- 1 egg
- 1 1/2 teaspoons vanilla extract
- 2 1/2 cups all purpose flour
- 1/4 teaspoon baking soda
- 1/4 teaspoon salt
- 1/2 cup jam
Instructions
-
Place the softened butter, granulated sugar, and light brown sugar in the bowl of a stand mixer fitted with the paddle attachment. Beat on medium speed until the mixture is light and fluffy, usually about 2-3 minutes. Scrape down the sides of the bowl as needed.
-
Add the large egg and vanilla extract to the creamed mixture. Beat for an additional 1-2 minutes, or until all ingredients are thoroughly combined and the mixture is smooth.
-
In a separate bowl, whisk together the all-purpose flour, baking soda, and salt. Gradually add these dry ingredients to the wet mixture in the mixer bowl. Beat on low speed until just blended and no dry streaks of flour remain. Be careful not to overmix.
-
Transfer the dough onto a large sheet of plastic wrap. Gently form it into a flattened disk. Cover the dough completely with the plastic wrap and refrigerate for at least one hour. For best results and easier handling, you can chill the dough for up to 3 days.
-
About 10 minutes before you plan to start baking, remove the chilled cookie dough from the refrigerator to allow it to soften slightly, making it easier to roll.
-
Preheat your oven to 375 degrees F (190°C). Prepare two baking sheets by lining them with parchment paper or silicone baking mats.
-
Roll the dough into uniform 1-inch balls. Pour some granulated sugar into a shallow dish and coat each dough ball generously in the sugar, ensuring it’s evenly covered.
-
Place the sugar-coated dough balls on the prepared baking sheets, spacing them about 3 inches apart to allow for proper spreading during baking.
-
Use your thumb, the back of a small teaspoon, or the rounded end of a pestle to gently make an indentation in the center of each cookie. Apply gentle pressure to avoid cracking the dough. If minor cracks appear, simply smooth them out with your fingers.
-
Carefully spoon approximately 1/2 teaspoon of your chosen fruit jam into each indentation. Be mindful not to overfill, as the jam can bubble over during baking.
-
For optimal shape retention, place the trays of filled cookies in the freezer for 10-15 minutes, or until the cookies are firm to the touch. This crucial step minimizes spreading in the oven.
-
Bake the cookies for 10-11 minutes, or until the edges are lightly golden brown. The centers should still appear soft.
-
Allow the cookies to cool on the baking sheets for 5 minutes before carefully transferring them to a wire rack to cool completely. The jam will set as the cookies cool. Enjoy your homemade classic thumbprint cookies!
Notes
- Dough Temperature is Key: Always keep the dough cold when rolling it into balls. If it becomes too warm, it will be sticky and the balls may not be smooth. If needed, chill the dough in the fridge or freezer before handling.
- Prevent Sticking: If you find the dough difficult to shape or it’s sticking to your hands, try lightly coating your palms with a tiny bit of cooking spray or butter.
- Jam Choices: For the most visually appealing cookies, avoid very dark jams like blackberry or grape, as they can sometimes “stain” the light cookie dough. Raspberry, strawberry, and apricot jams work wonderfully.
- Storage: Store cooled cookies in an airtight container at room temperature for up to 5 days. For longer storage, see our FAQ on freezing.