
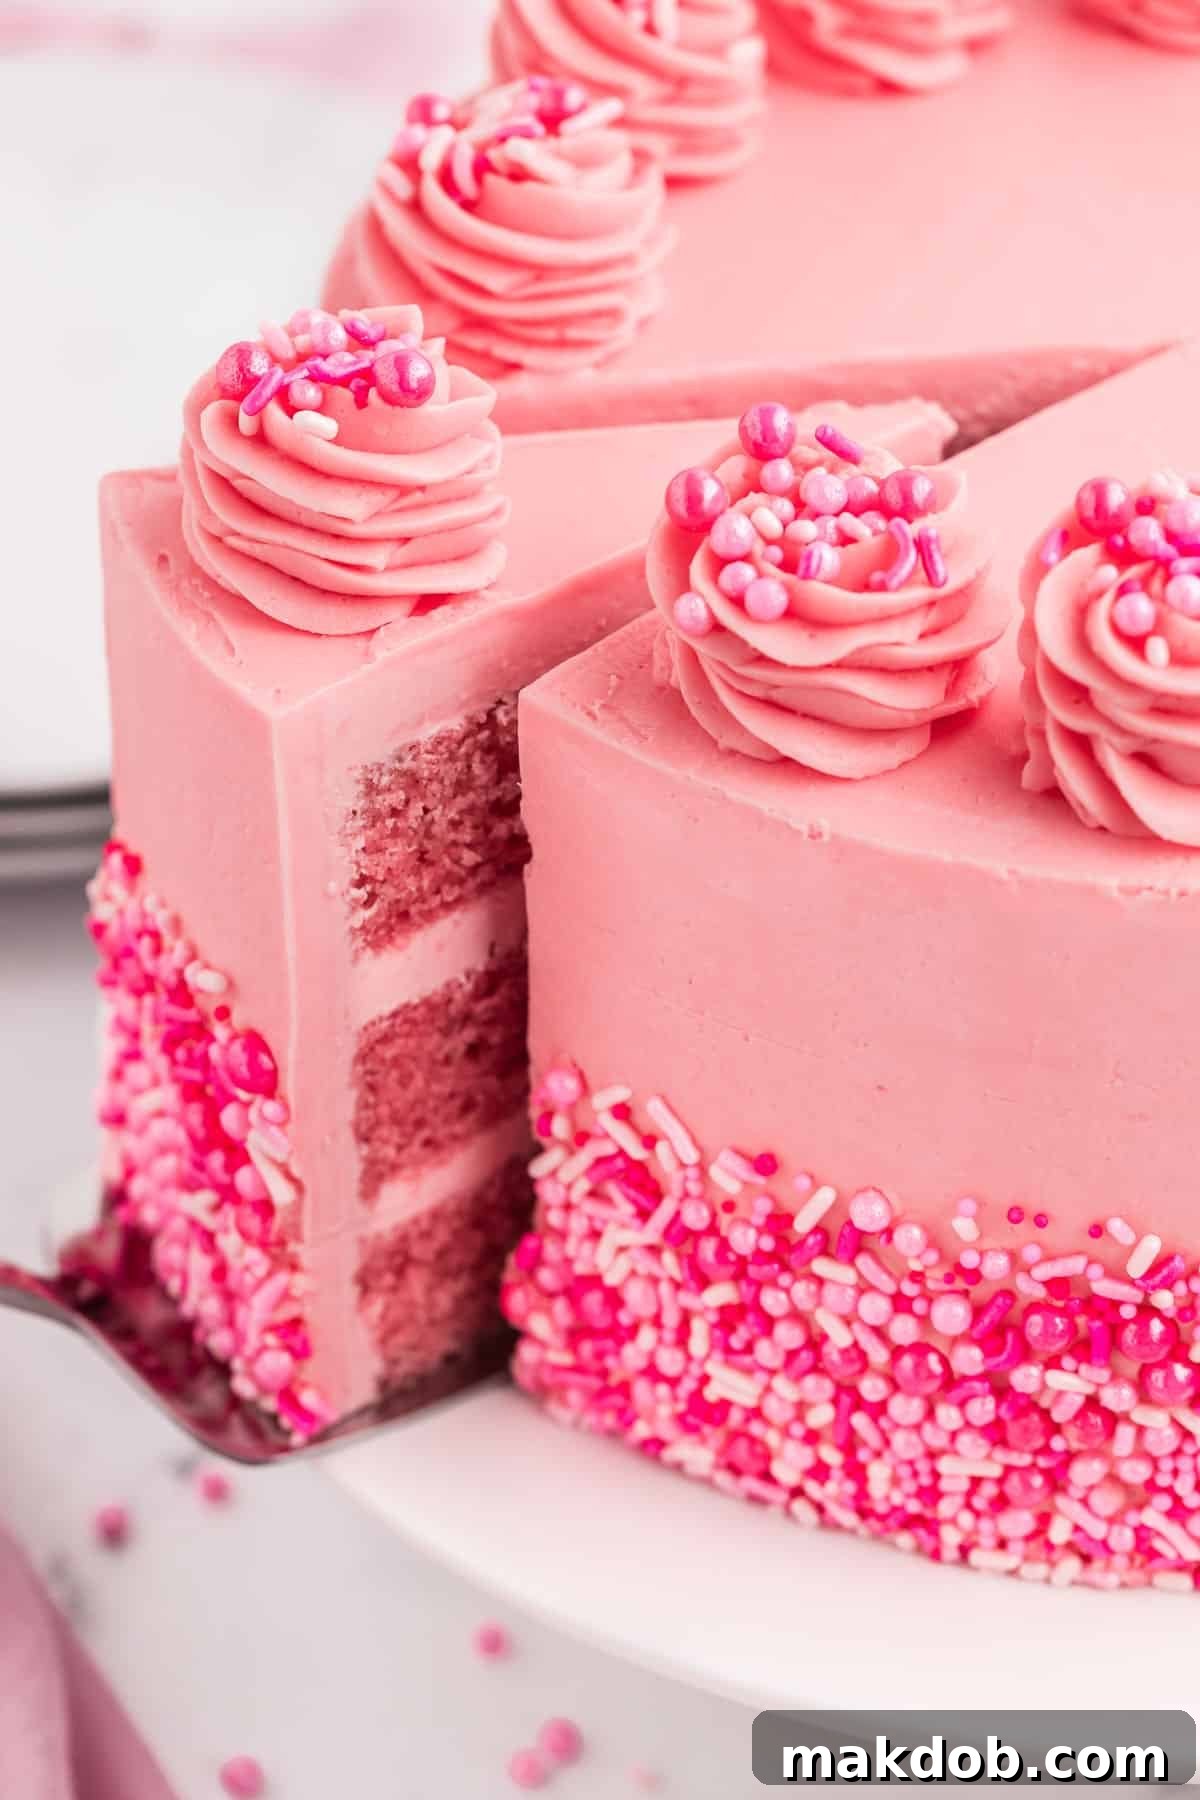
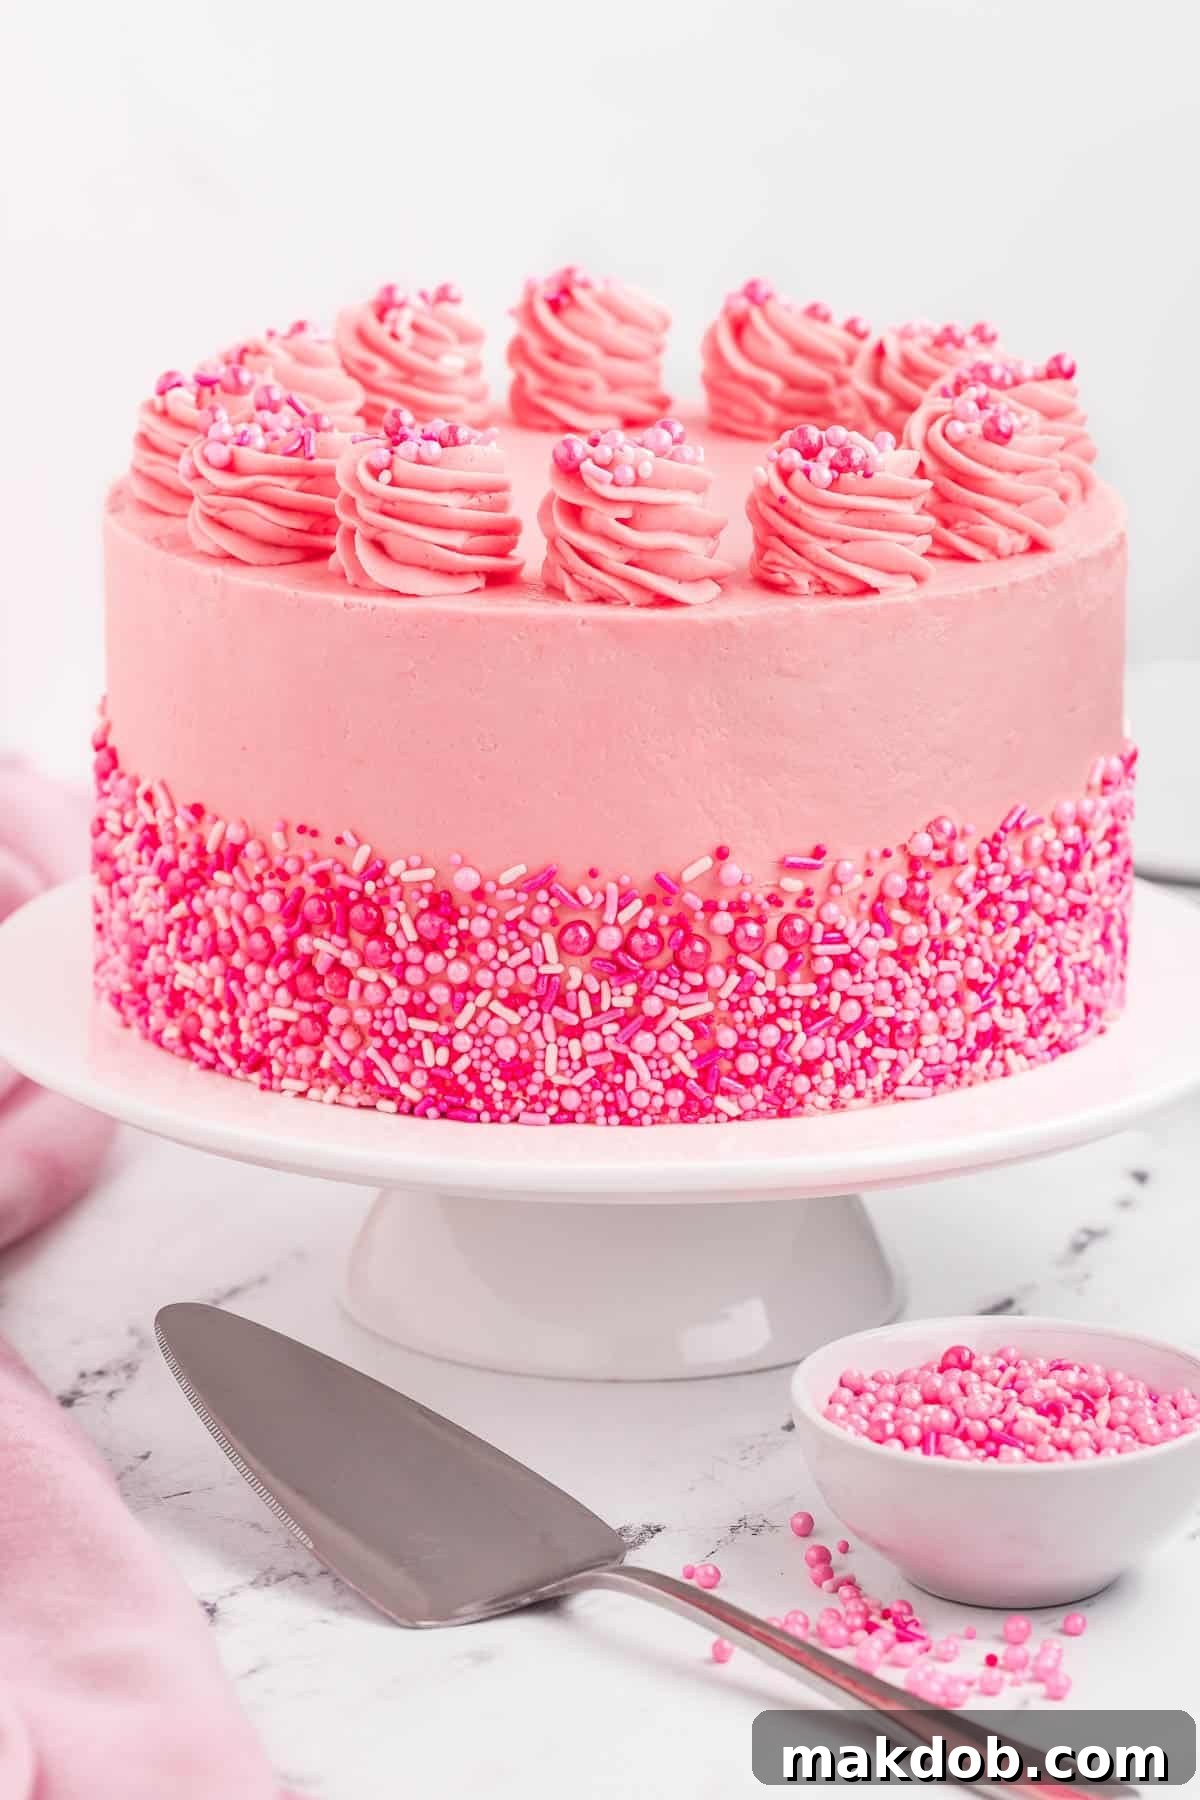
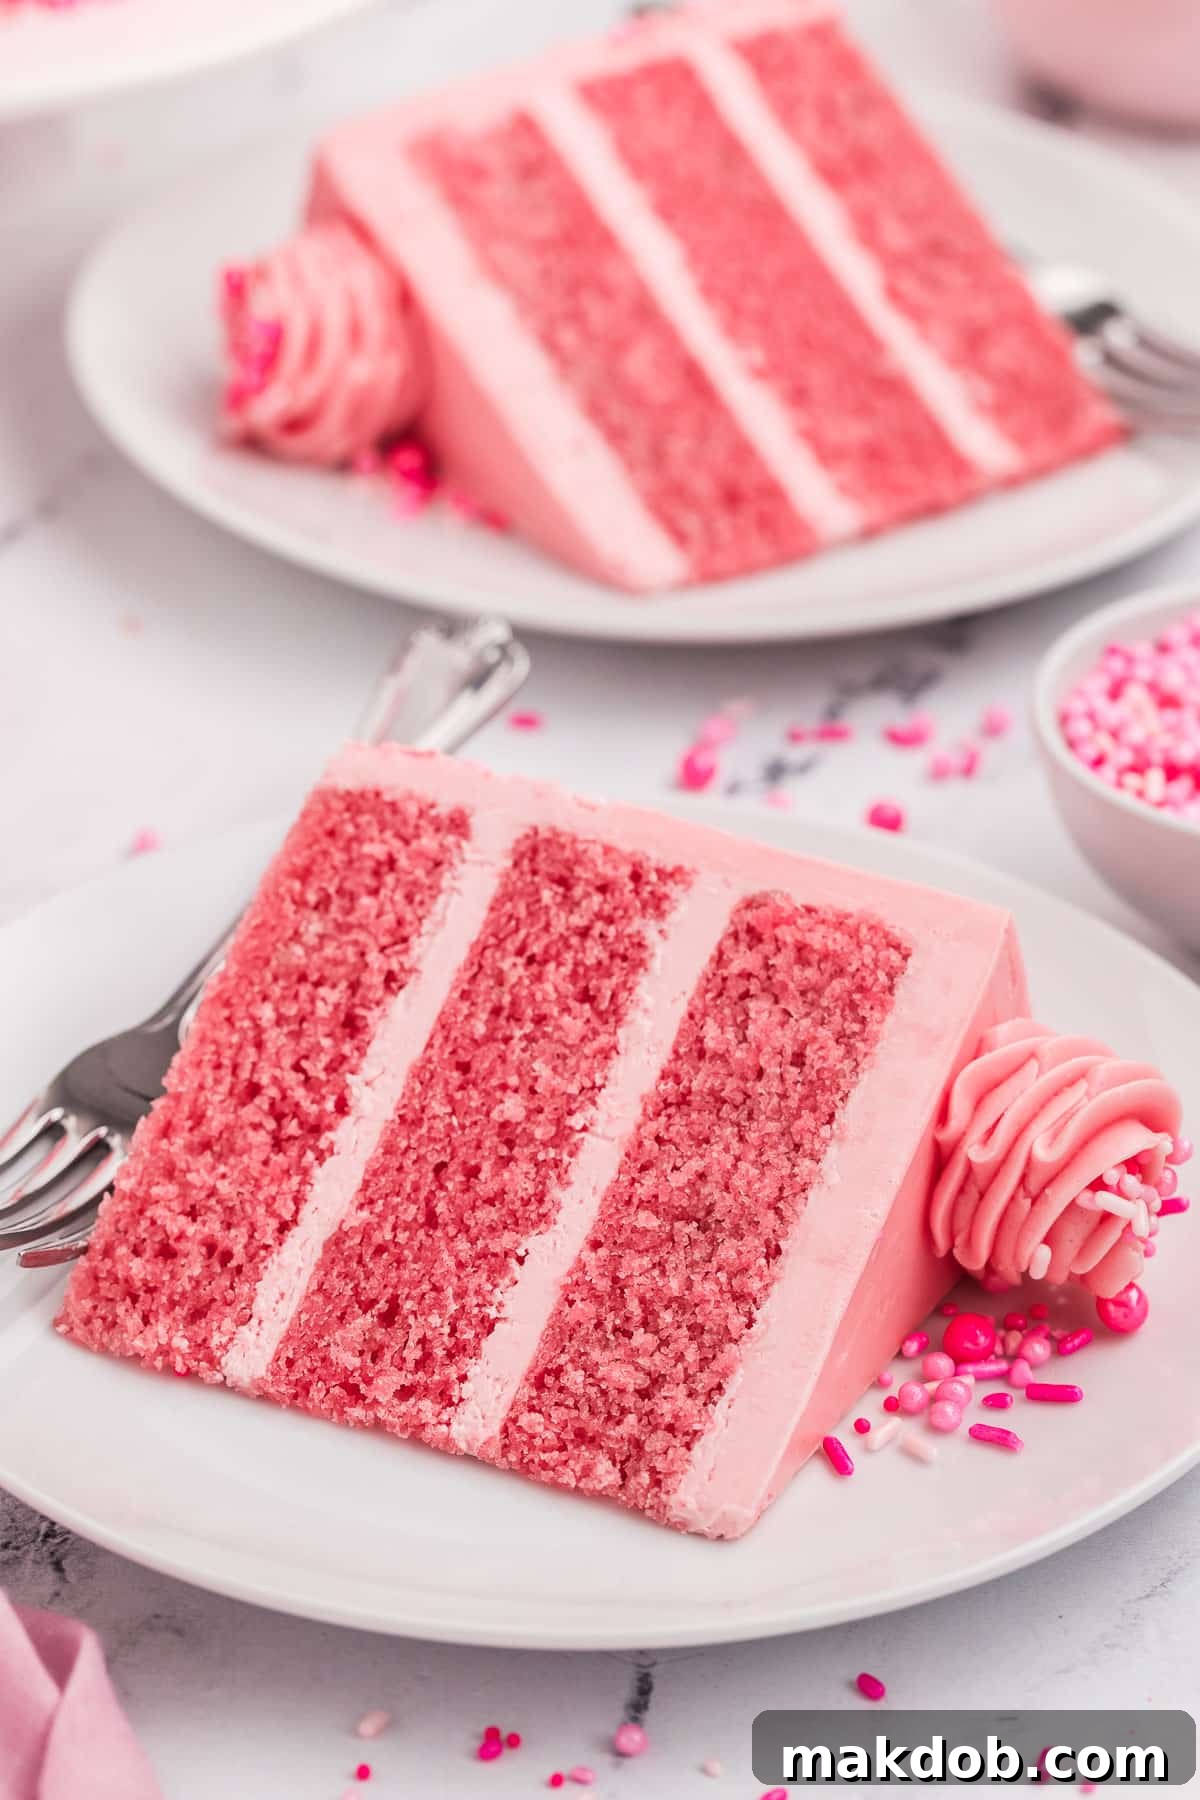
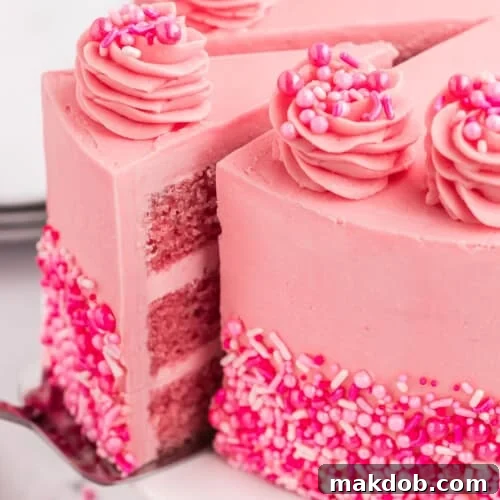
Step into a world of enchanting flavors and vibrant aesthetics with our incredible Pink Velvet Cake recipe. This dessert isn’t just a treat for your taste buds; it’s a feast for the eyes, guaranteed to be the centerpiece of any celebration. Imagine tender, fluffy layers of perfectly pink velvet cake, generously enrobed in a cloud-like Swiss meringue buttercream, and adorned with an abundance of festive sprinkles. It’s an exquisitely beautiful dessert offering that promises to elevate any occasion, from intimate family gatherings to grand celebrations.
For those who love to impress with their baking, creating stunning dessert recipes is a true art form. While classics like rich Black Forest Cupcakes, refreshing Strawberry Lemon Cake, indulgent Nutella Cake, romantic Heart Cake, or elegant Berry Chantilly Cake hold a special place, nothing quite captures hearts like a whimsical and vibrant Pink Velvet Cake. Its striking color and delicate texture make it an unforgettable choice for any festive event, drawing gasps of delight from all who behold it.
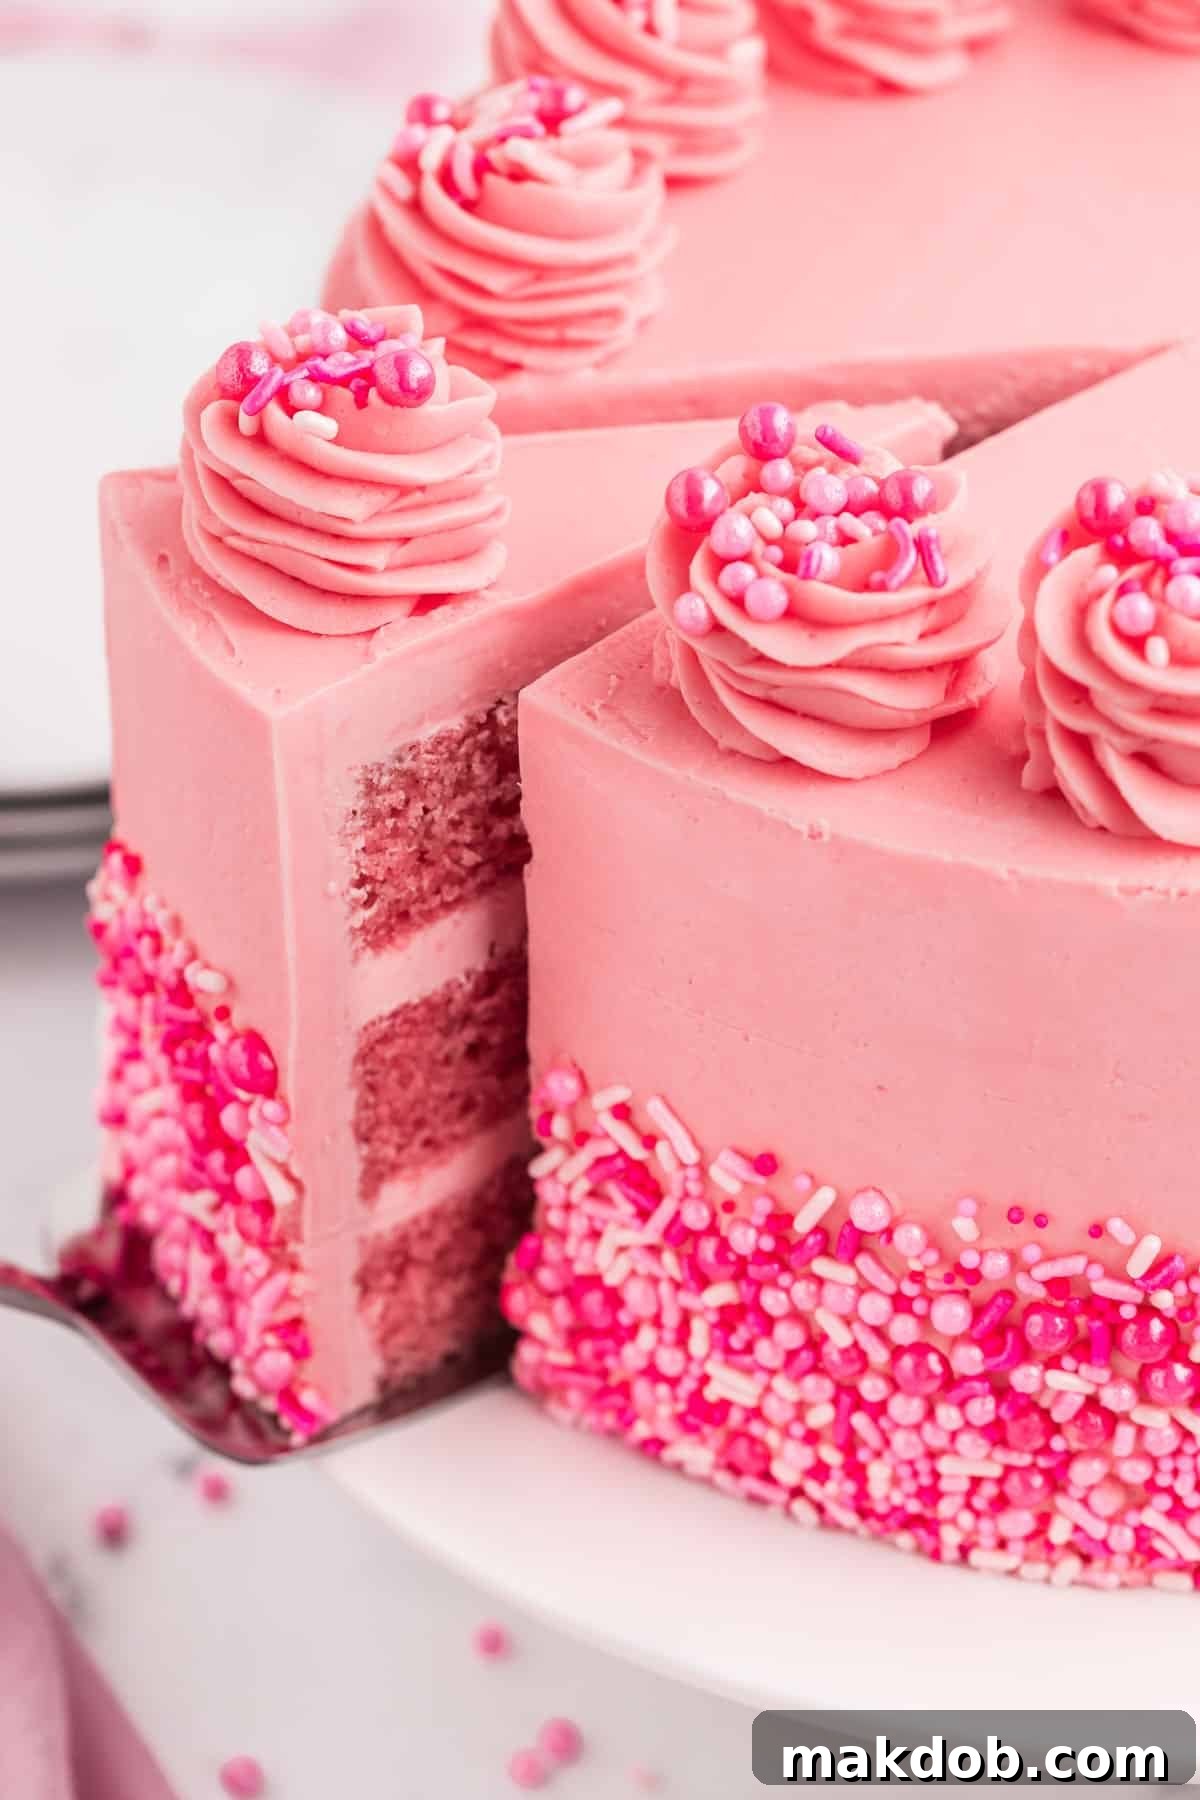
Sometimes, all it takes is a burst of color to infuse joy into a dull day or make a special occasion truly memorable. This is precisely where our fabulous Pink Velvet Cake shines! It’s not only a joy to bake, transforming simple ingredients into a show-stopping masterpiece, but it’s also packed with a delicate, rich flavor that will leave everyone craving more. This delightful cake is perfectly suited for a myriad of celebrations. Imagine it as the star of your Valentine’s Day spread, a charming centerpiece for birthday parties of all ages, a sweet surprise for Mother’s Day brunch, or the ideal dessert to announce a baby girl at a shower. Its versatility and undeniable charm make it a go-to recipe for bakers looking to add a touch of magic and a pop of beautiful color to their repertoire, ensuring every slice is a moment of pure bliss.
Table of Contents
- Pink Velvet Cake Ingredients
- How to Bake a Stunning Pink Velvet Cake
- Mastering Swiss Meringue Buttercream
- Assembling and Decorating Your Pink Velvet Masterpiece
- Expert Tips For The Perfect Pink Velvet Cake
- Quick Food Coloring Tip
- Pink Velvet Cake FAQs
- Creative Flavor Variations
- More Irresistible Dessert Recipes
- Pink Velvet Cake Recipe
Pink Velvet Cake Ingredients: The Building Blocks of Sweet Perfection
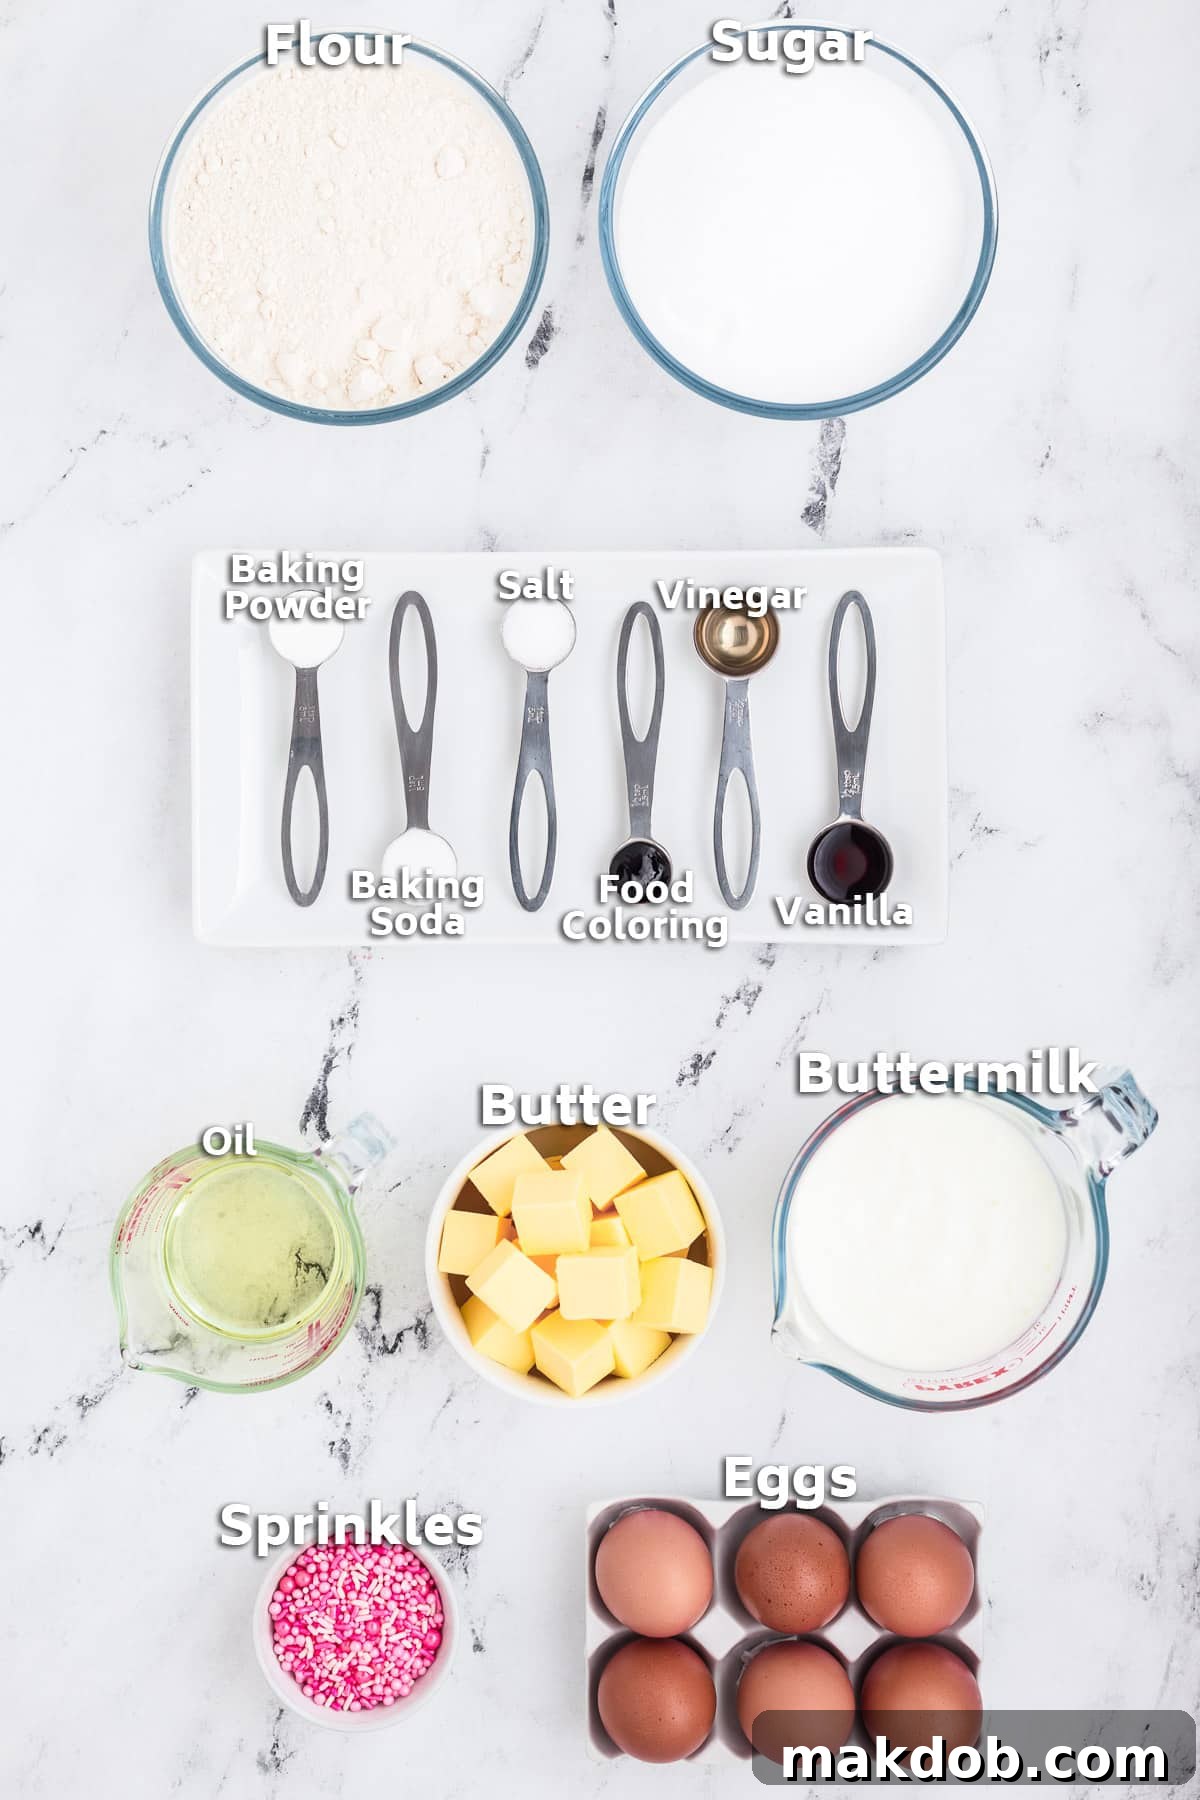
Crafting this exquisite Pink Velvet Cake begins with selecting the right ingredients, each playing a crucial role in achieving its signature moist texture, delicate flavor, and vibrant hue. While the list might seem extensive, each item contributes to the overall success of this spectacular dessert. Always ensure your ingredients are at room temperature unless otherwise specified, as this helps them emulsify properly and creates a smoother, more uniform batter.
For the exceptionally tender cake layers, you will need:
- All-purpose flour: This forms the essential structural foundation of our cake, providing a delicate yet sturdy crumb.
- Baking powder and baking soda: These powerful leavening agents work in perfect harmony, especially with acidic ingredients like buttermilk and vinegar, to create that characteristic light, airy, and truly “velvet” texture.
- Salt: A small but mighty ingredient, salt is absolutely essential for balancing and enhancing all the sweet flavors in the cake, preventing it from tasting overly sugary or flat.
- Granulated sugar: Not only does sugar provide the necessary sweetness, but it also plays a critical role in keeping the cake moist by attracting and holding onto moisture during and after baking.
- Buttermilk: A cornerstone ingredient for all velvet cakes. Its acidity tenderizes the cake’s crumb, making it incredibly soft, and reacts with the baking soda for an optimal rise. It also imparts the cake’s distinct, subtle tang.
- Unsalted butter (melted): This contributes a rich, buttery flavor and helps achieve the cake’s moistness and fine, tender crumb. Using unsalted butter allows you to precisely control the overall salt content of the recipe.
- Vegetable oil: Adding an extra layer of moisture, vegetable oil ensures the cake remains incredibly soft, tender, and fresh for a longer period, even when chilled.
- Whole eggs: Eggs are vital for binding all the ingredients together, adding richness to the batter, and contributing significantly to the cake’s structure and overall lift.
- Vanilla extract: A universal flavor enhancer, pure vanilla extract complements the other ingredients beautifully, adding warmth and depth to the cake’s profile.
- White vinegar: Alongside buttermilk, distilled white vinegar is crucial for this velvet cake. It not only helps to tenderize the crumb but, more importantly, enhances the vivid pink color by reacting with the food coloring and baking soda.
- Pink gel food coloring: This is the magic ingredient for achieving that stunning, intense pink hue without affecting the cake’s delicate flavor or consistency. Gel coloring is highly concentrated, so a small amount goes a long way to create vibrant results.
- Cooking spray: Essential for meticulously preparing your cake pans, ensuring a smooth and effortless release of the baked layers.
For the luscious Swiss Meringue Buttercream, gather:
- Egg whites: These form the foundational base for the meringue, which is carefully cooked with sugar to create a remarkably stable, silky, and less-sweet frosting.
- Granulated sugar: Sweetens the meringue and, when heated with the egg whites, forms a stable syrup that provides structure to the buttercream.
- Unsalted butter (cubed and softened): Incorporated into the whipped meringue, butter transforms it into a smooth, rich, and incredibly stable buttercream. Ensure it’s softened enough to be pliable but still cool enough to hold its shape.
- Pink gel food coloring: Used to tint your buttercream a complementary, often slightly paler, shade of pink, creating a beautiful and harmonious visual contrast with the vibrant cake layers.
And finally, for a dazzling, celebratory finish:
- Pink sprinkles: The perfect festive touch to make your cake sparkle and shine, adding both delightful texture and an irresistible visual appeal that screams celebration!
How to Bake a Stunning Pink Velvet Cake: Step-by-Step Guide
Creating this eye-catching Pink Velvet Cake is a rewarding process, and breaking it down into manageable steps ensures a flawless result every time. We’ll start with preparing your cake layers to ensure they are perfectly moist and evenly baked, forming the magnificent foundation of your spectacular dessert.
Preparing the Perfect Pink Velvet Cake Layers
Before you begin mixing, ensure your workspace is organized and all ingredients are precisely measured. This methodical approach is paramount to successful baking, guaranteeing each layer of your Pink Velvet Cake is tender and perfect.
- Preheat and Prepare Pans: Begin by preheating your oven to 325 degrees F (160 degrees C). This slightly lower temperature is ideal for velvet cakes as it allows for a more gradual and even bake, which helps prevent dry edges and promotes a tender crumb. Next, meticulously coat three 8-inch round cake pans with cooking spray, ensuring every crevice is covered. For an extra layer of protection against sticking, line the bottoms and sides of each pan with parchment paper. This simple yet crucial step ensures your beautiful cake layers release effortlessly after baking. Simultaneously, prepare three cake baking strips by soaking them thoroughly in water; these ingenious tools help prevent doming, leading to perfectly flat cake layers without the need for excessive trimming.
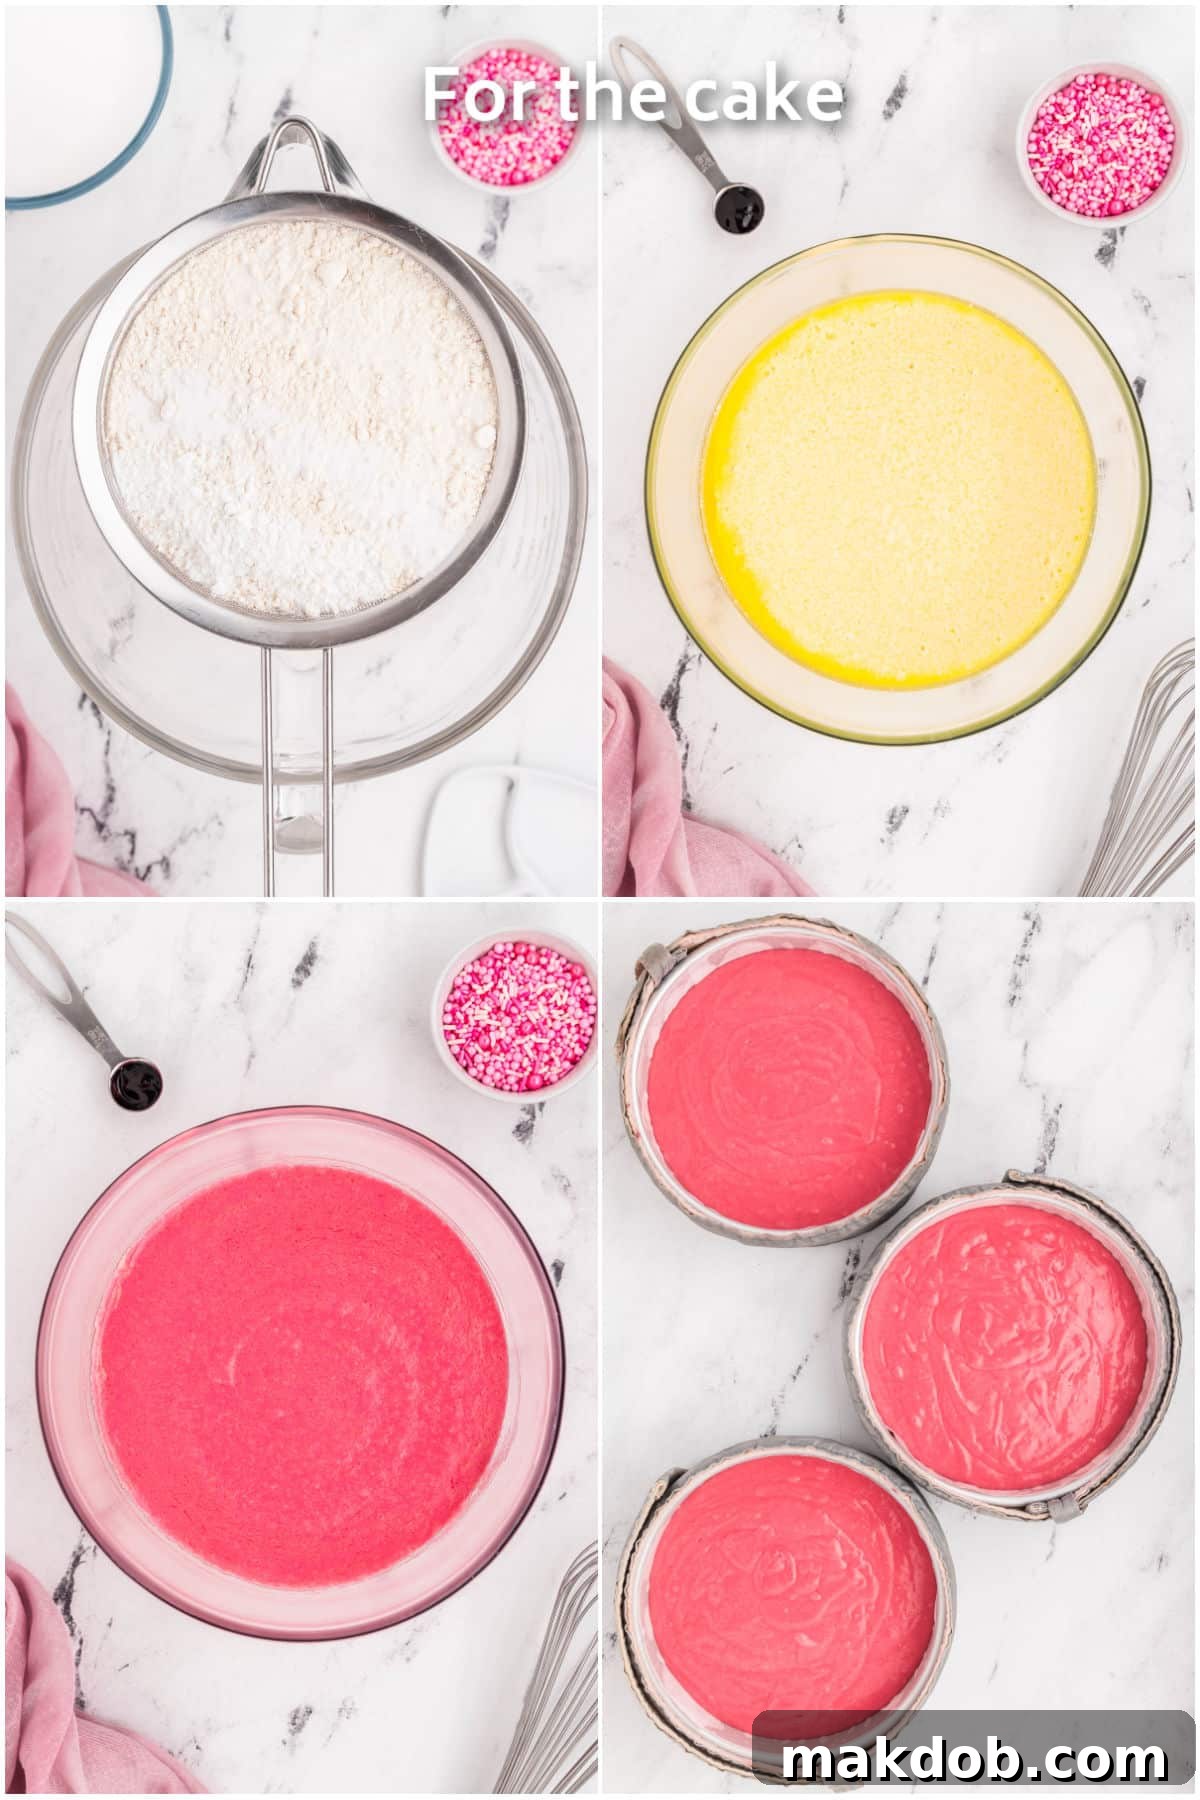
- Combine Dry Ingredients: In the large bowl of your stand mixer, or any spacious mixing bowl, carefully sieve together the all-purpose flour, baking powder, baking soda, and salt. Sifting is crucial here as it aerates the flour, preventing any lumps and ensuring a lighter, more tender crumb in your final cake. Once sifted, gently stir in the granulated sugar until all the dry ingredients are uniformly combined.
- Whisk Wet Ingredients: In a separate, medium-sized bowl, use a whisk to thoroughly combine the buttermilk, melted unsalted butter, vegetable oil, whole eggs, vanilla extract, distilled white vinegar, and, most importantly, the vibrant pink gel food coloring. Whisk vigorously until all these wet ingredients are fully incorporated and the color is uniformly distributed and strikingly vibrant. The vinegar and buttermilk actively react with the baking soda, creating tiny air bubbles that contribute to the characteristic velvet texture, while also helping to intensify and set the beautiful pink hue.
- Combine Wet and Dry: Slowly and gradually pour the wet ingredients mixture into the dry ingredients in your stand mixer. Using the paddle attachment, mix on a low speed, just until the ingredients are combined and a smooth batter begins to form. It is incredibly important not to overmix the batter; overmixing can overdevelop the gluten in the flour, which will result in a tough, dense, and less “velvety” cake. Mix only until no streaks of dry flour remain, embracing a few small lumps if necessary.
- Fill Pans and Bake: With your perfectly mixed, luscious pink cake batter, divide it evenly among the three meticulously prepared cake pans. Squeeze any excess water from your soaked baking strips and wrap them snugly and securely around the outside of each cake pan. These specialized strips will ensure your cakes bake more evenly, remain incredibly moist, and rise with a flatter top. Bake the cakes for approximately 50-55 minutes, or until the tops are springy to the touch and a toothpick inserted into the very center comes out clean or with only a few moist crumbs attached.
- Cool Completely: Allow the freshly baked cakes to cool in their pans on a wire rack for about 20 minutes. This initial resting period is vital as it allows the delicate cake structure to set and firm up. After 20 minutes, carefully invert the cakes onto the wire rack, gently remove the parchment paper from the bottoms, and allow them to cool completely. This step is critical before you even think about frosting them; a warm cake will inevitably melt your beautifully prepared buttercream, leading to a messy and frustrating experience. Patience truly is a virtue in this final cooling step!
Mastering Swiss Meringue Buttercream: The Silky-Smooth Frosting
No truly elegant Pink Velvet Cake is complete without a luxurious, stable, and incredibly silky frosting. Swiss Meringue Buttercream is the epitome of sophisticated elegance, known for its remarkably smooth texture and a less-sweet flavor profile compared to traditional American buttercream, making it the perfect complement to the delicate cake layers. Mastering this frosting is simpler than you might imagine, and the results are absolutely worth the effort:
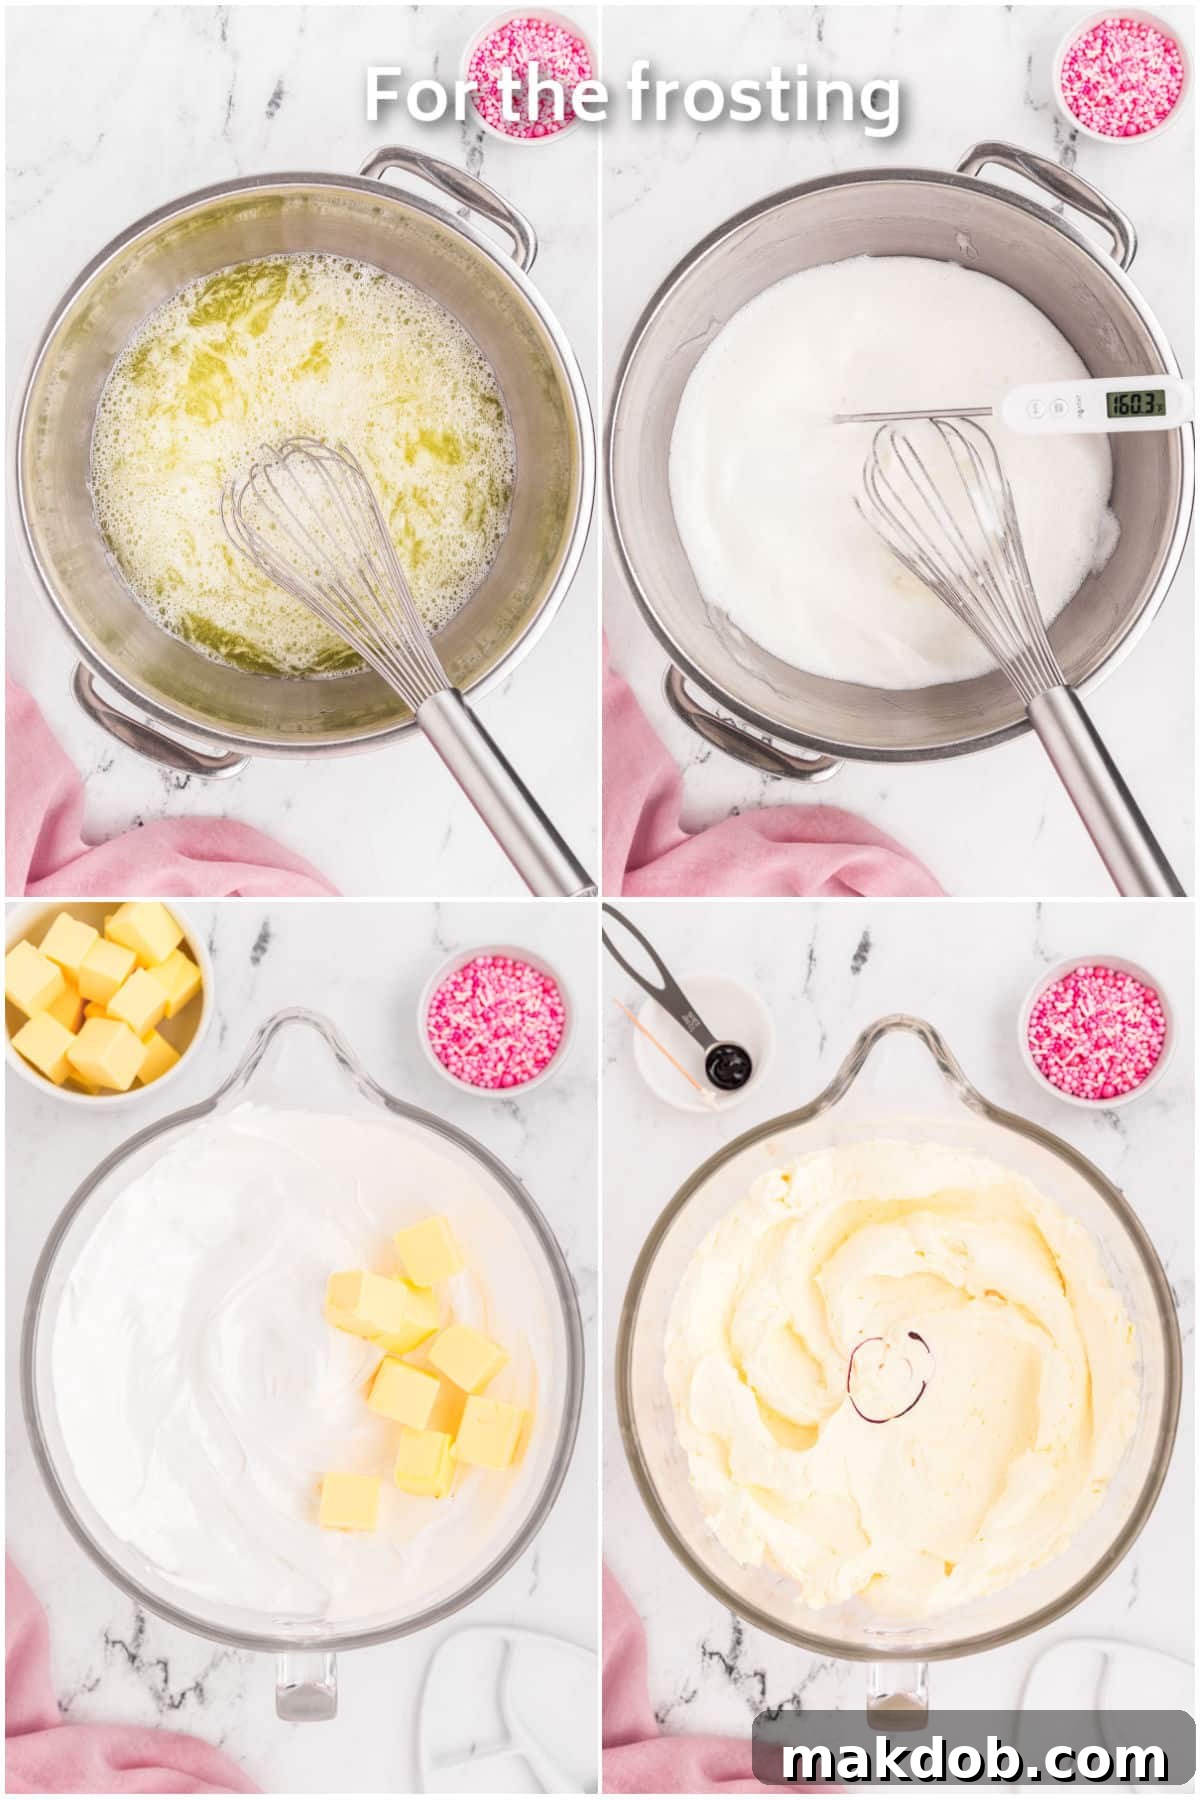
- Create the Meringue Base: Begin by filling a medium pot halfway with water and bringing it to a gentle simmer over medium-low heat. In a large, heatproof bowl (preferably a metal bowl that fits snugly over your pot, effectively creating a double boiler), combine the egg whites and granulated sugar. Place this bowl over the simmering water, ensuring the bottom of the bowl does not directly touch the water. Whisk the egg whites and sugar constantly with a balloon whisk, preventing the eggs from scrambling, until the mixture reaches a temperature of at least 160 degrees F (71 degrees C) on an instant-read thermometer. Continue whisking gently for another 2 minutes after reaching this temperature. This crucial heating step not only dissolves the sugar completely into the egg whites, creating a smooth mixture, but also safely pasteurizes the egg whites, making them perfectly safe to eat in their uncooked state within the buttercream.
- Whip the Meringue: Carefully remove the bowl from the heat and immediately transfer the warm egg white and sugar mixture to the clean, dry bowl of a stand mixer fitted with the whisk attachment. Begin whisking on high speed. You will observe a magical transformation as the mixture whips into a glossy, incredibly firm meringue with beautiful, airy peaks. This process typically takes around 10 minutes, but it’s important to continue whisking until the bowl feels cool to the touch. This coolness indicates that the meringue has properly cooled and stabilized, ready for the next step.
- Incorporate the Butter: Once the meringue is completely cool and holds its soft, stable peaks, switch the stand mixer attachment from the whisk to the paddle. With the mixer running on a slow speed, begin adding the softened, cubed unsalted butter, a few cubes at a time. It’s absolutely essential to add the butter slowly and patiently, allowing each small addition to fully incorporate into the meringue. Initially, the mixture might look quite unsettling – appearing curdled, soupy, or even completely separated. Do not panic! This is a completely normal and expected stage when making Swiss Meringue Buttercream.
- Achieve Silky Buttercream: Continue mixing on low to medium speed. Patience is key here. After several minutes (it can feel like a long time, but trust the process), the seemingly broken mixture will miraculously transform into a cohesive, beautiful, silky-smooth, and remarkably glossy buttercream. Once it’s fully smooth and perfectly emulsified, increase the mixer speed to medium-high for about 30 seconds to whip out any remaining trapped air bubbles and achieve a truly luxurious, light-as-air texture.
- Tint and Reserve Frosting: To give your exquisite buttercream that perfect, soft pink hue, use a toothpick to add a very small amount of pink gel food coloring at a time. Mix thoroughly after each tiny addition until you achieve your desired shade. Aim for a slightly paler pink than your cake layers; this creates an appealing visual contrast that enhances the cake’s overall aesthetic. For the best decorating results and easiest application, use the frosting immediately. Set aside approximately 1 cup of this beautifully tinted frosting in a separate piping bag already fitted with a large closed star tip; this reserved portion will be used later for piping the delicate and decorative rosettes on top of your stunning Pink Velvet Cake.
Assembling and Decorating Your Pink Velvet Masterpiece
Once your beautiful Pink Velvet Cake layers are completely cool and your silky Swiss Meringue Buttercream is perfectly ready, it’s time for the most exciting part: assembly and decoration! This is where your cake truly comes to life, transforming from individual components into a stunning, cohesive centerpiece that will impress everyone.
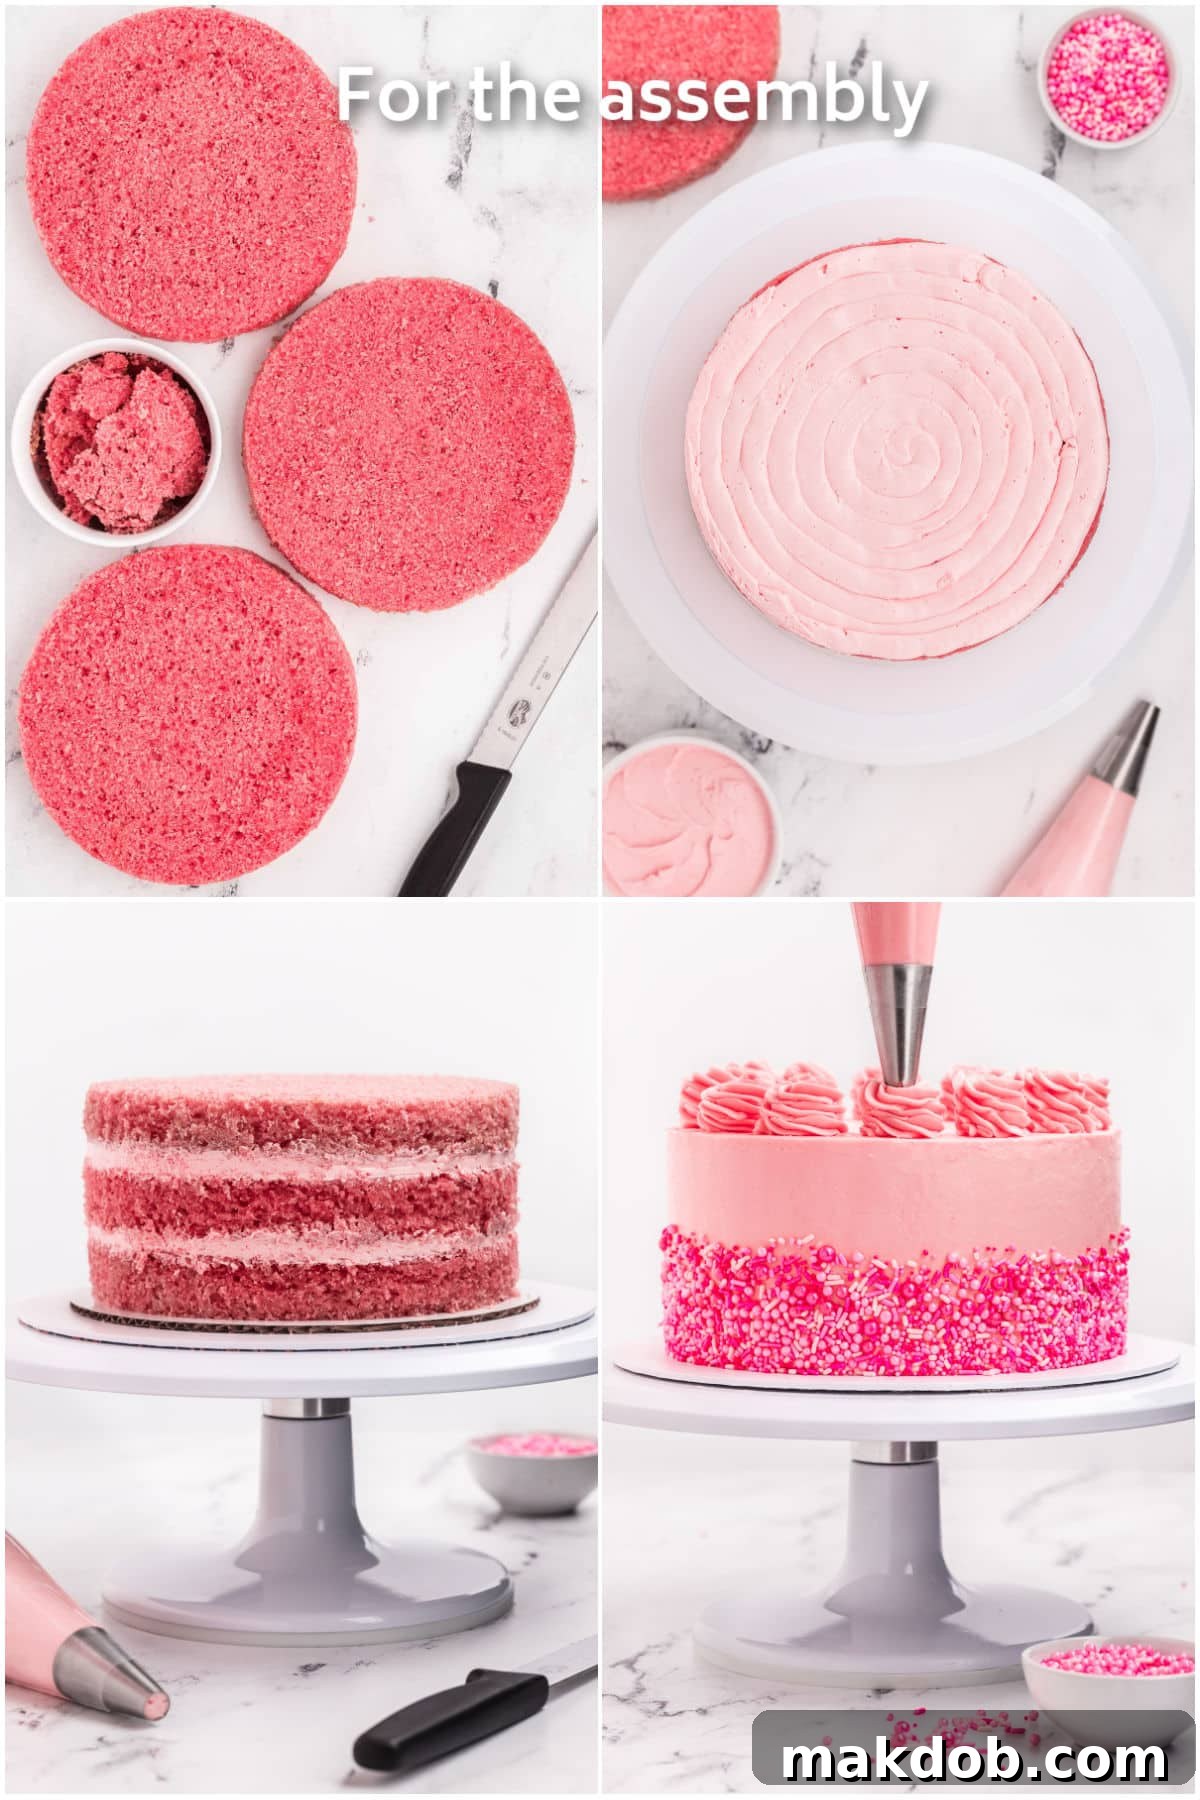
- Level the Cake Layers: Begin by using a large, sharp serrated knife or a specialized cake leveler to carefully trim any domed tops and any uneven bottoms off your completely cooled cake layers. The primary goal here is to create perfectly flat, even layers that will stack neatly and result in a professional-looking cake with sharp, clean lines. Don’t be too quick to discard the trimmed cake pieces – they make for a delicious baker’s snack or can be used for trifles!
- Prepare Your Workstation: For ease of assembly and a smoother decorating process, it’s highly recommended to use a cake turntable. Secure an 8-inch cake board onto a larger 10-inch cake board with a small dab of buttercream to prevent it from sliding around. Place this entire assembly onto your turntable, ensuring it’s stable and ready to rotate smoothly.
- First Layer and Frosting: Carefully place the first leveled cake layer squarely on the 8-inch cake board, securing it with a small amount of buttercream underneath to anchor it. Pipe an even, generous layer of your freshly made Swiss Meringue Buttercream onto the surface of this cake layer. Use an offset spatula or a cake scraper to smoothly spread the frosting evenly across the entire surface.
- Stack Remaining Layers: Gently and carefully place the second cake layer directly on top of the frosted first layer, ensuring it is perfectly centered for even stacking. Repeat the frosting process over this second layer. Finally, add the third and final cake layer on top, ensuring it is also perfectly aligned with the layers beneath it, creating a uniform tower.
- The Crumb Coat: This is an absolutely vital step for achieving a pristine, professional finish on your cake. Apply a very thin, translucent layer of buttercream all over the top and sides of the assembled cake. This “crumb coat” acts as a protective barrier, effectively trapping any loose crumbs that may come off the cake layers, preventing them from mixing into your final, visible layer of frosting. Once applied, chill the cake in the refrigerator for 15-20 minutes, or until the crumb coat is firm to the touch. This chilling ensures a stable, crumb-free base for your decorative frosting.
- Final Frosting Layer: Remove the chilled cake from the refrigerator. Apply a more generous, thicker amount of buttercream to the top and sides of the cake. Using a cake scraper or a long offset spatula, work meticulously around the cake on the turntable to create a perfectly smooth, clean finish on both the sides and the top. For the sharpest edges and the smoothest surfaces, do not hesitate to chill the cake at intervals during this step, especially if your kitchen is warm; this helps the buttercream firm up, making it easier to work with.
- Apply Sprinkles: To add a playful, celebratory, and undeniably festive touch, gently press pink sprinkles onto the sides of the cake. Start from the bottom edge and work your way upwards, covering approximately halfway up the sides. For a neater, more embedded look, carefully run a cake smoother around the base of the cake over the sprinkles to press them gently and securely into the buttercream. Chill the cake again until the frosting is firm and the sprinkles are securely in place.
- Pipe Rosettes: Take the reserved 1 cup of frosting in a piping bag already fitted with a large closed star nozzle. Pipe beautiful, even rosettes around the entire top edge of the cake. You can refer to the “Expert Tips” section below for a clever trick to create guide points, ensuring perfect symmetry and a professional appearance for your rosettes.
- Final Sprinkle Touch: For an extra flourish and added sparkle, sprinkle a few additional pink sprinkles directly onto each rosette you’ve piped. This final touch truly completes the festive and whimsical look of your Pink Velvet Cake.
- Serve and Enjoy: Carefully transfer your magnificent Pink Velvet Cake to a suitable cake stand. It is now ready to be admired by all your guests and, most importantly, savored and enjoyed by everyone!
Expert Tips For The Perfect Pink Velvet Cake
Achieving a truly perfect Pink Velvet Cake, with its moist, tender layers and smooth, luscious buttercream, often comes down to a few key techniques and considerations. Here are some expert tips to ensure your baking experience is not only successful but also results in a cake that is nothing short of spectacular and leaves a lasting impression:
- Optimal Storage and Serving: Your delicious Pink Velvet Cake can be stored at cool room temperature (around 68-72°F or 20-22°C) for up to 3 days, provided it is covered tightly with a cake dome or plastic wrap to prevent it from drying out. For longer storage, or if your kitchen is particularly warm, it can be safely kept in the refrigerator for up to a week. However, for the absolute best flavor and tender texture, it’s highly recommended to enjoy the cake at room temperature. If stored in the fridge, remember to remove it one to two hours before serving to allow the buttercream to soften slightly and the cake layers to regain their optimal moistness and tenderness. For extended preservation, individual portions or slices can be tightly wrapped in plastic wrap, then placed in an airtight container, and stored in the freezer for up to 3 months. Thaw frozen slices in the refrigerator overnight or at room temperature for a few hours until soft.
- The Magic of Baking Strips: Investing in (or even making your own, for the DIY enthusiast) baking strips is an absolute game-changer for producing professional-looking layer cakes. These specialized strips, which are soaked in water and then wrapped around the exterior of your cake pans, insulate the sides of the pan. This insulation helps the cake bake more evenly from the edges to the center, significantly preventing the sides from setting too quickly and rising into a dreaded dome in the middle. The remarkable result? Perfectly flat, uniform cake layers that require minimal, if any, trimming, leading to a much easier and less wasteful assembly process and a consistently professional final look.
- Precision with a Kitchen Scale: For truly consistent and evenly baked cake layers, a digital kitchen scale is your best friend in the baking arsenal. After preparing your luscious cake batter, the most accurate way to divide it evenly is by weight among your three cake pans. This simple act ensures that each layer receives the exact same amount of batter, which in turn results in cakes that rise and bake uniformly, providing a beautifully level and stable foundation for stacking. Eyeballing the batter distribution can often lead to uneven layers, which can make the subsequent assembly and decorating process much more challenging.
- Smooth Trimming Techniques: When it comes to leveling your cake layers, a clever technique can significantly help prevent tearing and ensure a pristine cut. Begin by gently cutting the outside edge of the cake with a long, sharp serrated knife, scoring all the way around the perimeter. This serrated edge delicately saws through the outer, often slightly firmer, crust, greatly reducing resistance when you then use a specialized cake leveler (or continue with the knife) to cut through the softer interior of the cake. This technique ensures a clean, smooth cut and preserves the delicate integrity of your tender cake layers.
- Guide Points for Perfect Rosettes: For perfectly symmetrical and consistently beautiful frosting rosettes on top of your cake, a simple guide can make all the difference in achieving a professional finish. Take a piece of parchment paper and draw around an 8-inch cake pan. Then, cut out a slightly smaller circle, approximately ½ inch inside the drawn edge. Fold this paper circle precisely in half, then half again, and finally into thirds. Unfold it, and you will have a series of evenly spaced creases. Gently place this guide on top of your crumb-coated and chilled cake and use a toothpick to lightly mark each point where a rosette will be piped. This creates a foolproof guide for piping perfectly aligned and aesthetically pleasing decorative elements.
- Room Temperature Ingredients: Always, without exception, ensure your butter, eggs, and buttermilk are at true room temperature unless the recipe explicitly states otherwise. Room temperature ingredients emulsify more effectively and smoothly into the batter, resulting in a finer, more uniform crumb in your baked cake and a more consistent overall texture. For Swiss Meringue Buttercream, this is especially critical for both the egg whites (to whip properly into a stable meringue) and the butter (to incorporate smoothly into the meringue without causing it to curdle or separate).
- Don’t Overmix the Batter: This tip cannot be stressed enough, particularly for velvet cakes. Once you combine the wet and dry ingredients, your goal is to mix only until they are just barely combined. Overmixing develops the gluten in the flour too much, which inevitably leads to a tough, dense, and disappointingly dry cake. A few small, harmless lumps of flour are far better and will result in a more tender cake than an overmixed, gummy batter. Stop mixing as soon as you see no more streaks of dry flour.
Quick Food Coloring Tip: Master Your Pink Hue
The undeniable beauty of this Pink Velvet Cake lies not only in its delightful flavor but also in its wonderfully customizable color. You have complete creative control over the intensity of the pink hue. For a soft, delicate, and subtly elegant shade of pink, perfect for a sophisticated bridal shower or a subtle hint of romance, use less gel food coloring. If you desire a more dramatic, bold, and vibrantly celebratory dessert that truly pops, add a little more food coloring to achieve a deeper, richer hue. Remember to add the gel coloring gradually, a tiny drop or a toothpick dip at a time, and mix thoroughly after each addition to ensure uniform color distribution throughout the batter or buttercream. This meticulous approach allows you to achieve your exact desired shade, making your cake truly unique for any celebration.
Pink Velvet Cake FAQs: Your Questions Answered
A Pink Velvet Cake is a delightful and visually stunning variation of the classic velvet cake, distinguished by its vibrant pink color and exceptionally moist, tender crumb. Its core ingredients are carefully selected to achieve this signature profile. You’ll typically find all-purpose flour providing the cake’s foundational structure, unsalted butter and vegetable oil contributing to its deep richness and remarkable moistness, and granulated sugar for sweetness. Whole eggs are crucial for binding the ingredients, adding to the cake’s structure and overall lift. Key to its characteristic “velvet” texture and subtle tangy flavor are acidic ingredients like buttermilk and white vinegar, which also react beautifully with baking soda and baking powder to create a light, airy crumb. Pure vanilla extract enhances the overall flavor, and most importantly, pink gel food coloring is used to infuse it with its iconic, brilliant pink hue without affecting the delicate flavor. The cake is then often elegantly paired with a silky and stable Swiss Meringue Buttercream, a less-sweet frosting made from egg whites, sugar, and additional butter, and typically finished with an array of festive sprinkles for a celebratory touch.
While both Red Velvet and Pink Velvet cakes share a similar “velvet” texture and often boast a delightful, subtly tangy flavor profile, there are two primary and defining differences between them. The most immediately apparent distinction is, of course, the color: Red Velvet cake traditionally presents a deep, rich, and intense red hue, which was historically achieved through a chemical reaction between natural cocoa powder, vinegar, and buttermilk, though modern recipes often rely on a generous amount of red food coloring (often paired with a smaller amount of cocoa) to guarantee the vibrant shade. Pink Velvet cake, in contrast, is specifically tinted pink using pink gel food coloring, aiming for a lighter, more whimsical, and distinctly pink appearance. The second, and perhaps more fundamental, difference lies in the flavor profile and the absence of cocoa powder in Pink Velvet Cake. Adding cocoa powder, even in a small quantity, would impart a brownish tint to the batter, making it impossible to achieve a pure, unblemished vibrant pink color. Therefore, Pink Velvet focuses purely on a bright vanilla-butter flavor profile, without the subtle chocolate notes that are characteristic of its red counterpart. This distinction allows the pink color and delicate vanilla flavor to truly shine.
Absolutely! This Pink Velvet Cake is an excellent dessert to prepare in advance, making it a perfect choice for busy hosts, special events, or simply to spread out your baking process. You can confidently bake the cake layers up to 2-3 days ahead of time. Once they are completely cooled, ensure each layer is tightly wrapped in plastic wrap to prevent drying, and then store them at room temperature. For even longer storage, the unfrosted cake layers can be individually wrapped and frozen for up to a month; simply thaw them in the refrigerator overnight when ready to use. The Swiss Meringue Buttercream can also be made a few days in advance and stored in an airtight container in the refrigerator. Before using, allow it to come back to room temperature, then re-whip it briefly in your stand mixer until it regains its incredibly silky and smooth consistency. You can also fully assemble and apply the crumb coat to the entire cake a day before your event, then apply the final layer of frosting and all the beautiful decorations on the day of serving, allowing you to present a fresh, flawlessly decorated cake with minimal last-minute stress.
Don’t panic if your Swiss Meringue Buttercream appears curdled, lumpy, or even completely separated after you begin adding the butter! This is a very common stage in the process and is almost always easily fixable. It typically means that the butter and meringue haven’t fully emulsified or come together yet, or that the butter might have been slightly too cold or too warm when added. The best solution is simple: keep mixing! Continue to beat the mixture patiently on medium speed with the paddle attachment of your stand mixer. Within a few minutes, you will witness a remarkable transformation as the mixture comes together and smooths out into a beautiful, luscious, and silky buttercream. If, after several minutes, it’s still not coming together and appears very soupy, try chilling the bowl (with the mixture inside) in the refrigerator for 10-15 minutes (if it seems too warm). If it seems too stiff, gently warm the bottom of the bowl over a pot of warm water for a few seconds. Then, return it to the mixer and continue beating until smooth. Patience and persistence are key!
While it is technically possible to use liquid food coloring for this Pink Velvet Cake recipe, it is highly recommended to use gel food coloring instead, especially when the goal is to achieve truly vibrant and intense colors without compromising the cake’s texture. Liquid food colorings are much less concentrated, meaning you would typically need to add a significantly larger quantity to achieve the desired pink hue. Adding too much liquid food coloring can introduce an excess of moisture into your delicate cake batter. This additional liquid can throw off the carefully balanced ratios of ingredients, potentially affecting the cake’s overall texture, making it denser, heavier, or even causing it to sink in the middle during baking. Gel food colorings, on the other hand, are highly concentrated and deliver intense, brilliant color with just a small amount, ensuring your Pink Velvet Cake remains perfectly structured, delightfully moist, and beautifully colored without any undesirable textural changes. Always opt for gel for the best results!
FOLLOW ME FOR MORE DELICIOUS RECIPES
Creative Flavor Variations for Your Pink Velvet Cake
While our classic Pink Velvet Cake recipe with its luscious Swiss Meringue Buttercream is undeniably delicious and a showstopper as-is, one of the greatest joys of baking is the freedom to customize and experiment. This recipe serves as a fantastic canvas for your creativity! Here are a few delightful changes and additions you can make to tailor this cake to your personal tastes, specific occasions, or simply to try something new:
- Alternative Frosting: Classic Cream Cheese Frosting: If you prefer a tangier, richer, and slightly denser frosting that offers a wonderful contrast to the light cake layers and is less involved than Swiss meringue, a classic cream cheese frosting is an excellent and incredibly popular choice for velvet cakes. To whip up this delightful alternative, begin by placing 2½ cups of unsalted butter (softened to room temperature) and 20 ounces of softened full-fat cream cheese in the bowl of a stand mixer. Beat these two ingredients together on medium-high speed until the mixture is light, airy, and wonderfully fluffy – this can take several minutes to achieve the perfect consistency. Next, gradually add 9 cups of powdered sugar, one cup at a time, mixing on low speed until each addition is fully incorporated before adding more. This slow addition is key to preventing a “sugar cloud” in your kitchen! Once all the sugar is in, increase the speed to medium-high and beat again until you achieve a smooth, utterly creamy frosting. Finally, stir in 2½ teaspoons of pure vanilla extract for that signature flavor. This frosting will be thicker and sweeter, offering a delightful and satisfying textural contrast to the delicate cake.
- Customizing the Color Palette: The inherent beauty of this velvet cake lies in its incredible adaptability beyond just pink! This recipe can easily be made in any color you like to perfectly match your party theme, celebrate a favorite shade, or align with a specific holiday celebration. Simply swap out the pink food coloring for your desired hue – think a vibrant sky blue for a boy baby shower, a sunny yellow for a cheerful spring celebration, an emerald green for a festive St. Patrick’s Day treat, or a deep, regal purple for an elegant and sophisticated touch at any gathering. Remember to add sprinkles that either perfectly match or beautifully complement your chosen color scheme for a cohesive and truly striking presentation. For instance, using red gel food coloring will effortlessly transform this into a traditional Red Velvet Cake (without the cocoa, for a pure vanilla base), making it perfect for Christmas, Valentine’s Day, or a timeless classic touch.
- Adding Zest or Alternative Extracts: Elevate the flavor profile of your Pink Velvet Cake even further by introducing the bright notes of citrus zest or alternative flavor extracts. A teaspoon of finely grated lemon or orange zest added to the cake batter can impart a wonderfully bright, fresh, and aromatic note that beautifully complements the vanilla. Alternatively, consider swapping a portion of the vanilla extract for a different flavor: almond extract can add a subtle, sophisticated nutty aroma, or a hint of rosewater can introduce an even more romantic, delicate floral twist that pairs exquisitely with the pink aesthetic. Explore other extracts like coconut or raspberry for unique flavor combinations.
- Incorporating Delicious Fillings: Take your cake to the next level of indulgence by adding a delicious filling between the layers. A simple homemade berry compote (raspberry or strawberry would be particularly lovely with the pink theme) or a luxurious layer of cream cheese filling (if you’re opting to use the Swiss meringue buttercream for the exterior) can add an exciting burst of contrasting flavor and delightful texture. If using fruit fillings, ensure any added filling is not too wet or runny, as excessive moisture could potentially make the delicate cake layers soggy. A thin layer of fruit curd or even a white chocolate ganache could also be a stunning addition.
Whether you’re planning an extravagant party, celebrating a significant milestone, or simply seeking a sweet, beautiful treat to brighten your day and satisfy a craving, this captivating Pink Velvet Cake is more than just a dessert – it’s an enchanting experience. With its vibrant, tender layers, sumptuously creamy Swiss meringue buttercream, and playful festive sprinkles, it’s absolutely sure to be an undeniable winner and a memorable highlight for anyone who tastes its delicate perfection! Get ready to bake, decorate, and delight your senses with this incredible creation!
More Irresistible Dessert Recipes You’ll Love
Brownie Pizza
50 mins
Red Velvet Brownies
3 hrs
Ice Cream Sandwich Cake
21 mins
Pear Custard Pie
1 hr
Funfetti Cookies
15 mins
Love This Recipe?
We truly hope you adore this enchanting Pink Velvet Cake! Your feedback is incredibly valuable. Please consider leaving a 5-star 🌟🌟🌟🌟🌟 rating in the recipe card below & sharing your thoughts in the comments section further down the page. Your review helps other bakers discover and enjoy this wonderful recipe as much as you do!
Pink Velvet Cake
Pin Recipe
Time
Equipment
-
3 8 inch round cake pans
-
3 cake baking strips
-
stand mixer
-
cake leveler
-
cake turntable
-
cake scraper
-
8 inch and 10 inch cake boards
-
piping bags
-
large round and large closed star piping tips
Ingredients
For the cake
- 3¾ cups all purpose flour
- 1¼ teaspoons baking powder
- 1¼ teaspoons baking soda
- 1¼ teaspoons salt
- 2⅔ cups granulated sugar
- 1¾ cups buttermilk
- 1 cup unsalted butter, melted
- ¼ cup vegetable oil
- 3 eggs
- 2 teaspoons vanilla extract
- 1¼ teaspoons distilled white vinegar
- ½ teaspoon pink gel food coloring
- cooking spray
For the frosting
- 12 egg whites
- 3 cups granulated sugar
- 30 ounces unsalted butter cubed and softened
- 1/8 teaspoon pink gel food coloring
For assembly
- 1/2 cup pink sprinkles
Instructions
For the cake layers
-
Preheat your oven to 325 degrees F (160°C). Prepare three 8-inch round cake pans by coating them thoroughly with cooking spray and then lining the bottoms and sides with parchment paper. Submerge three cake baking strips in water, ensuring they are fully soaked for later use.
-
In the bowl of a stand mixer, or a large mixing bowl, sieve together the all-purpose flour, baking powder, baking soda, and salt. Once sifted, stir in the granulated sugar until uniformly combined.
-
In a separate, medium-sized bowl, whisk together the buttermilk, melted unsalted butter, vegetable oil, eggs, vanilla extract, distilled white vinegar, and pink gel food coloring until all components are well combined and the color is consistent.
-
Gradually pour the wet ingredients into the dry ingredients. Using a stand mixer fitted with the paddle attachment, mix on a low speed just until the ingredients are combined and a smooth batter forms. Exercise caution not to overmix, as this can lead to a tough cake.
-
Evenly divide the cake batter among the three prepared pans. Squeeze out the excess water from the baking strips and secure them snugly around the perimeter of each cake pan.
-
Bake for approximately 50-55 minutes, or until the cake layers are springy to the touch and a toothpick inserted into the center emerges clean or with only a few moist crumbs attached.
-
Allow the cakes to cool in their pans on a wire rack for 20 minutes. After this time, carefully invert them onto the cooling rack, remove the parchment paper, and let them cool completely before proceeding with frosting.
For the Swiss Meringue Buttercream frosting
-
Fill a pot halfway with water and bring it to a gentle simmer. In a large, heatproof bowl, combine the egg whites and granulated sugar. Place the bowl over the simmering water, ensuring it does not touch the water directly. Whisk continuously until the temperature reaches 160°F (71°C), and then continue whisking for another 2 minutes to ensure the egg whites are pasteurized and safe to consume.
-
Transfer the warm egg white mixture to the bowl of a stand mixer fitted with the whisk attachment. Whisk on high speed for about 10 minutes until the mixture forms stiff, glossy peaks and resembles a stable meringue. The bowl should feel cool to the touch.
-
Switch the mixer attachment to the paddle. With the mixer running on low speed, gradually add the softened, cubed unsalted butter, a few cubes at a time, allowing each addition to incorporate before adding more.
-
Initially, the mixture may appear curdled or broken; this is a normal stage. Continue to mix patiently. After several minutes, the buttercream will transform into a silky-smooth, luscious consistency. Increase speed to medium-high for 30 seconds to remove any air bubbles.
-
To tint the buttercream, add a small amount of pink gel food coloring using a toothpick. Mix after each tiny addition until you achieve your desired pale pink shade. Use the frosting immediately for best results.
-
Reserve approximately 1 cup of this finished frosting in a piping bag fitted with a large closed star tip for piping rosettes later.
For assembly and decoration
-
Trim the tops and bottoms of the cooled cake layers with a large, serrated knife or a cake leveler to create flat, even surfaces.
-
Attach an 8-inch cake board to a larger 10-inch cake board using a small amount of buttercream, then place this assembly onto a cake turntable. Secure the first leveled cake layer onto the 8-inch board with a dab of buttercream. Pipe an even layer of frosting over it, smoothing with a cake scraper, then add the second cake layer. Repeat the frosting process and top with the third and final cake layer.
-
Lightly trim the sides of the stacked cake with a serrated knife to ensure a perfectly flat, uniform surface, if needed.
-
Using an offset spatula, apply a thin layer of buttercream all over the cake to create a crumb coat, trapping any loose crumbs. Chill the cake in the refrigerator for 15-20 minutes until the crumb coat is set firm.
-
Remove the chilled cake and apply a more generous layer of buttercream to the top and sides. Use a cake scraper or offset spatula to achieve a smooth, professional finish. Chilling the cake periodically can aid in achieving perfectly smooth sides and sharp edges.
-
Gently press pink sprinkles into the side of the cake, starting from the bottom and extending upwards to about halfway. For a neater look, run a cake smoother around the base of the cake over the sprinkles to help embed them. Chill until firm.
-
Fit a large piping bag with a large closed star nozzle and fill it with the reserved 1 cup of frosting.
-
Pipe 12 decorative rosettes evenly spaced around the top edge of the cake. Refer to the “Expert Tips” section for creating guide points for perfect symmetry.
-
Sprinkle a few additional pink sprinkles onto each rosette for a final festive flourish.
-
Carefully transfer your stunning Pink Velvet Cake to a cake stand and serve. Enjoy your beautiful homemade masterpiece!
Notes
- For optimal freshness and taste, Pink Velvet Cake is best enjoyed at room temperature. It can be stored covered at room temperature for up to 3 days, or in the refrigerator for up to a week. If refrigerated, allow it to sit at room temperature for 1-2 hours before serving. Individual slices can be wrapped and frozen in an airtight container for up to 3 months.
- Baking strips are invaluable for preventing doming during baking, resulting in perfectly flat cake layers that are much easier to stack and decorate. These can be found online or in most craft and baking supply stores.
- Utilize a kitchen scale to accurately divide your cake batter into equal portions for each pan. This ensures uniform baking and consistent layer thickness across all cakes.
- When leveling your cake layers, start by gently cutting the outer edge with a serrated knife before using a cake leveler or continuing with the knife to slice through the center. This technique helps prevent the cake from tearing and ensures a cleaner cut.
- To achieve perfectly symmetrical frosting rosettes, create a simple parchment paper guide. Draw an 8-inch circle, cut a smaller circle ½ inch inside it, then fold it in half, then half again, and finally into thirds. Unfold to reveal evenly spaced guide points. Lightly mark these points on your cake with a toothpick before piping.