
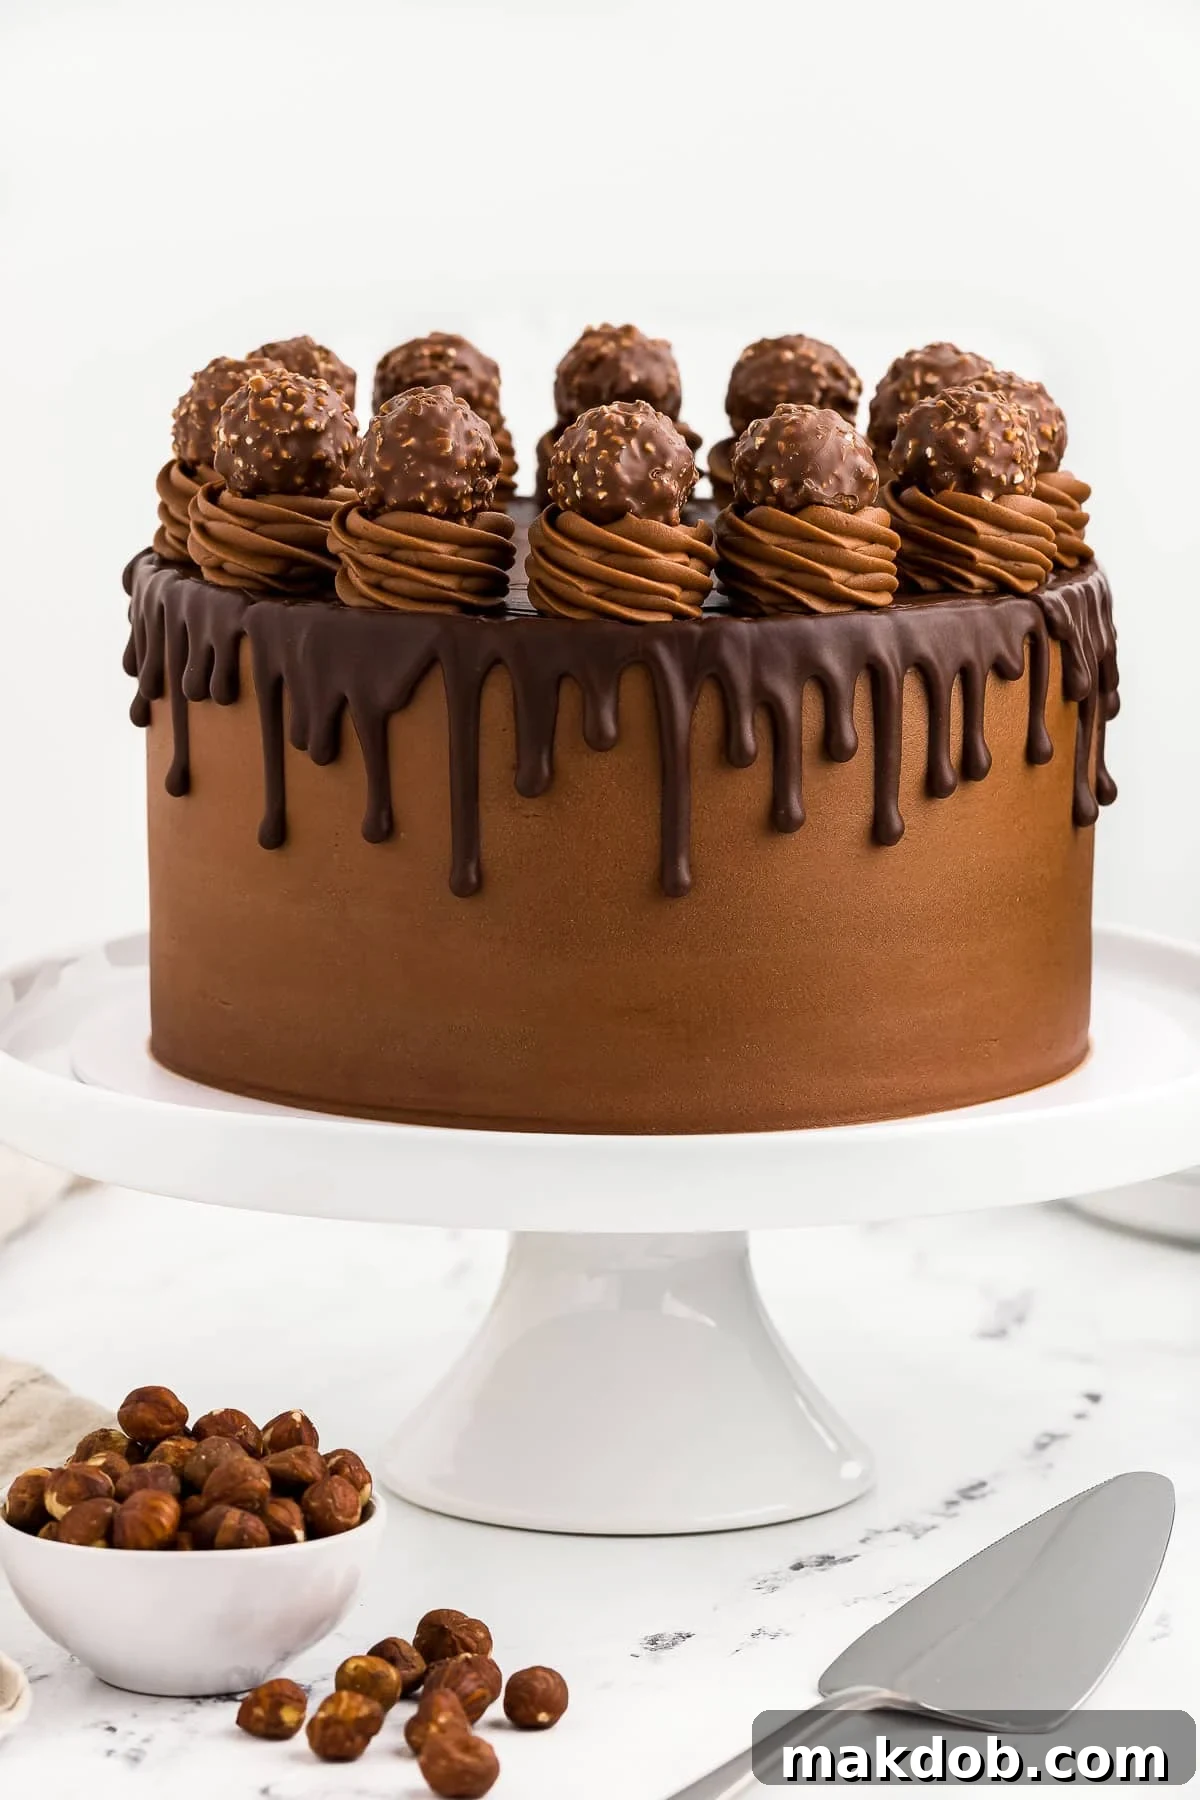
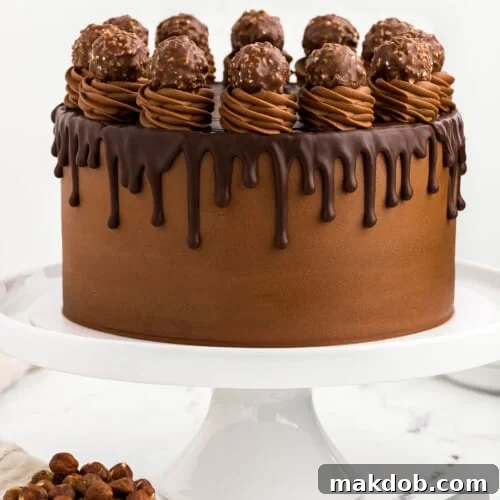
Prepare to create a truly unforgettable dessert with this incredible Nutella Cake. Imagine three lush layers of rich chocolate cake, each generously slathered with a velvety Nutella buttercream, then crowned with a glistening Nutella ganache drizzle and elegantly garnished with exquisite hazelnut chocolates, such as Ferrero Rocher. This isn’t just a cake; it’s a magnificent center-piece, a testament to sophisticated baking, and an undeniably elegant and decadent dessert option that promises to captivate every palate.
When the occasion demands something truly special, something that leaves a lasting impression, my go-to choice is always a show-stopping dessert. Whether it’s the vibrant red velvet brownies, the delicate berry chantilly cake, the festive eggnog cake, or the charming black forest cupcakes, each recipe aims to delight. However, for sheer indulgence and universal appeal, this fabulous Nutella cake stands in a league of its own. If you consider yourself a true chocolate enthusiast or a hazelnut lover, you will absolutely adore the deep, complex flavor and the perfectly moist, delectable texture of this extraordinary chocolate hazelnut cake recipe!
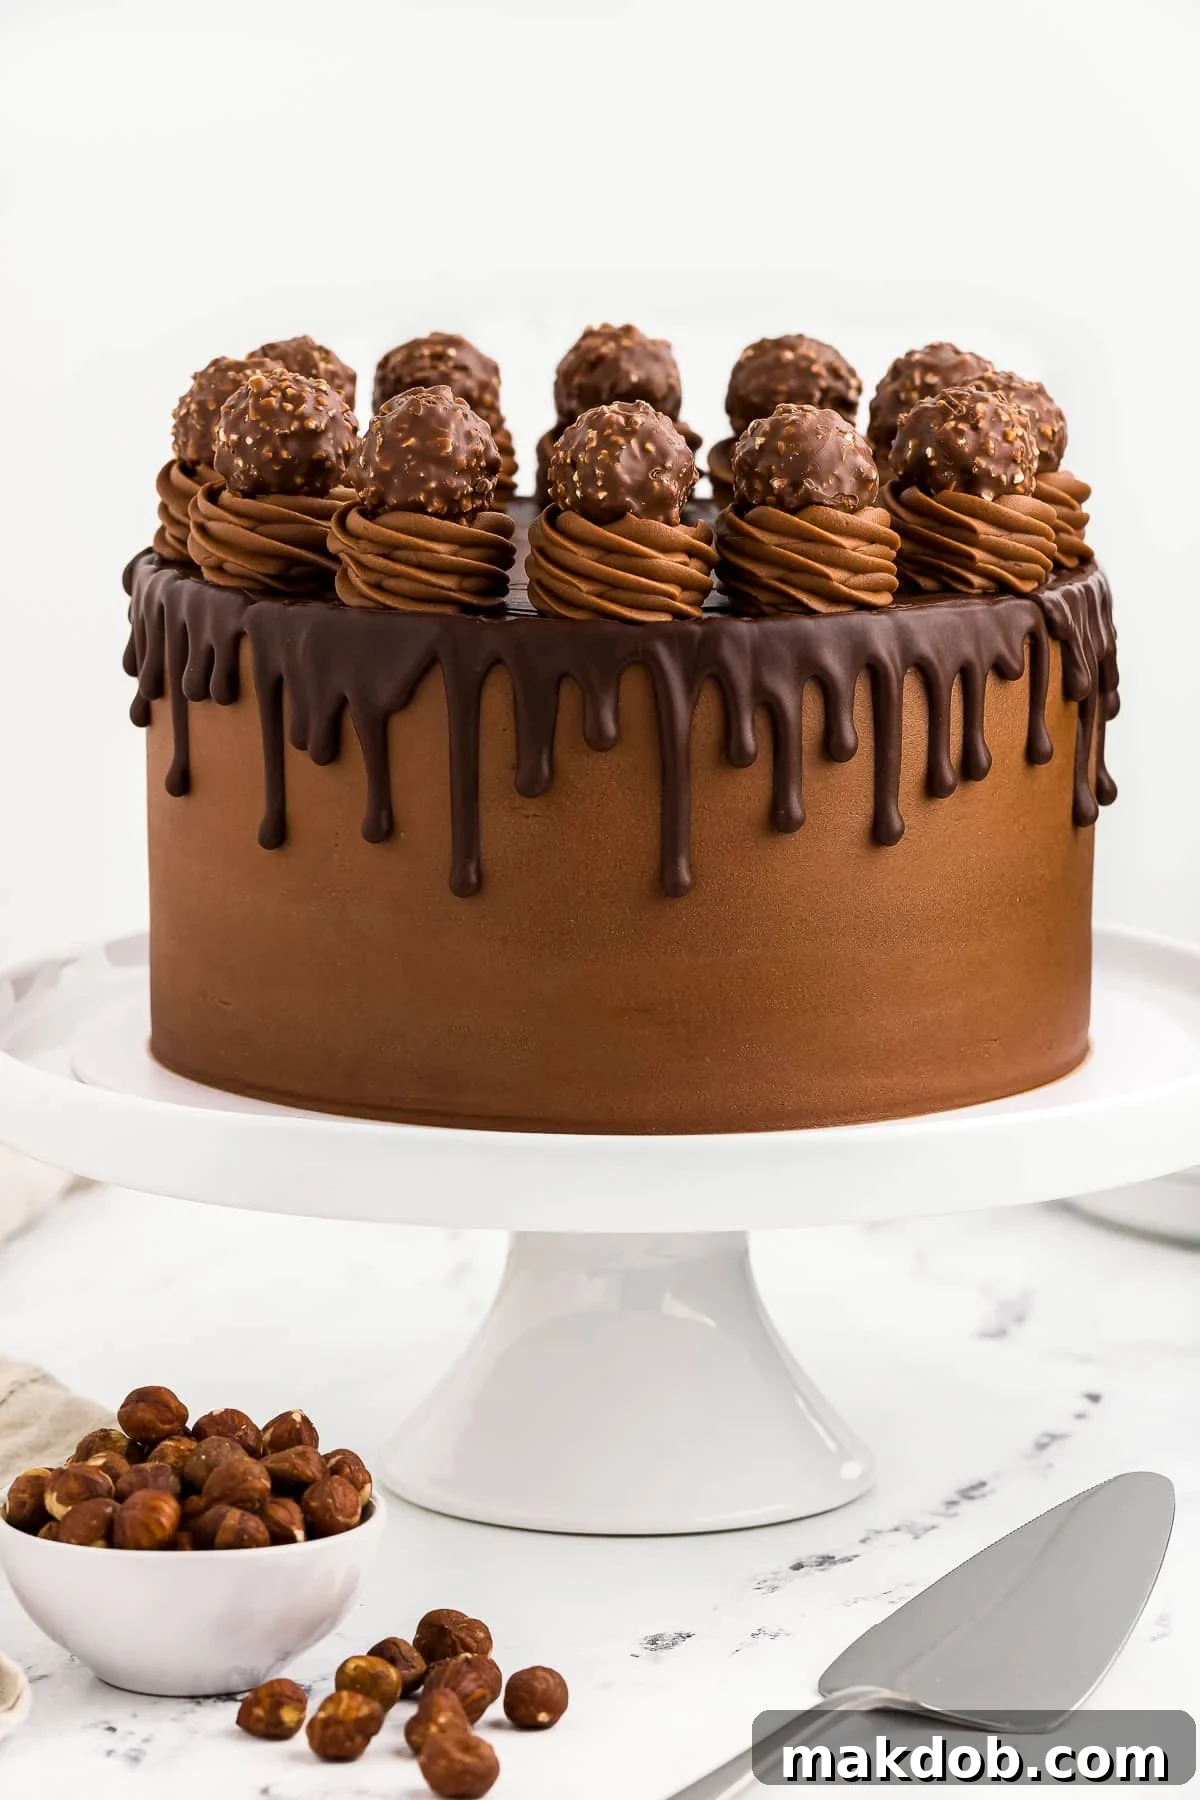
Nutella, with its irresistible blend of chocolate and hazelnut, holds a special place in the hearts of dessert lovers worldwide. It’s wonderfully versatile – delicious when paired with fresh berries, spread generously on warm toast, or simply enjoyed straight from the jar for an instant treat. But its true potential for culinary magic shines brightest when it’s transformed into a magnificent dessert, such as this delightful Nutella chocolate layer cake. This recipe elevates the humble spread to new heights, creating a symphony of flavors and textures that is truly unparalleled.
Table of Contents
- Why You’ll Love This Nutella Cake
- Nutella Cake Ingredients Explained
- How to Make the Ultimate Nutella Cake
- For The Moist Chocolate Cake Layers
- Crafting The Silky Nutella Ganache
- Preparing The Dreamy Nutella Buttercream Frosting
- Expert Cake Assembly Techniques
- Pro Tips For The Perfect Cake
- Baking Secrets for Flat Cake Layers
- Recipe FAQs and Troubleshooting
- More Irresistible Dessert Recipes
- Share Your Nutella Cake Masterpiece
- Nutella Cake Recipe Card
Why You’ll Love This Nutella Cake
This Nutella cake isn’t just another dessert; it’s an experience. The rich, deep chocolate flavor of the cake layers, perfectly balanced with the sweet, nutty essence of Nutella, creates a harmonious taste profile that is simply irresistible. Each component is designed for maximum flavor and texture: the cake is incredibly moist and tender, the buttercream is light yet decadent, and the ganache adds a luxurious finish. It’s a sophisticated treat that looks as impressive as it tastes, making it ideal for birthdays, anniversaries, holidays, or any moment you want to make extraordinary. Beyond its deliciousness, the step-by-step instructions ensure that even intermediate bakers can achieve professional-looking results. Get ready to impress your family and friends with a homemade Nutella cake that will have everyone asking for the recipe!
Nutella Cake Ingredients Explained
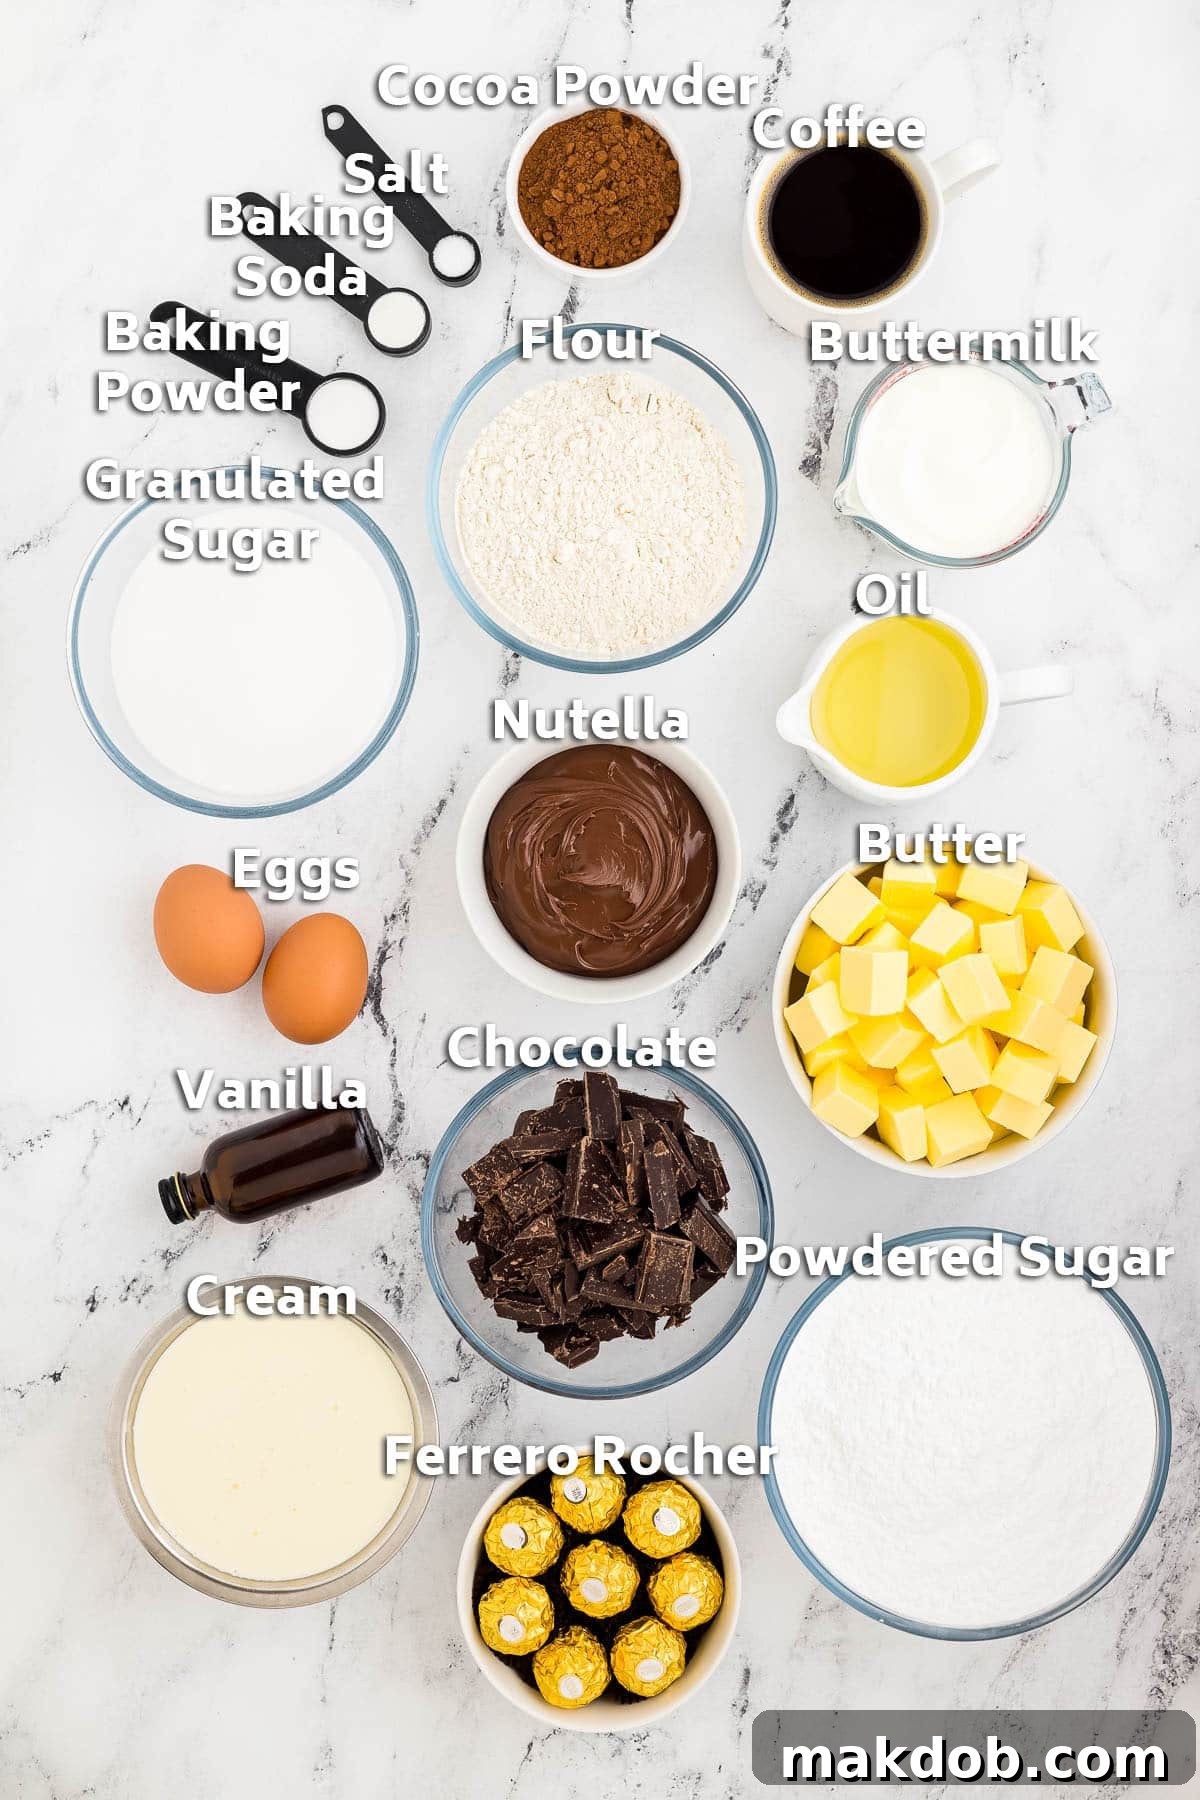
To embark on the creation of this delightful Nutella cake, you’ll need a selection of high-quality ingredients, each playing a crucial role in achieving the perfect flavor and texture. For the cake layers, gather all-purpose flour, unsweetened cocoa powder (preferably Dutch-processed for a darker color and milder flavor), baking soda and baking powder for optimal lift, and a touch of salt to enhance the overall sweetness. Granulated sugar provides sweetness, while buttermilk is essential for a tender, moist crumb due to its acidity reacting with the leavening agents. Vegetable oil contributes to the cake’s moisture without adding a heavy butter flavor, allowing the chocolate and Nutella to shine. Nutella itself is incorporated directly into the cake batter for an authentic hazelnut-chocolate base. Instant coffee, dissolved in hot water, doesn’t make the cake taste like coffee but profoundly deepens and intensifies the chocolate flavor – a secret weapon for any chocolate cake! Large eggs bind the ingredients together and add richness, and vanilla extract rounds out the flavors. Finally, cooking spray will be needed to prepare your cake pans.
For the luxurious Nutella ganache, you’ll require good quality semisweet chocolate, finely chopped for quick and even melting. Heavy cream provides the necessary richness and creates a smooth, pourable consistency. More Nutella is added to the ganache to infuse it with its signature hazelnut flavor. And for the luscious buttercream frosting, you’ll need unsalted butter, softened to room temperature for optimal creaming, a substantial amount of powdered sugar (sifted to prevent lumps), and additional vanilla extract. To complete the presentation and add an extra layer of hazelnut goodness, prepare chocolate hazelnut candies, such as Ferrero Rocher, for garnishing.
How to Make the Ultimate Nutella Cake
Creating this stunning Nutella cake involves several distinct components, each contributing to the final masterpiece. While the process may seem extensive, none of the individual steps are inherently difficult. The key to success lies in a little planning and organization, ensuring you have ample time to complete each stage and allow for proper cooling and chilling. Begin your baking journey by preheating your oven to the specified temperature, then prepare your cake pans by soaking cake baking strips in water, generously coating the pans with cooking spray, and lining the bottoms with parchment paper for easy release. This meticulous preparation sets the stage for beautifully baked cake layers.
For The Moist Chocolate Cake Layers
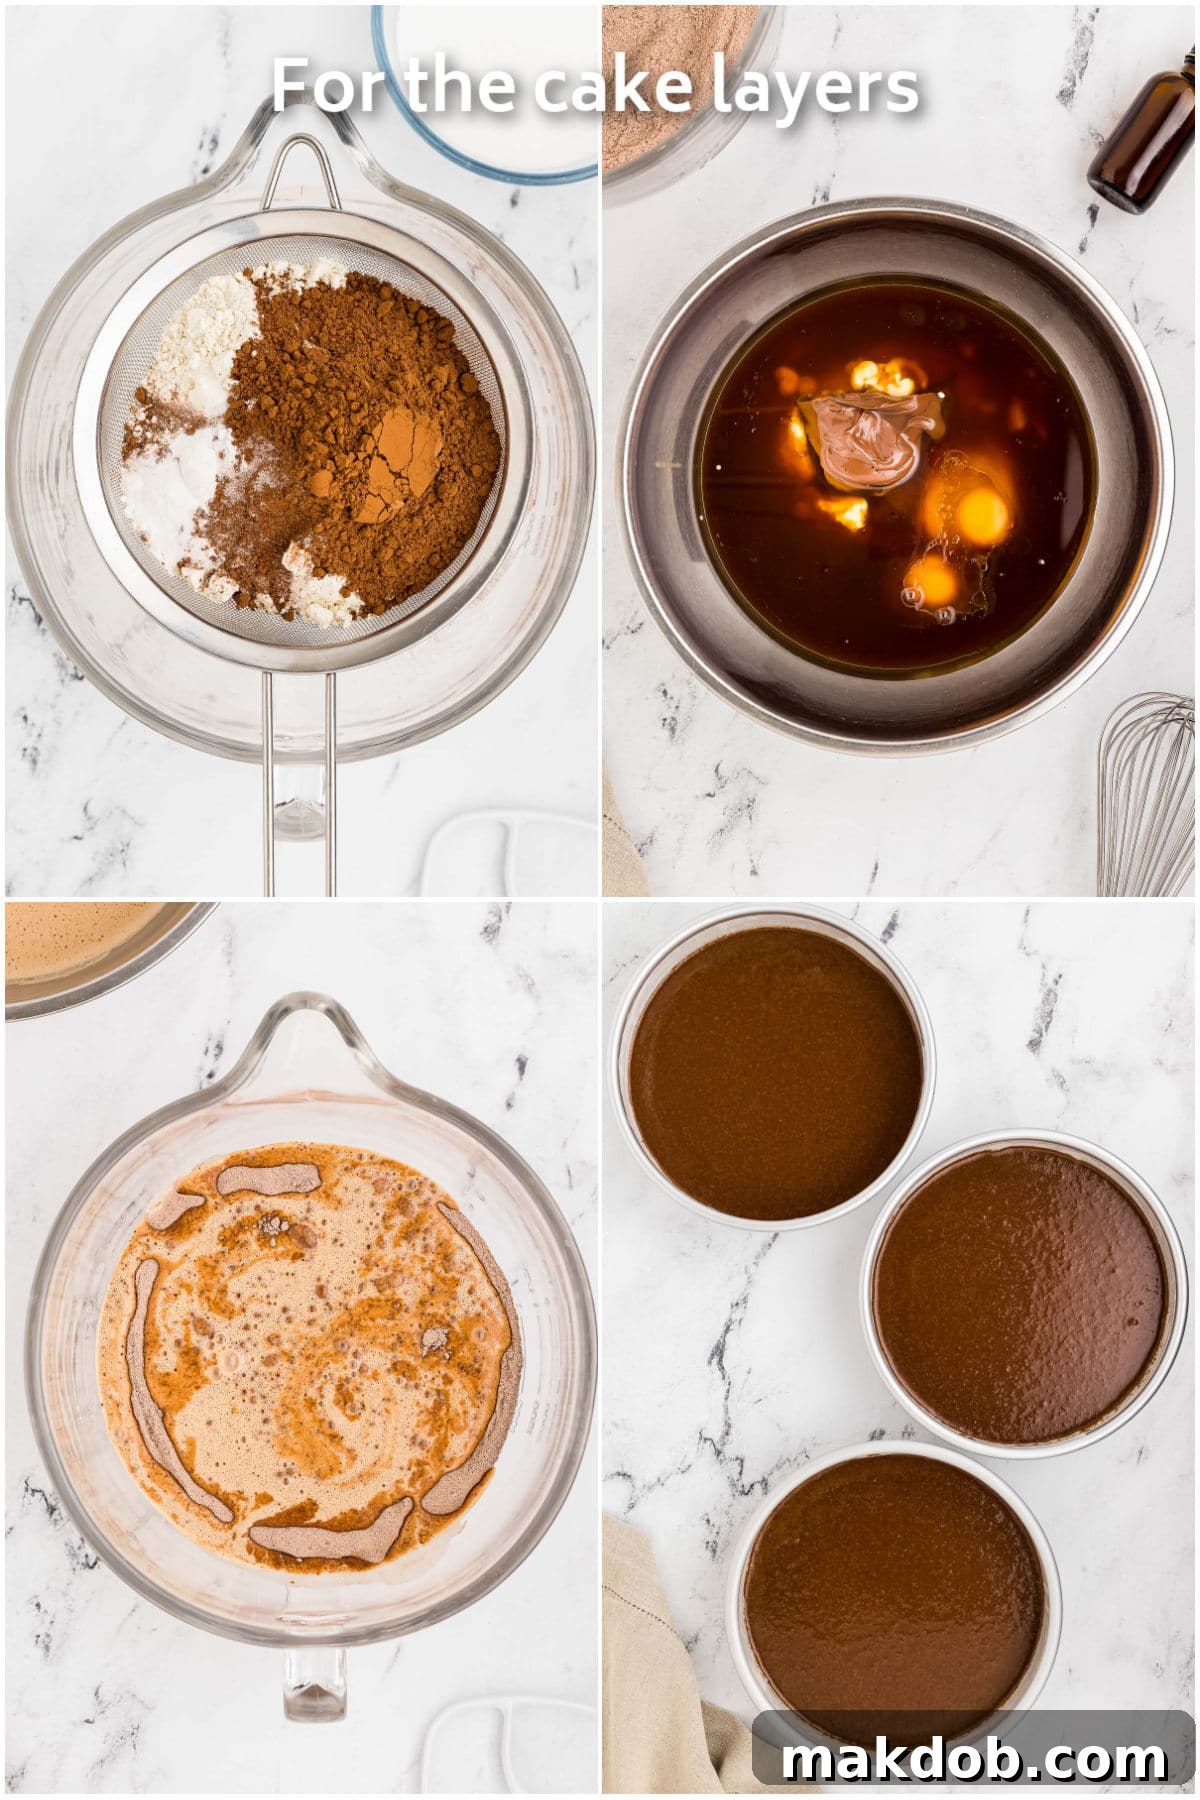
The foundation of this exquisite dessert is its moist and flavorful chocolate cake. In a large mixing bowl, meticulously sift together the dry ingredients: all-purpose flour, unsweetened cocoa powder, baking soda, baking powder, and salt. Sifting is crucial for aerating the dry ingredients and preventing lumps, ensuring a uniformly smooth batter. Once sifted, stir in the granulated sugar. In a separate bowl, whisk together the wet ingredients until thoroughly combined: buttermilk, vegetable oil, a portion of the Nutella, the dissolved instant coffee, large eggs, and vanilla extract. The combination of buttermilk and coffee is key here; buttermilk contributes to the cake’s exceptional tenderness and moisture, while the coffee dramatically enhances the deep chocolate notes without imparting a coffee flavor. With your mixer on low speed, gradually add the wet mixture to the dry ingredients. Mix continuously, just until the ingredients are combined and you achieve a smooth, somewhat runny batter. Be careful not to overmix, as this can lead to a tough cake. Divide the luscious cake batter evenly among your prepared cake pans, then bake until a toothpick inserted into the center of each cake comes out clean or with only a few moist crumbs attached. This indicates perfect doneness. Allow the freshly baked cakes to cool in their pans for about 15 minutes, allowing them to firm up slightly before inverting them onto a wire rack to cool completely. Patience during this cooling process is vital to prevent the cakes from breaking and to ensure they are firm enough for frosting.
Crafting The Silky Nutella Ganache
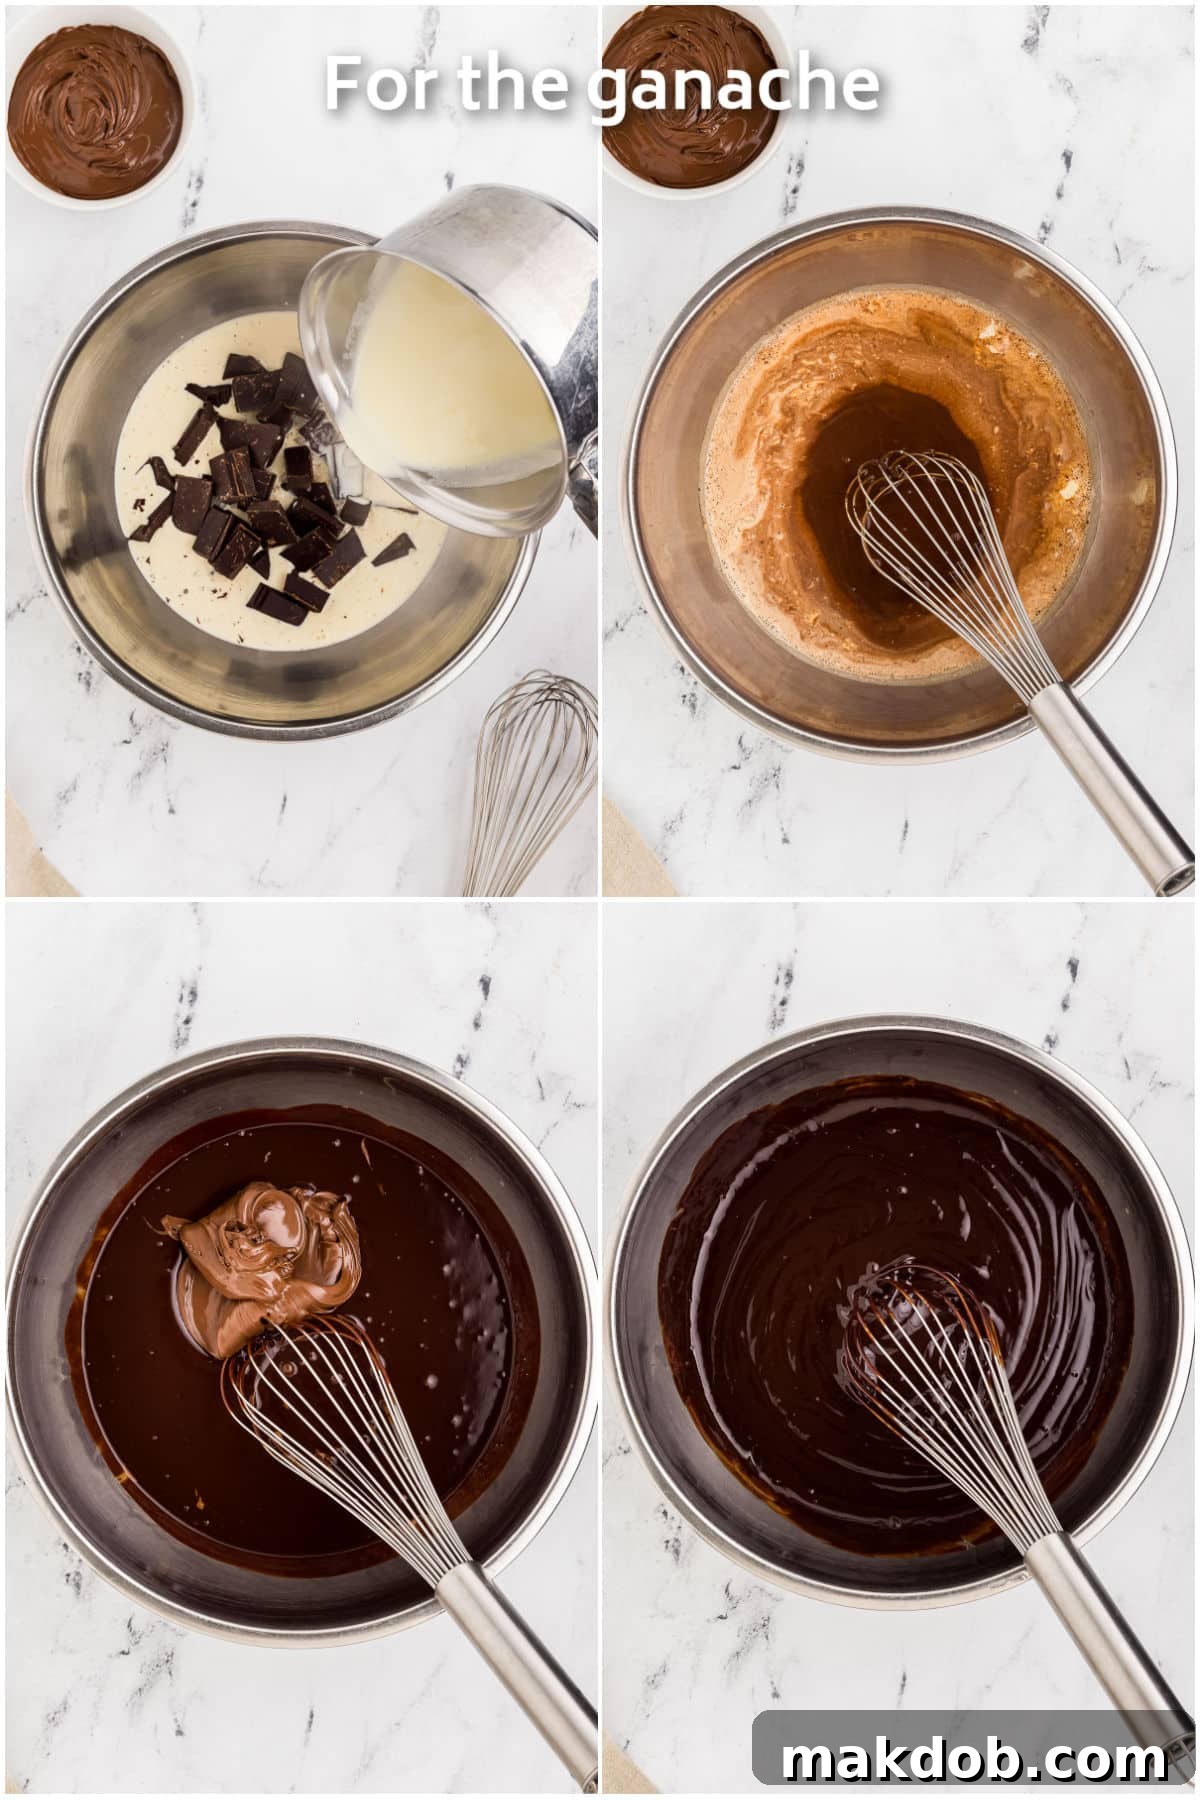
The Nutella ganache serves a dual purpose in this cake: it’s incorporated into the buttercream for an extra layer of flavor and used as a decadent drizzle for the final decoration. To begin, place the finely chopped semisweet chocolate in a large, heatproof bowl. In a small saucepan, gently heat the heavy cream over medium heat, stirring occasionally, until it just begins to bubble around the edges. This typically happens when the cream reaches around 185°F (85°C). Immediately remove the cream from the heat and pour it over the chopped chocolate. Resist the urge to stir right away; instead, let the hot cream sit over the chocolate for 10 minutes. This crucial resting period allows the residual heat from the cream to melt the chocolate thoroughly and evenly, preventing the ganache from becoming grainy or splitting. After 10 minutes, begin whisking the cream and chocolate together, starting from the center of the bowl and gradually expanding your whisking motion outwards until you achieve a beautifully smooth, glossy, and emulsified ganache. Finally, add the remaining Nutella and stir it in until it’s fully incorporated, resulting in a smooth and shiny chocolate hazelnut ganache. Reserve approximately 1½ cups of this luscious ganache for the frosting, and set aside the rest in a separate heatproof bowl to cool and slightly thicken for the decorative drip on the cake. Achieving the right consistency for the drip will be key, and cooling it gradually helps.
Preparing The Dreamy Nutella Buttercream Frosting
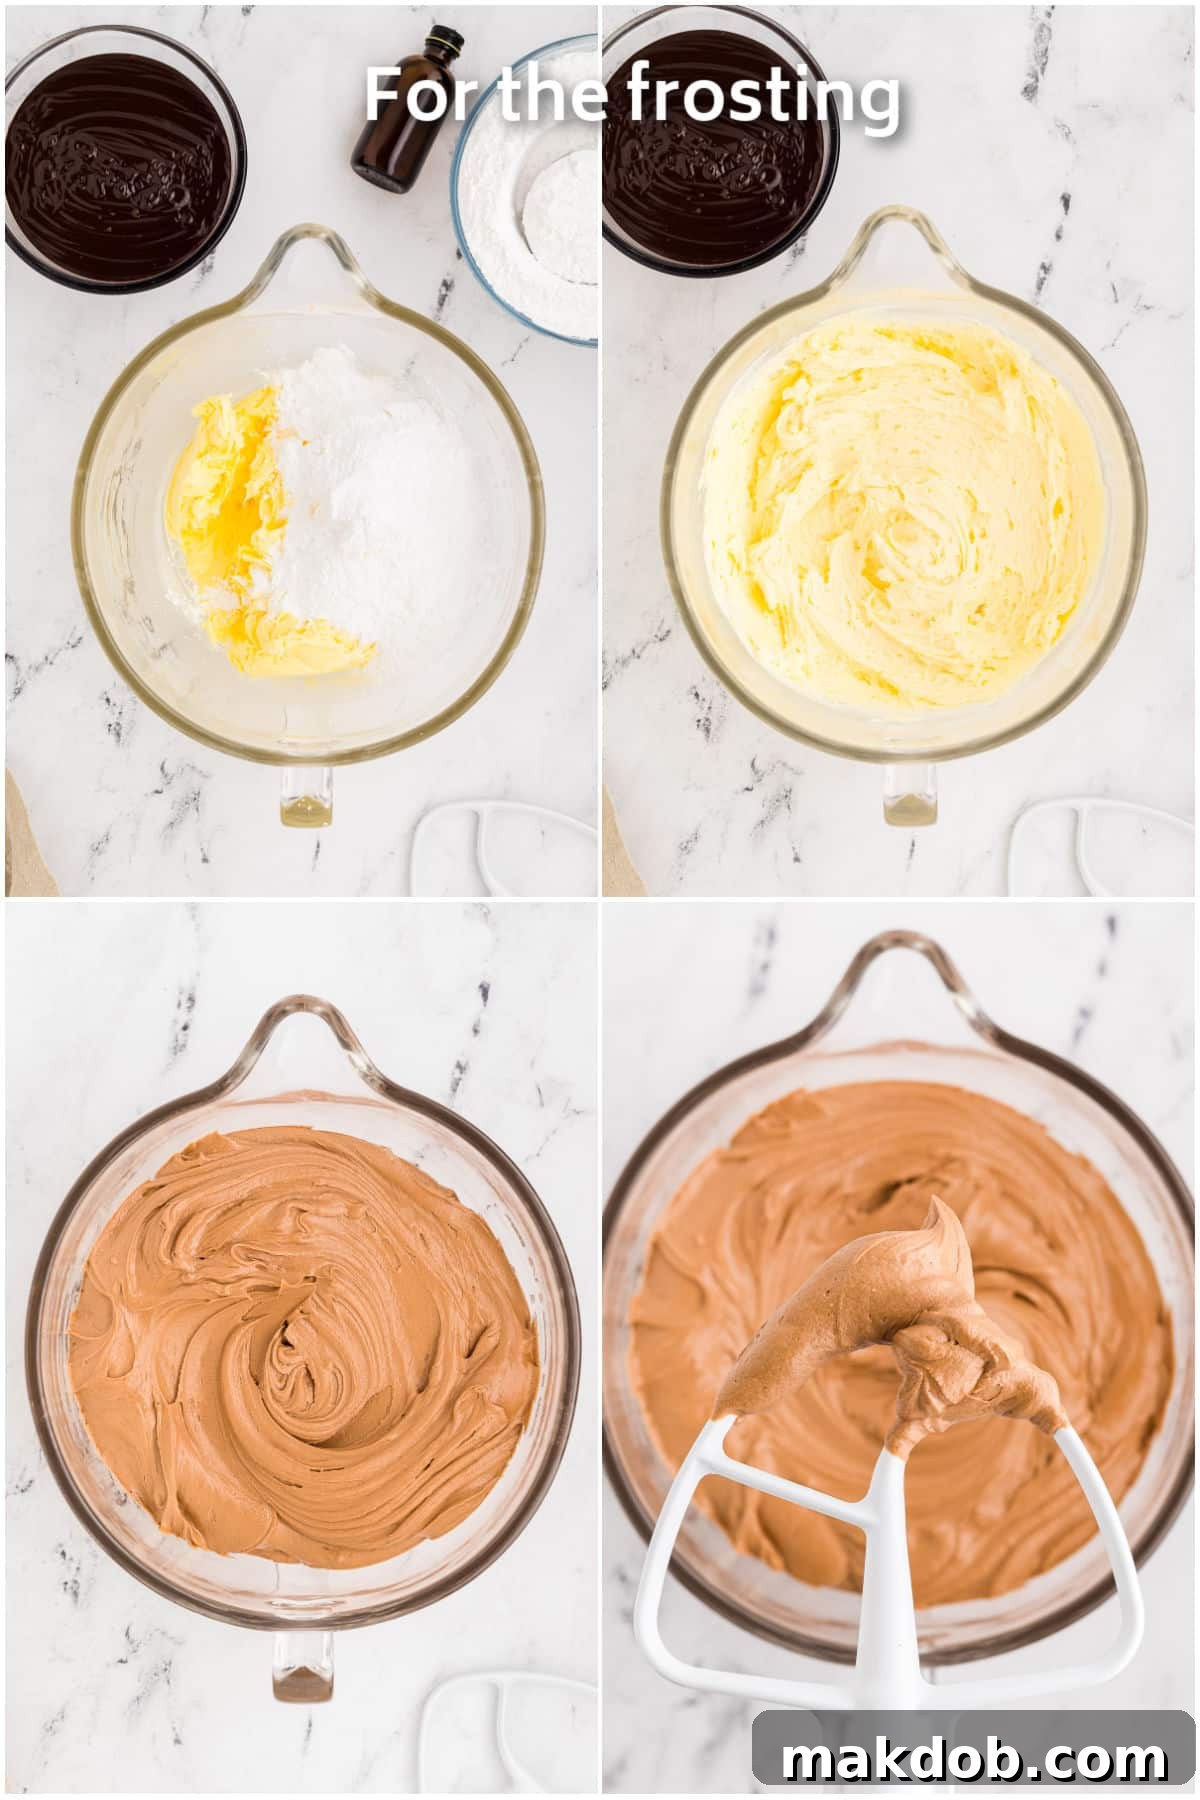
The Nutella buttercream frosting is what truly ties all the elements of this cake together, providing a rich, creamy, and flavorful experience. To create this dreamy frosting, start by placing your softened, room-temperature butter in the bowl of a stand mixer fitted with the paddle attachment (or use an electric hand mixer). Beat the butter on medium-high speed until it becomes incredibly smooth, light, and creamy, usually for about 3-5 minutes. This aeration step is essential for a fluffy buttercream. Next, gradually incorporate about 1-2 cups of the sifted powdered sugar, along with the vanilla extract, mixing on low speed until just combined. Gradually add the remaining powdered sugar, one cup at a time, allowing each addition to fully incorporate before adding the next. Once all the sugar is in, increase the mixer speed to medium-high and beat for another 2-3 minutes until the frosting is light, airy, and wonderfully fluffy. This extended beating time is what gives buttercream its signature smooth and voluminous texture. Finally, gently mix in the reserved 1½ cups of Nutella ganache until it is fully incorporated and the frosting achieves a uniform color and flavor. If your reserved ganache has become too firm, you can gently rewarm it in the microwave in very short bursts (5-10 seconds) until it has softened to a workable consistency before adding it to the buttercream. This Nutella buttercream is not only delicious but also stable enough to hold its shape for piping and spreading.
Expert Cake Assembly Techniques
Once your cake layers are completely cooled, your frosting is perfectly whipped, and your ganache is ready, it’s time for the exciting stage of assembly. Precision here will yield a beautifully polished cake. Start by using a long, serrated knife to carefully trim any domed tops off your cake layers, ensuring each layer is perfectly flat and approximately 1¼ inch thick. Flat layers are crucial for a stable and aesthetically pleasing stacked cake. Next, place a 10-inch cake board on a rotating cake turntable. Secure an 8-inch cake board precisely in the center of the larger board with a small dab of frosting. This provides a stable base and makes handling the finished cake much easier. Place a dab of frosting on the 8-inch board to “glue” your first trimmed cake layer firmly in place. Now, fill a piping bag fitted with a large round tip with some of your glorious Nutella frosting. Pipe an even, generous layer of frosting onto the first cake layer, spreading it out smoothly with an offset spatula. Carefully place the second cake layer directly on top, aligning it perfectly. Repeat the piping and spreading process with the second layer of frosting, then gently place the final cake layer on top. Take a moment to ensure all layers are straight and even.
With the layers stacked, it’s time to refine the shape. Using your serrated knife, very carefully trim around the sides of the stacked cake. The goal is to remove any cake that overhangs the 8-inch board, creating perfectly flat and uniform sides. This step is critical for a professional finish. Once trimmed, remove any loose cake crumbs and apply a thin, even layer of frosting over the entire cake – top and sides. This is known as a “crumb coat,” and its purpose is to trap any loose crumbs, preventing them from mixing into your final layer of frosting. After applying the crumb coat, chill the cake in the refrigerator for at least 15-20 minutes until the frosting is firm to the touch. This firm base makes applying the final coat of frosting much smoother. Remove the chilled cake and generously spread a thick layer of the remaining Nutella frosting over the entire cake using an offset spatula. For an incredibly smooth finish, use a tall cake scraper. Hold the scraper perpendicular to the cake’s side and gently rotate the turntable, applying even pressure to scrape away excess frosting and create a pristine surface. Repeat this process for the top of the cake. You may need to apply a few coats and scrape multiple times to achieve your desired smoothness. For an even glassier finish, briefly chill the cake for 10 minutes between coats. Once the final frosting layer is applied and smoothed, return the cake to the refrigerator for another 30 minutes to firm up completely before adding the ganache drip.
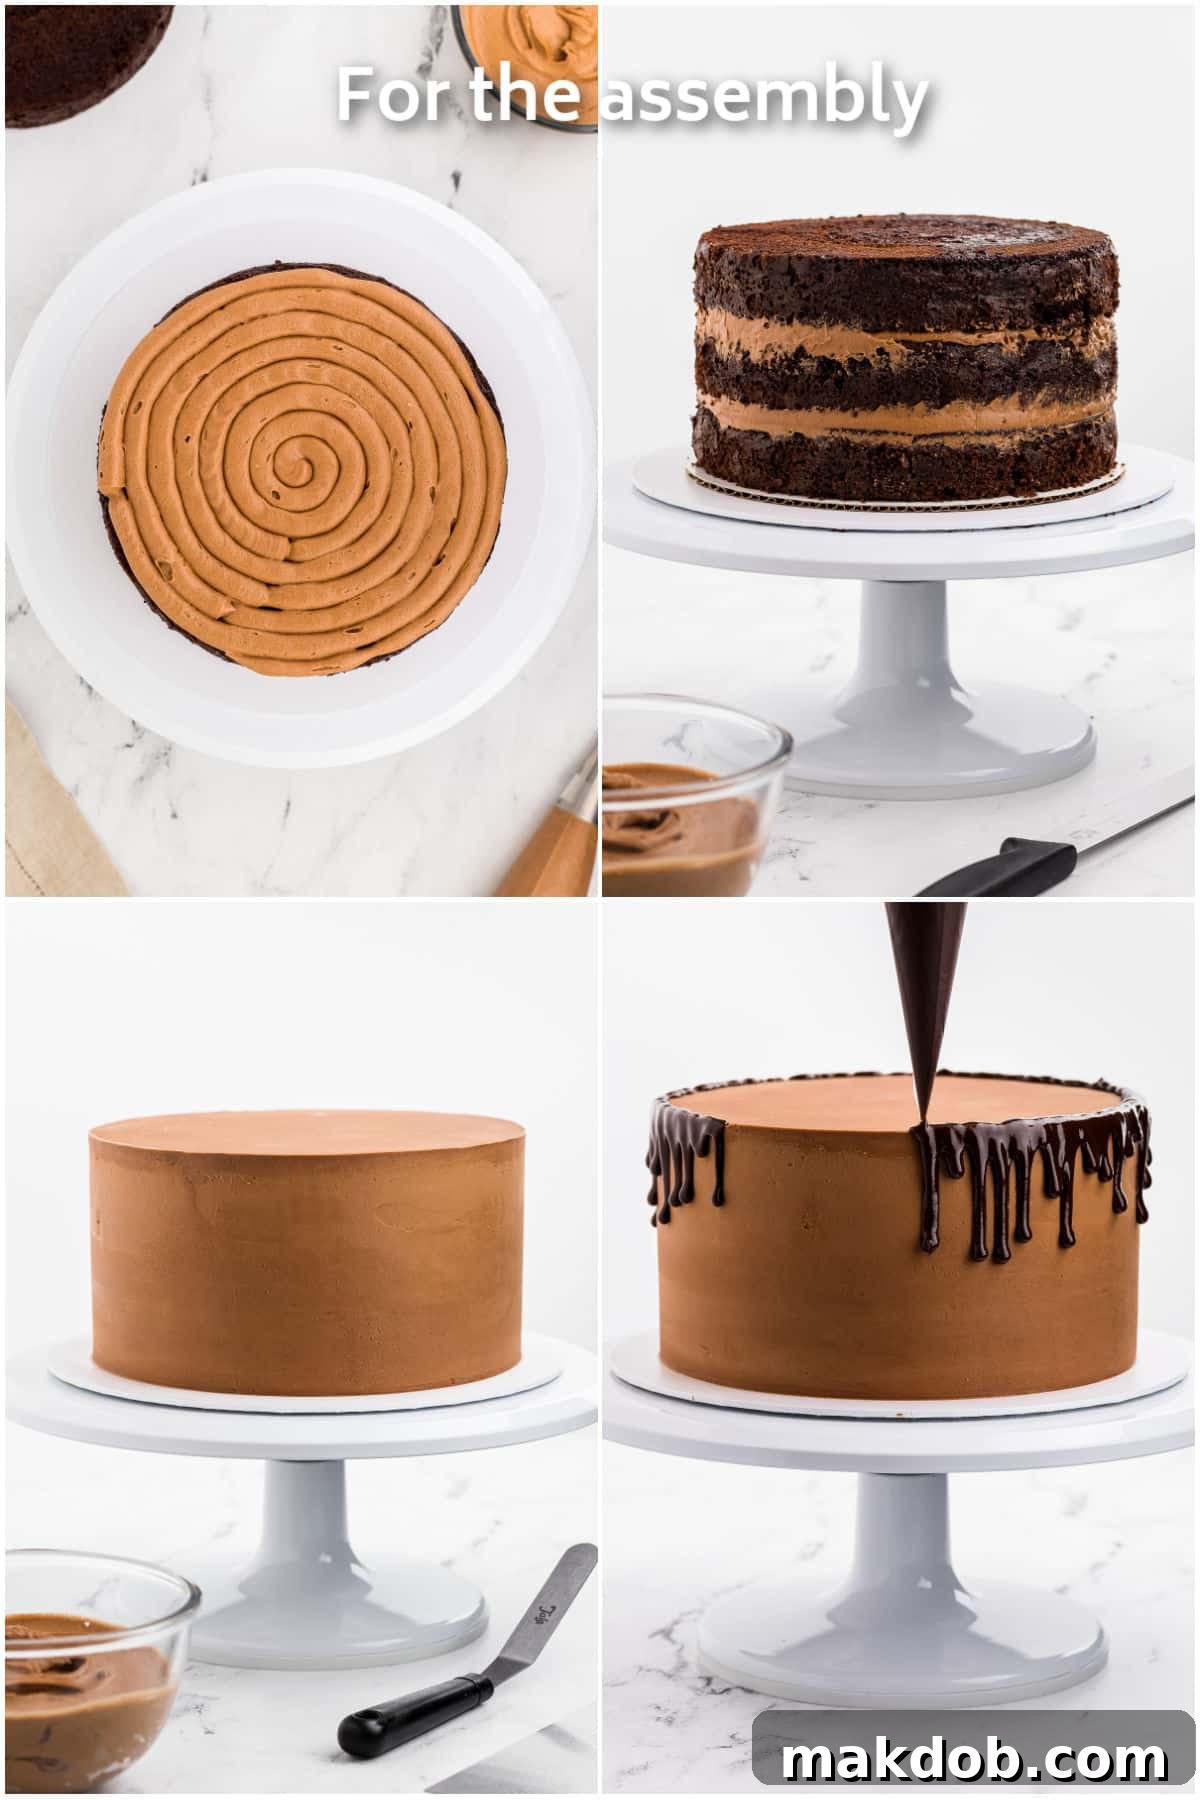
Now for the pièce de résistance: the Nutella ganache drip and final decorations. The consistency of your ganache is paramount here. Before applying it to your chilled cake, perform a quick test: place an empty cake pan upside down on your turntable. Fill a piping bag with a small amount of your reserved ganache and snip a very small hole (about 3/16ths of an inch) from the tip. Gently pipe a few drips onto the side of the inverted cake pan. You want the ganache to drip halfway down the pan, creating elegant trails. If it runs all the way to the bottom, your ganache is too runny; let it sit for a few more minutes to thicken slightly. If it barely drips, it’s too thick; gently warm it in the microwave for a few seconds (5-10 seconds) to loosen its consistency. Once you’ve achieved the perfect consistency, switch out the test pan for your chilled, frosted Nutella cake. Using the piping bag, carefully create random drips along the top edge of the cake, varying the pressure and release to achieve drips of different lengths, mimicking a natural, artistic flow. Once you’re satisfied with the drips around the sides, fill in the entire top surface of the cake with the remaining ganache, spreading it smoothly with an offset spatula. After the ganache is applied, chill the cake again for about 15 minutes to allow the ganache to set firmly. This prevents any smudging when you add the final decorative elements.
For the finishing touches, prepare to pipe beautiful frosting rosettes. To ensure even spacing, a helpful trick is to create a guide: on a piece of parchment paper, trace an 8-inch circle (the size of your cake layers) and cut it out. Fold the circle in half, then in half again, and then fold the quarter into three equal sections. When you unfold it, you should have 12 evenly spaced folds. Place this template gently on top of your set ganache and use a toothpick to make very light marks on the cake at each fold line. These will be your guides for piping. Fill another piping bag, this time fitted with a large closed star piping tip, with your leftover Nutella frosting. Practice piping a few rosettes on a spare piece of parchment paper until you feel confident. Then, pipe beautiful frosting rosettes directly onto the marked points on the top of your cake. Finally, place a decadent Ferrero Rocher chocolate on top of each frosting rosette, adding a glorious hazelnut crunch and an elegant touch. Your show-stopping Nutella cake is now complete, ready to be cut into slices and served to eager guests who will undoubtedly be mesmerized by its beauty and flavor.
Pro Tips For The Perfect Cake
- Practice Makes Perfect Piping: Before you pipe those beautiful rosettes onto your meticulously frosted cake, take a moment to practice on a piece of parchment paper. This allows you to get a feel for the piping bag and tip, ensuring your final decorations are flawless. The best part? You can simply scrape your practice rosettes back into the bowl to reuse the frosting, minimizing waste.
- Strategic Storage for Success: Preparation is key to a stress-free baking experience. The individual cake layers, the Nutella buttercream frosting, and the Nutella ganache can all be prepared in advance. Store them at room temperature overnight if you plan to assemble the cake the following day. For longer storage, they will keep beautifully for up to 3 days in the refrigerator. Once assembled, the finished Nutella cake can be stored at room temperature for up to 3 days or in the refrigerator for up to 5 days, ensuring maximum freshness. To freeze this glorious cake, wrap it tightly either whole or in individual portions and store in the freezer for up to three months. When ready to serve, defrost the cake overnight in the refrigerator before allowing it to come to room temperature for the best flavor and texture.
- Achieving a Flawless Finish: For an exceptionally smooth and polished frosting finish, leverage the power of chilling. Freezing or chilling the cake for 10-15 minutes in between frosting coats helps to firm up each layer, making subsequent applications and smoothing much easier. To achieve that coveted super smooth, almost glass-like finish, try this professional trick: heat your cake scraper in hot water, wipe it completely dry, and then quickly sweep it around the sides of the chilled cake for one final pass. The warm scraper will melt and smooth any tiny imperfections.
- The Secret to Flat Cake Layers: One of the most common challenges in cake baking is preventing domed tops. The solution lies in using cake baking strips. These clever strips, which you soak in water and wrap around the sides of your cake pans before baking, insulate the edges of the pan. This causes the cake to bake more evenly from the outside in, preventing the edges from setting too quickly and allowing the center to rise without a peak. The result is beautifully flat cake layers that are a dream to stack and frost. You can easily purchase cake strips online or find them at specialty craft or kitchen supply stores.
Baking Secrets for Flat Cake Layers
Our chocolate Nutella cake layers bake at a slightly lower temperature for a longer period of time than many traditional recipes. This extended, gentle baking process is a fundamental secret to creating wonderfully even layers without unsightly rounded tops, contributing significantly to the cake’s flawless structure and appearance.
Recipe FAQs and Troubleshooting
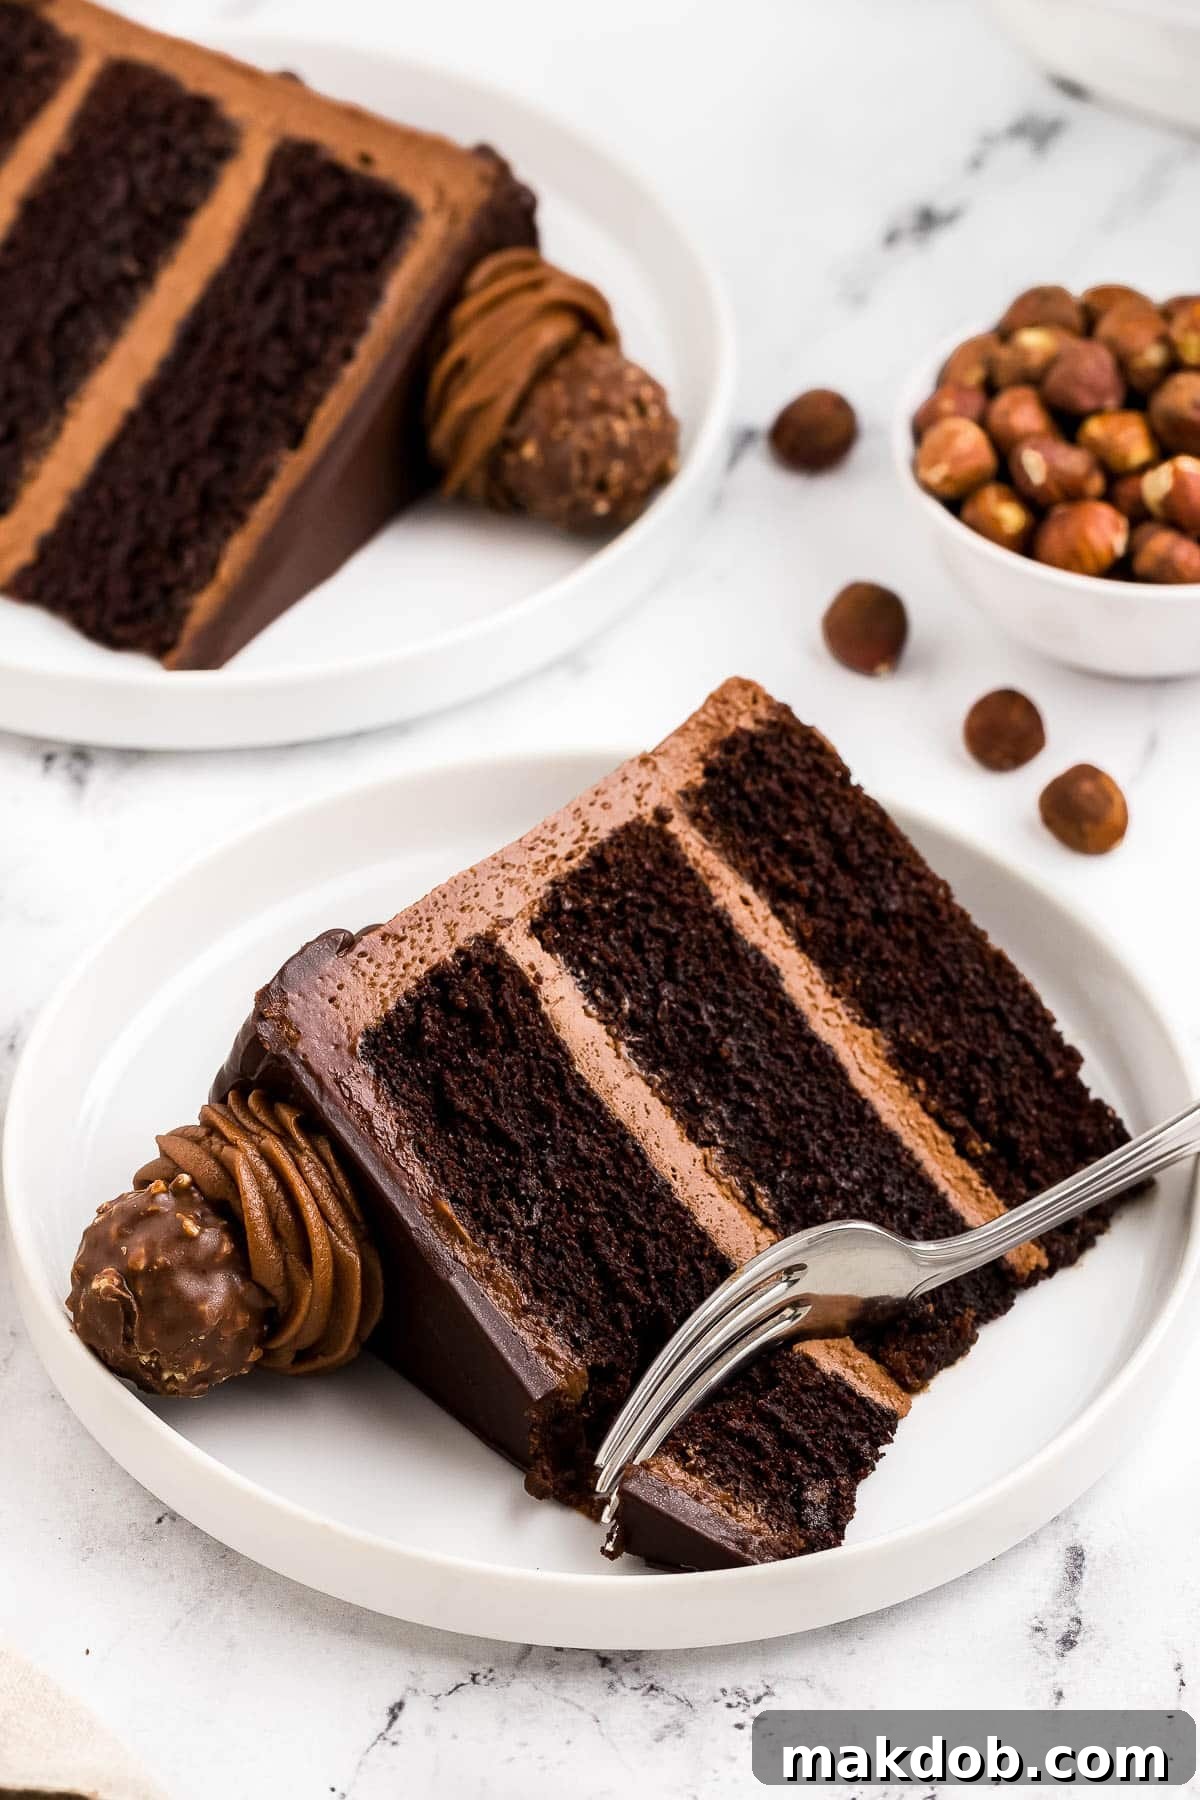
This decadent Nutella cake features three distinct layers of rich chocolate cake, each lovingly infused with the sweet, nutty flavor of Nutella. These moist cake layers are then generously enrobed in a luscious Nutella buttercream frosting, culminating in a topping of smooth, shiny Nutella-flavored ganache, creating a truly immersive chocolate hazelnut experience.
Generally, oil tends to make a cake more moist and tender, which is precisely why I’ve opted for vegetable oil in this particular Nutella cake recipe. Oil remains liquid at room temperature, contributing to a softer crumb over a longer period. While butter certainly imparts a richer flavor, it can sometimes result in a slightly drier texture in cakes, especially if not used in combination with other moisturizing ingredients. For optimal moisture in this recipe, oil is the preferred choice.
Absolutely! This Nutella cake is perfect for making in stages. The cake layers can be baked, wrapped tightly in plastic wrap, and stored at room temperature for up to 2 days, or frozen for up to 2-3 weeks. The ganache and buttercream can also be prepared ahead of time and stored in the refrigerator for up to 3 days. Simply bring the frosting and ganache to room temperature and re-whip the frosting briefly before assembly. Assembled and frosted, the cake can be kept at room temperature for 3 days or refrigerated for 5 days.
Achieving the perfect ganache consistency for dripping is crucial. If your ganache is too thick, place the bowl over a saucepan of simmering water (creating a double boiler) and stir gently until it loosens to a thick syrup-like consistency. Alternatively, microwave in 5-second bursts, stirring well after each. If it’s too thin, allow it to cool at room temperature, stirring occasionally, until it thickens. You can even place it in the refrigerator for 5-10 minute intervals, stirring frequently, until the desired consistency is reached. Always test on an inverted cake pan before applying to your actual cake!
While the recipe is optimized for best results, some substitutions are possible. For buttermilk, you can make a DIY version by adding 1 tablespoon of white vinegar or lemon juice to a measuring cup, then filling the rest with regular milk until it reaches 1⅓ cups. Let it sit for 5-10 minutes until it curdles. For cocoa powder, Dutch-processed is recommended for depth of color and flavor, but natural unsweetened cocoa powder can also be used. For Nutella, while it’s the star, a high-quality chocolate hazelnut spread could be a substitute, but the flavor profile may vary slightly.
FOLLOW ME
Your family and friends will undoubtedly be so impressed by this beautiful, rich, and utterly delicious Nutella cake recipe. It’s more than just a dessert; it’s a memorable culinary experience, perfect for celebrating life’s sweetest moments!
More Irresistible Dessert Recipes
Nutella Cookies
25 mins
Chocolate Chip Cupcakes
35 mins
Chocolate Pudding Cake
45 mins
Chocolate Hazelnut Cupcakes
50 mins
Chocolate Coconut Cake
50 mins
Share Your Nutella Cake Masterpiece
Did you love this recipe? Please consider leaving a 5-star 🌟🌟🌟🌟🌟 rating in the recipe card below and a thoughtful review in the comments section further down the page. Your feedback helps fellow bakers!
Nutella Cake
Pin
Time
Equipment
-
3 cake pan strips
-
3 8 inch cake pans
-
stand mixer or electric hand mixer
-
10 inch cake board
-
8 inch cake board
-
cake turntable
-
cake scraper
-
piping bags
-
large round piping tip
-
large closed star piping tip
Ingredients
For the cake
- 2⅔ cups all purpose flour
- 1 cup unsweetened cocoa powder
- 2½ teaspoons baking soda
- 1½ teaspoons baking powder
- ¾ teaspoon salt
- 2⅓ cups granulated sugar
- 1⅓ cups buttermilk
- ½ cup vegetable oil
- ⅓ Nutella
- 2½ teaspoons instant coffee dissolved in 1⅓ cups hot water
- 2 large eggs
- 2 teaspoons vanilla extract
- cooking spray
For the Nutella ganache
- 1¾ cup semisweet chocolate chopped
- 1¼ cups heavy whipping cream
- ⅔ cup Nutella
For the frosting
- 1 pound butter
- 7 cups powdered sugar sifted
- 2 teaspoons vanilla extract
- 1½ cups Nutella ganache
For the garnish
- 12 Ferrero Rocher chocolates
Instructions
For the cake
-
Preheat the oven to 325 degrees F and prepare the baking strips by soaking them in water.
-
Spray three 8-inch round cake pans with cooking spray. Line the base of the pans with a circle of parchment paper and line the sides with a thin strip of parchment.
-
Combine the dry ingredients by sifting the flour, cocoa, baking soda, baking powder and salt into a large bowl then stir in the sugar.
-
In a separate bowl combine the wet ingredients. Whisk together the buttermilk, vegetable oil, Nutella, diluted coffee, eggs, and vanilla extract.
-
Gradually pour the wet mixture into the dry mixture while mixing continuously to prevent any lumps forming. The batter will be quite runny.
-
Pour the batter evenly between the three pans.
-
Bake the cakes for 60-70 minutes. Check the cakes after 60 minutes by inserting a toothpick into the center. If it comes out clean or with a few crumbs attached remove the cakes from the oven. If the batter is still wet, bake for a further 5-10 minutes before retesting.
-
Transfer the cakes to a cooling rack and remove the baking strips. Allow them to cool in the pans for 15minutes, then carefully invert them onto the cooling rack and remove the parchment paper.
-
Allow the cakes to cool completely before wrapping them in plastic wrap.
-
Set them aside to assemble the next day or if you are assembling the cake the same day, pop them into the freezer for 30 minutes before you prepare them for stacking.
For the Nutella ganache
-
Place the chopped chocolate into a large bowl.
-
Pour the cream into a small saucepan and stir over a medium heat. Heat until it reaches 185°F or until it starts to bubble around the edges.
-
Turn off the heat and pour the hot cream over the chocolate. Let it sit for 10 minutes to allow the cream to melt the chocolate. This step will also help to prevent the ganache becoming grainy.
-
To create a smooth ganache, start whisking the cream and chocolate together in the center of the bowl. Once the ganache starts to form, whisk in the remaining cream and chocolate from the sides of the bowl.
-
Add the Nutella and mix until smooth and shiny.
-
Set 1 1/2 cups aside for the frosting and pour the remainder into a heatproof bowl for the drip design on the cake. The ganache will thicken as it cools.
For the frosting
-
In a large mixing bowl, beat the butter until smooth.
-
Slowly mix in 1-2 cups of powdered sugar and the vanilla extract.
-
Add the remaining powdered sugar 1 cup at a time, mixing slowly until it is all combined. Beat faster for 2-3 minutes until it is light and fluffy.
-
Mix in the reserved 1 1/2 cups of the Nutella ganache until combined. If the ganache has become too firm, rewarm in short bursts in the microwave until it has softened.
For assembly
-
Use a large, serrated knife to trim off the tops of the cakes. Each layer should be approximately 1¼ inch thick.
-
On a cake turntable, secure an 8-inch cake board onto a 10-inch cake board with a little frosting.
-
Secure the first cake layer onto the board with a little more frosting.
-
Place a large round tip into a piping bag and half fill with the Nutella frosting. Pipe a layer of frosting onto the cake layer. Repeat this process with the second layer and top with the third layer.
-
Use a large, serrated knife to trim around the sides of the cake. Trim away any cake that overhangs the 8-inchboard to create flat sides. This will help to create a smooth covering of frosting.
-
Remove the offcuts and spread a thin layer of frosting all over the cake to create a crumb coat. Chill the cake in the refrigerator for 15 minutes until set.
-
Using an off-set spatula, liberally spread a thick layer of frosting over the cake. Scrape the top and around the sides with a tall cake scraper to create a smooth finish. You may need to apply a few coats to get a smooth finish. Freezing or chilling the cake for 10 minutes in between coats also helps to achieve a smooth finish.
-
To create a super smooth finish, heat the scraper in hot water and dry before sweeping it around the sides for a final time.
-
To firm up the frosting before adding the drip, chill the cake in the refrigerator for 30 minutes.
For the Nutella ganache drip
-
If the ganache has started to harden, rewarm it in short bursts in the microwave or over a pan of simmering water until it is the consistency of thick syrup.
-
To test the consistency, place a cake tin upside down onto the turntable.
-
Fill a piping bag a third full of the ganache and cut 3/16ths of an inch off the end.
-
Hold the piping bag above the edge of the cake tin and squeeze gently, then firmly in intervals to create different size drips down the side of the tin as you turn the turntable. If the drips stops a third to halfway down it is ready to use. If they run all the way down it is too runny so wait a few minutes before trying again. If it doesn’t drip, then scrape the ganache out of the piping bag and warm again to make it runnier.
-
Swap out the cake tin for the cake and create random drips around the top edge of the cake.
-
Fill in the top with the remaining ganache, spreading it out with the off-set spatula.
-
Chill the cake for 15 minutesto set the top before piping the rosettes.
For the decorations
-
On a piece of parchment paper, draw around an 8-inch round board to create a circle and cut it out.
-
Fold the circle in half, then half again, then fold the quarter into three. Open it out, it should have 12 folds.
-
Place the circle on top of the cake and use a toothpick to mark the cake at each fold. These are your guide points for piping the rosettes.
-
Place a closed star tip into a piping bag and half fill the bag with the remaining frosting.
-
Pipe frosting rosettes onto the marked points on the cake.
-
Top each rosette with a Ferrero Rocher chocolate, then cut into slices and serve.
Notes
- Baking cakes at low temperatures and using baking strips helps to create even layers and prevents them from getting rounded tops.
- The cake layers, frosting and ganache can be stored at room temperature overnight before assembling the cake the following day or for 3 days in the refrigerator. The finished cake can be stored for 3 days at room temperature or 5 days in the refrigerator. To freeze, wrap the cake whole or in individual portions and store in the freezer for up to three months. Defrost in the refrigerator overnight before bringing to room temperature to serve.