
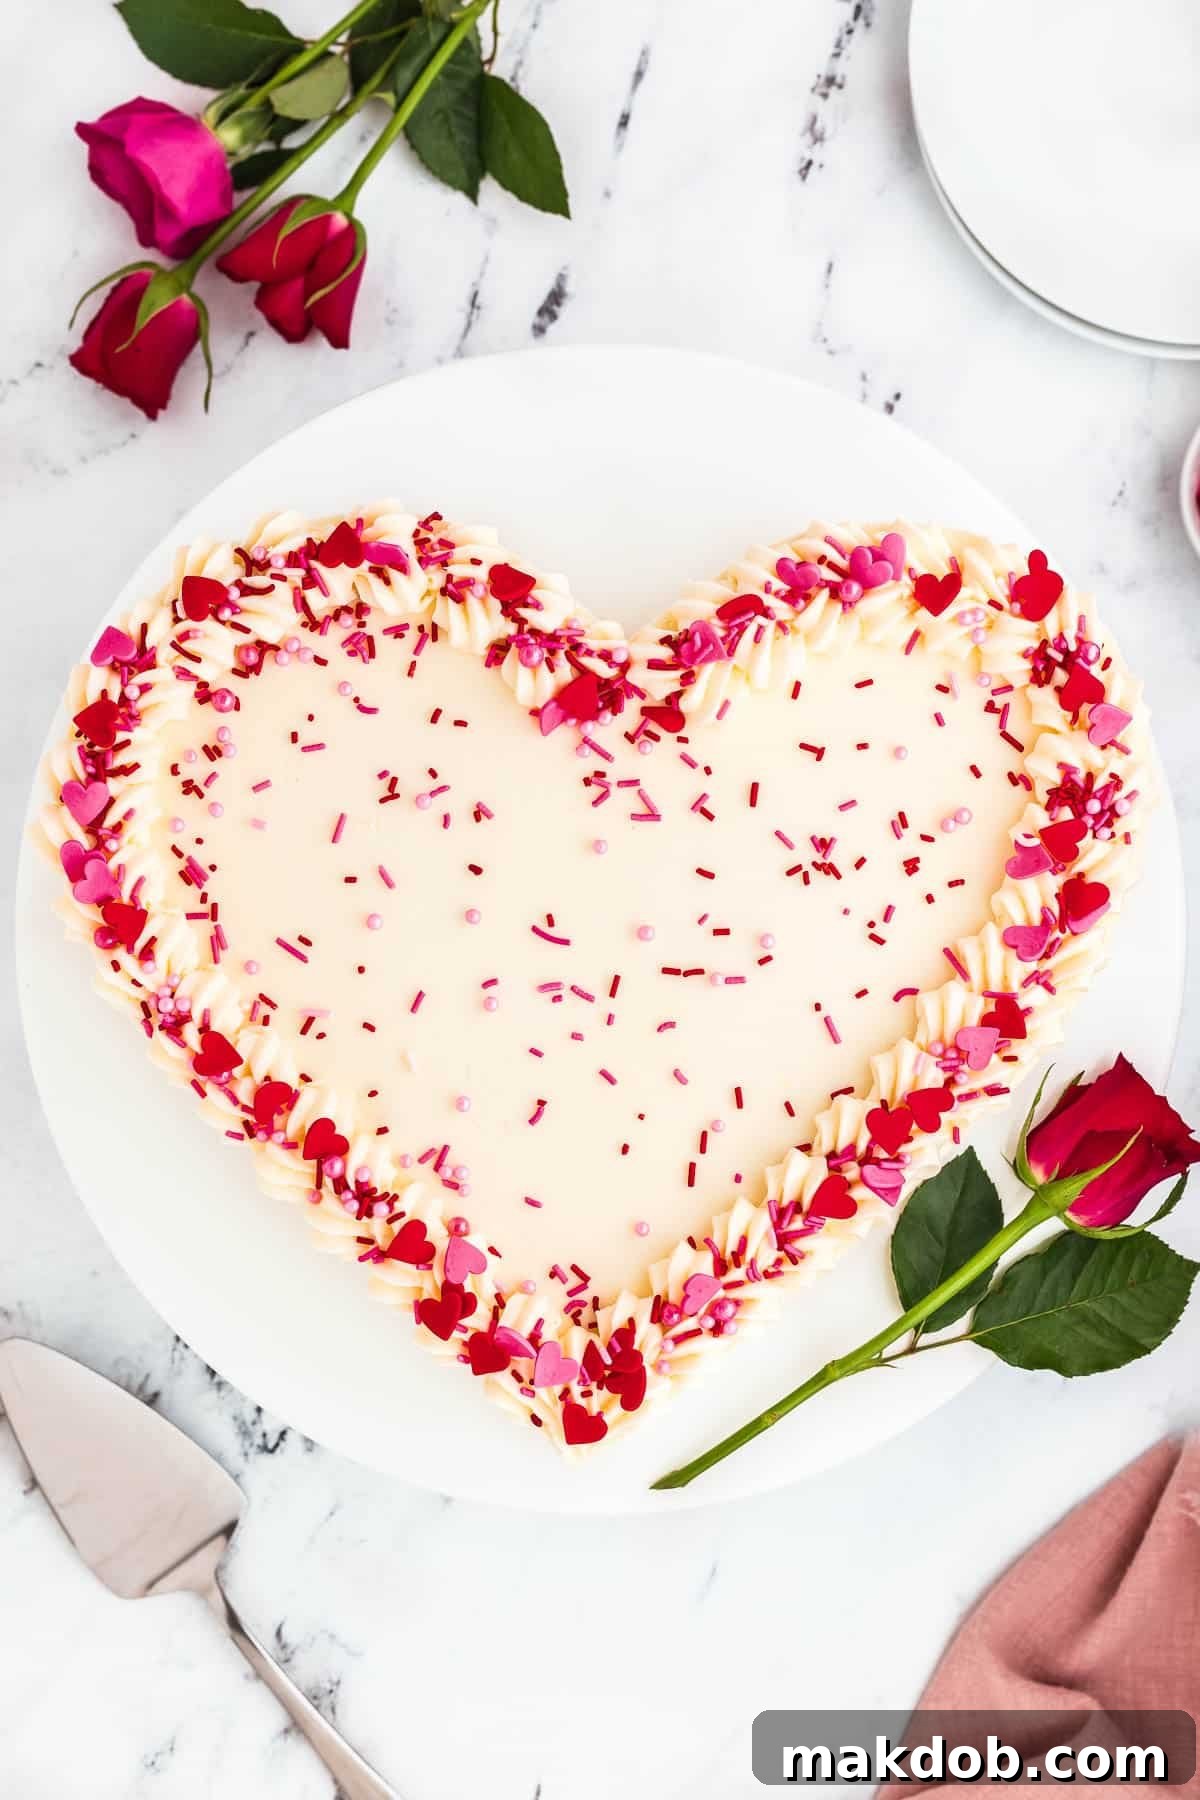
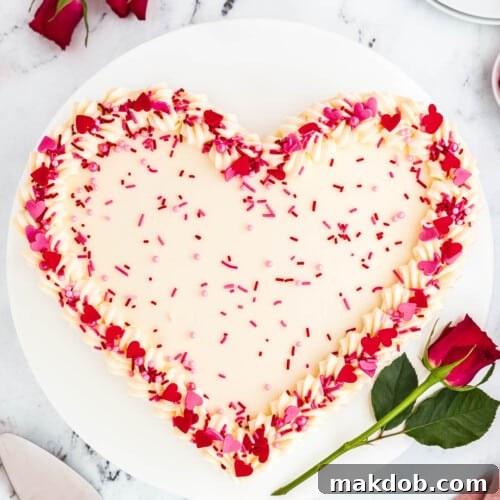
Embodying love and celebration, this exquisite **Red Velvet Heart Cake** is more than just a dessert; it’s a heartfelt statement. Shaped gracefully like a heart, this rich red velvet masterpiece is generously crowned with luscious cream cheese frosting and a scattering of festive sprinkles. It’s an effortlessly elegant treat, truly perfect for Valentine’s Day or any occasion where you want to show someone special how much you care.
When the season calls for a touch of romance and joy, especially around Valentine’s Day, my kitchen turns into a hub of festive dessert recipes. While I adore making heart cookies, red velvet brownies, chocolate covered cherries, black forest cupcakes, and chocolate fondue, this beautiful heart cake always stands out. Its vibrant color and classic flavor make it an irresistible centerpiece.
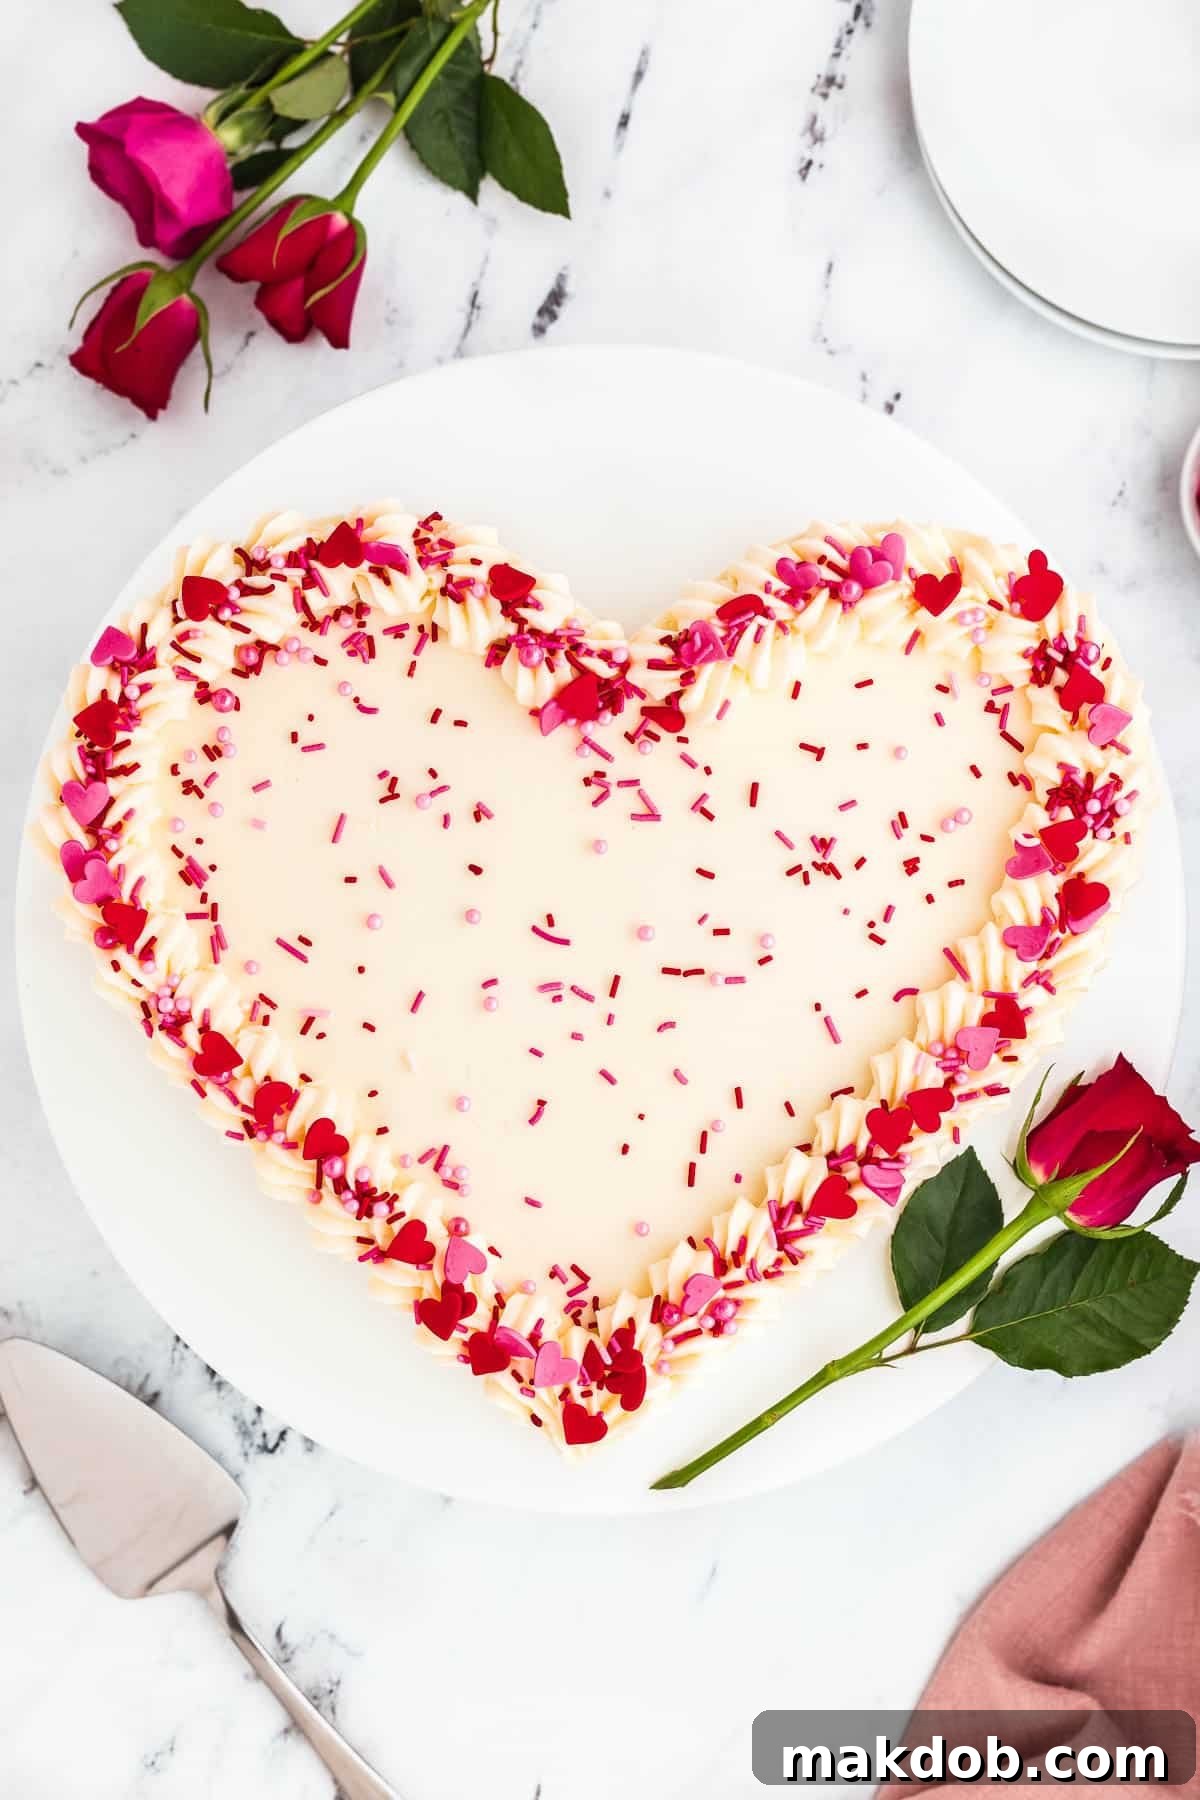
There’s an undeniable charm in presenting a dessert shaped like a heart – it’s a universal symbol of affection and appreciation. This particular recipe offers a wonderful advantage: you don’t need to invest in a specialized heart-shaped cake pan! Our detailed tutorial guides you through the simple process of transforming ordinary round cake layers into a perfectly sculpted heart, making this elegant dessert accessible to every home baker. Prepare to impress your loved ones with this stunning, homemade heart cake.
Table of Contents
- Heart Cake Ingredients
- How Do You Make A Heart Cake?
- For The Cake
- For The Frosting
- For The Heart Shape
- For The Decorating
- Tips For The Perfect Cake
- Quick Tip
- Recipe FAQs
- Flavor Variations
- More Dessert Recipes
- Love This Recipe?
- Heart Cake Recipe
Essential Heart Cake Ingredients
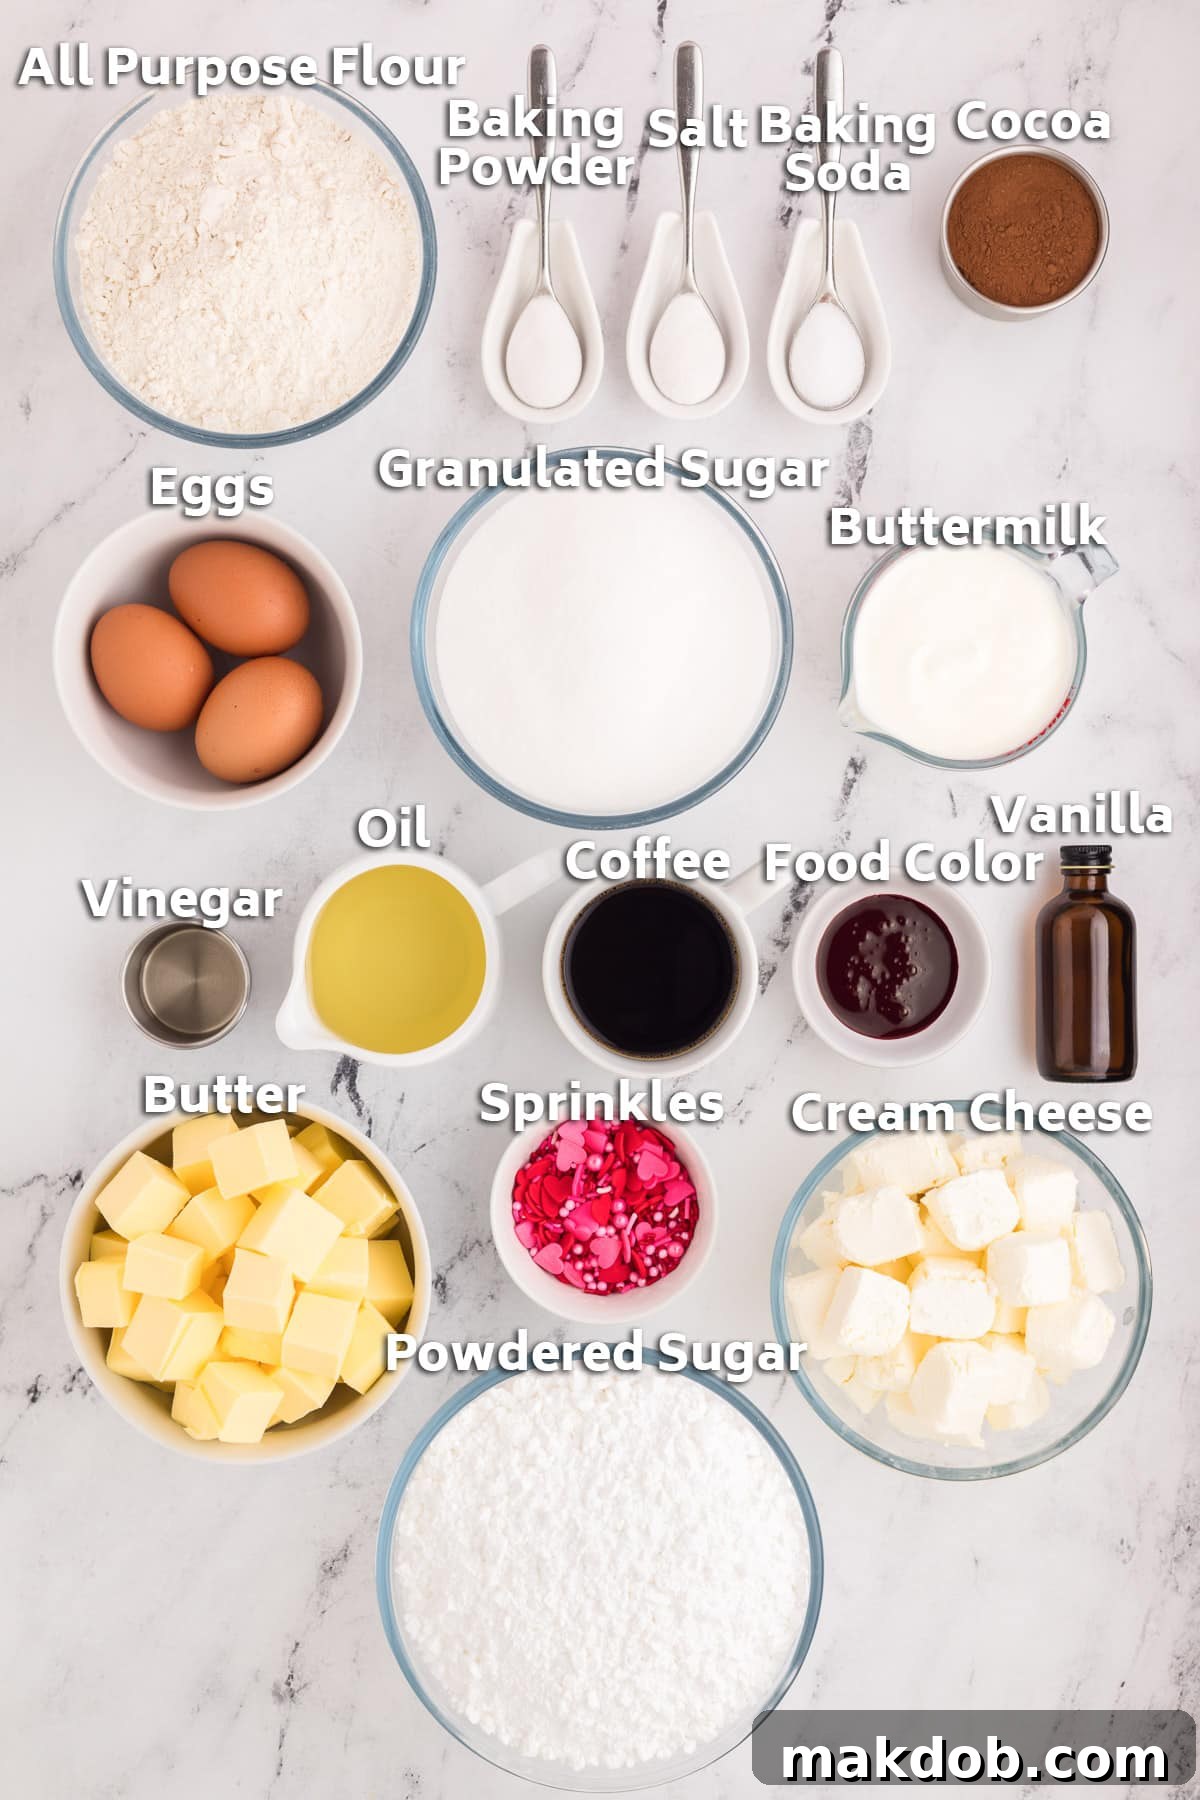
Crafting this delightful red velvet heart cake requires a thoughtful selection of both dry and wet ingredients. For the cake layers, you will need classic pantry staples such as all-purpose flour, rich cocoa powder (which gives red velvet its unique depth, not just color), baking soda and baking powder for perfect leavening, and a pinch of salt to balance the flavors. Granulated sugar provides sweetness and moisture. The wet ingredients include tangy buttermilk, vegetable oil for a tender crumb, large eggs for structure, pure vanilla extract for aroma, white vinegar (which reacts with baking soda to create lift and the signature red velvet tang), and a touch of instant coffee dissolved in hot water to enhance the cocoa flavor without making the cake taste like coffee. Finally, a generous amount of red gel food coloring is crucial for that iconic vibrant hue. For the decadent cream cheese frosting, gather softened unsalted butter, powdered sugar, smooth cream cheese, and more vanilla extract. Don’t forget your favorite sprinkles for a festive finish!
How Do You Make A Heart Cake? A Step-by-Step Guide
For The Cake: Crafting Perfect Red Velvet Layers
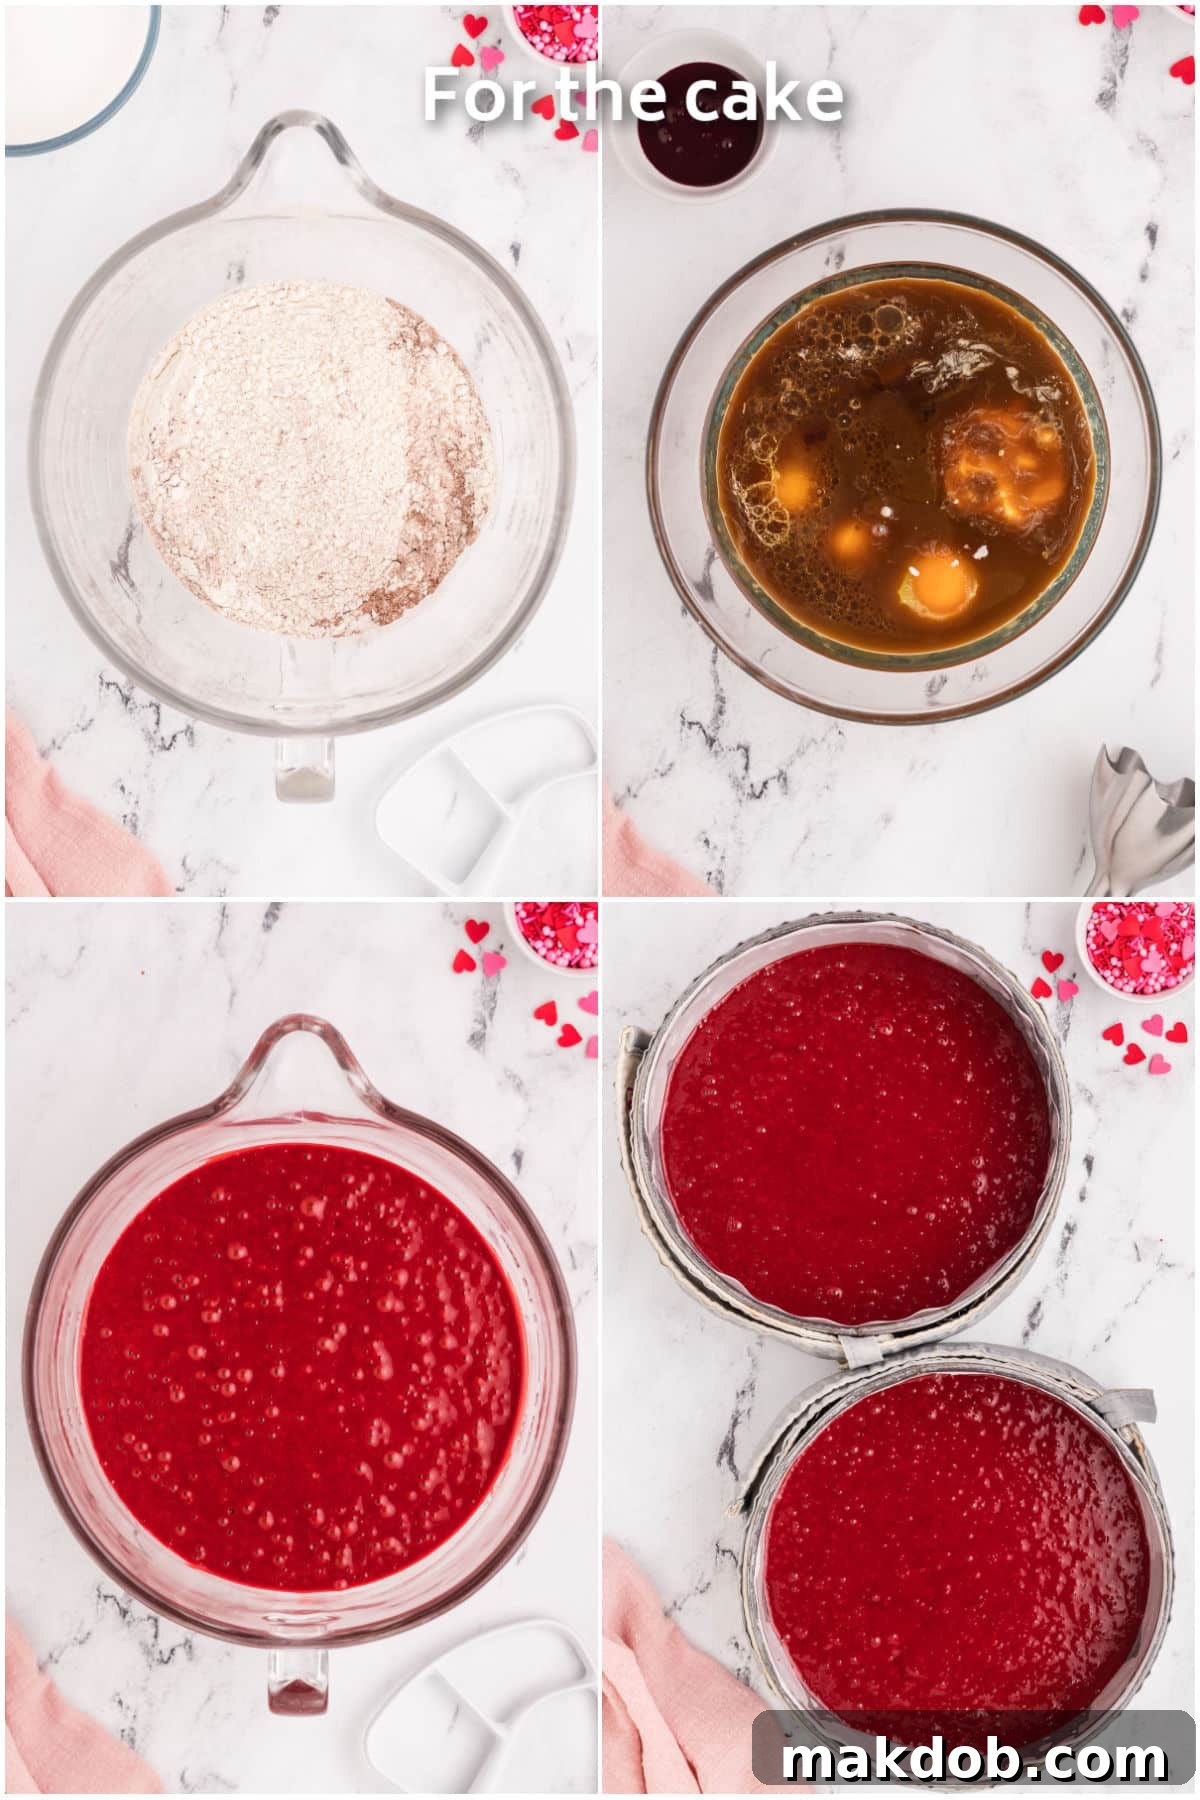
The journey to a perfect heart cake begins with impeccably baked red velvet layers. First, preheat your oven to 325 degrees F (160°C) and meticulously prepare two 9-inch round cake pans by coating them with cooking spray, then lining the bottoms and sides with parchment paper. This meticulous preparation prevents sticking and ensures your cakes release beautifully. To achieve wonderfully flat cake tops, remember to soak your cake baking strips in water; these strips will be wrapped around the pans after the batter is added, promoting even baking. In the large bowl of your stand mixer, sift together the dry ingredients: all-purpose flour, cocoa powder, baking powder, baking soda, and salt. Sifting is key for a light, airy texture. Stir in the granulated sugar until well combined. In a separate, large bowl, whisk together the wet ingredients: buttermilk, vegetable oil, eggs, vanilla extract, white vinegar, the instant coffee diluted in water, and the red food coloring. For a truly vibrant red, consider using a high-quality gel food coloring. With your mixer on low speed, gradually incorporate the wet ingredients into the dry. Mix only until just combined; overmixing can lead to a tough cake. Divide the vibrantly red batter evenly between your prepared pans – a kitchen scale can help ensure identical layers. Secure the damp baking strips around the pans and bake until a toothpick inserted into the center comes out clean. Allow the cakes to cool in their pans for about 20 minutes before inverting them onto a wire rack to cool completely. Patience during cooling is paramount for proper structure.
For The Frosting: Velvety Cream Cheese Perfection
While your cake layers are cooling to room temperature, it’s the perfect time to prepare the star of the show: the silky smooth cream cheese frosting. In the bowl of your stand mixer, combine the softened unsalted butter and vanilla extract. Cream these together on medium speed until the mixture is light, fluffy, and pale, typically for 1-2 minutes. This step incorporates air, making the frosting wonderfully soft. Next, reduce the mixer speed to low and gradually add the powdered sugar, one cup at a time, ensuring each addition is fully blended before adding the next. This prevents a sugar cloud and helps achieve a uniform consistency. In a separate, smaller bowl, beat your softened cream cheese until it is completely smooth and lump-free. This extra step is crucial to avoid any undesirable cream cheese lumps in your final frosting. Once smooth, add the beaten cream cheese to the butter and sugar mixture. Beat on medium-low speed until the frosting is fully combined, smooth, and beautifully creamy. Be careful not to overbeat the cream cheese, as this can make it too soft. Once prepared, set aside about 1½ cups of this delightful frosting in a separate bowl; this will be used for piping the decorative border later.
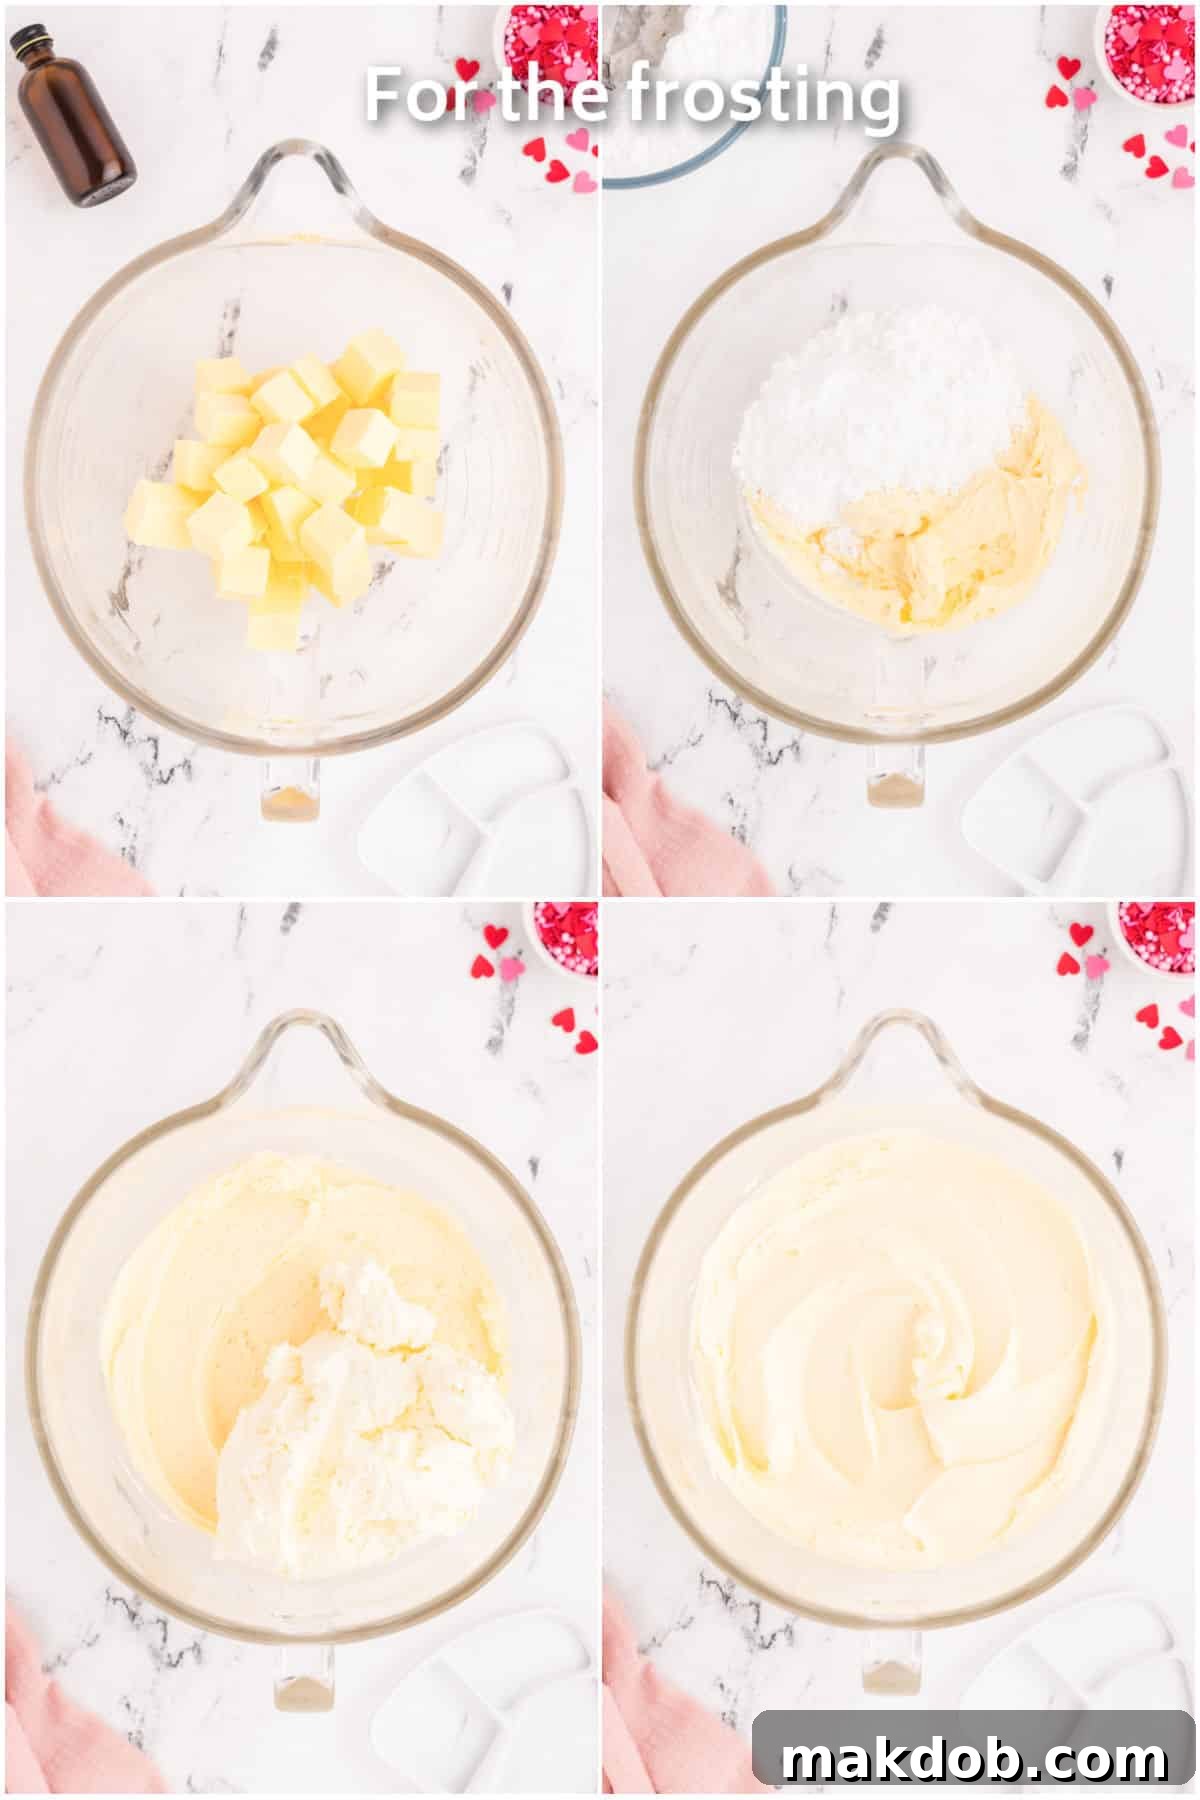
For The Heart Shape: Ingenious Cake Transformation
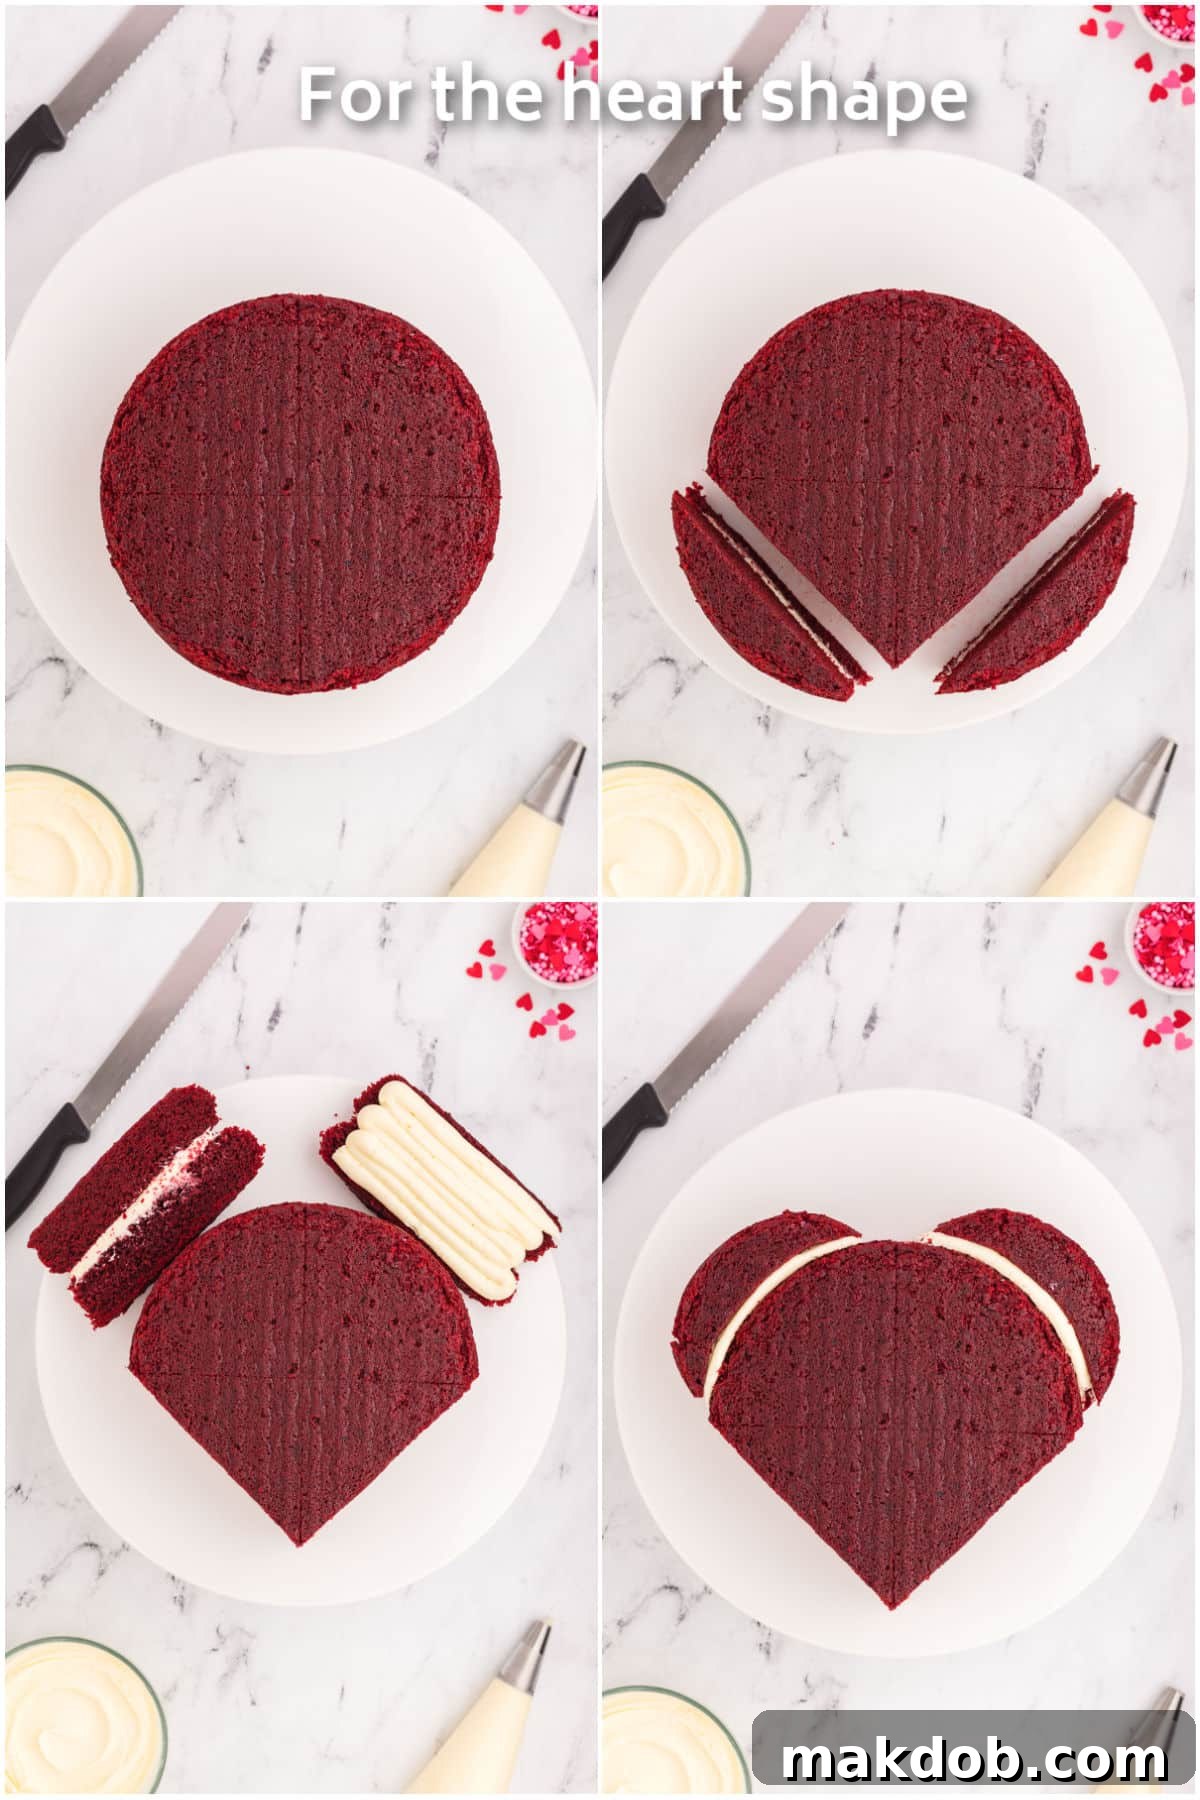
Now comes the magical part: transforming your round cakes into a perfect heart! First, using a large, serrated knife or a specialized cake leveler, carefully trim the domed tops off your cooled cake layers to create perfectly flat and even surfaces. This ensures a stable and beautiful cake. Place one of the trimmed cake layers onto your chosen cake stand or serving plate, positioning it slightly closer to the bottom edge. Using a medium round piping tip, pipe a thin, even layer of your delicious cream cheese frosting over this first cake layer. Carefully place the second trimmed cake layer directly on top. To create the iconic heart shape without a special pan, use your serrated knife to lightly score a cross shape on the top surface of the assembled round cake. This will serve as your guide. Now, for the critical cuts: from each bottom point of the scored cross, cut a wedge diagonally upwards to the horizontal point of the cross. You will now have two small triangular wedges. Turn these cut wedges on their sides, so the cut portion faces outward. Pipe a generous amount of frosting onto the cut sides of these wedges. Carefully attach each frosted wedge to the top rounded part of the main cake, effectively forming the two “humps” of the heart shape. For an even more defined heart, you can gently cut a small ‘V’ shape into the center where the two wedges meet. Once your heart shape is complete, apply a thin, even layer of frosting all over the entire cake – this is known as a crumb coat. This essential step traps any loose crumbs, ensuring a smooth, pristine final frosting layer. Chill the cake in the refrigerator for at least 30 minutes to firm up the crumb coat.
For The Decorating: The Finishing Touches
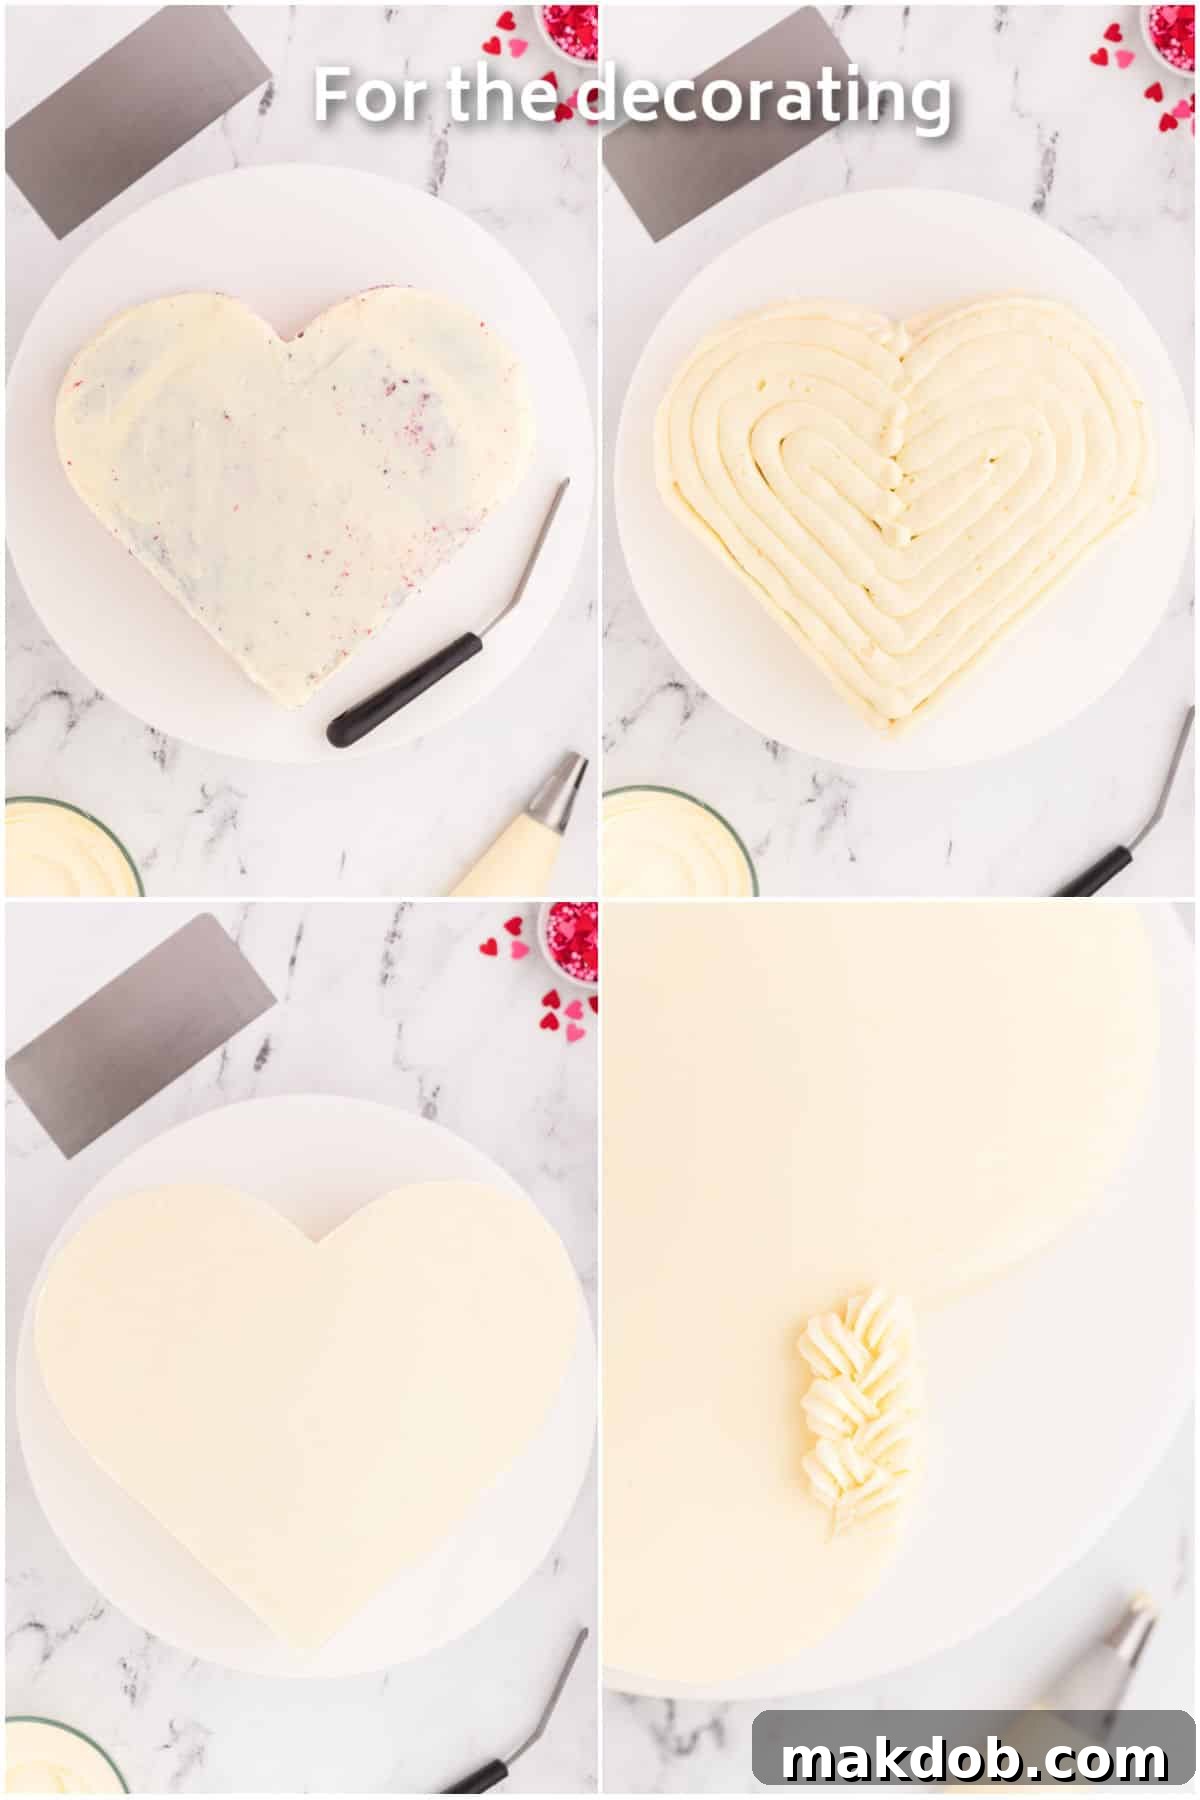
With the crumb coat chilled and firm, it’s time to bring your heart cake to its beautiful completion. Apply the remaining cream cheese frosting generously over the entire cake, covering both the top and sides. For a professional, smooth finish, use a cake scraper to evenly distribute and smooth out the frosting. If you prefer a more rustic or textured look, an offset spatula can be used to create swirls or peaks. Retrieve the 1½ cups of reserved frosting and transfer it to a piping bag fitted with a large star tip. This will create an elegant border. To pipe the border, start at one of the top “humps” of the heart. Pipe a small bulb of frosting and gently ease the nozzle back diagonally to form a delicate tail. Position the nozzle slightly lower than the first bulb and repeat the process, ensuring each new bulb just touches the previous one. Continue this pattern around the entire top edge of the heart cake, creating a beautiful, continuous piped border. Finally, scatter your chosen sprinkles over the top of the cake, letting them cascade down the sides for a truly celebratory effect. Once decorated, your impressive red velvet heart cake is ready to be served and enjoyed!
Expert Tips for the Perfect Heart Cake
- **Sprinkle Selection:** Don’t limit yourself! While red and pink hearts, pearls, and jimmies are classic for Valentine’s Day, feel free to use any sprinkles you like to match your occasion or preference. Consider gold edible glitter for an opulent touch or chocolate shavings for added richness.
- **Achieving a Smooth Frosting Finish:** Consistent chilling is your secret weapon. Chilling the cake in the refrigerator or freezer at various stages – especially after the crumb coat – will help the frosting set, making it much easier to create a **smooth, flawless final coat of frosting**. If a textured finish is more your style, an offset spatula can effortlessly create elegant swirls.
- **The Magic of a Crumb Coat:** Never skip the crumb coat! This thin initial layer of frosting is crucial as it effectively traps any loose cake crumbs, preventing them from mixing into your pristine final layer of frosting. It also provides a stable, firm base, making the subsequent application of frosting much easier and smoother.
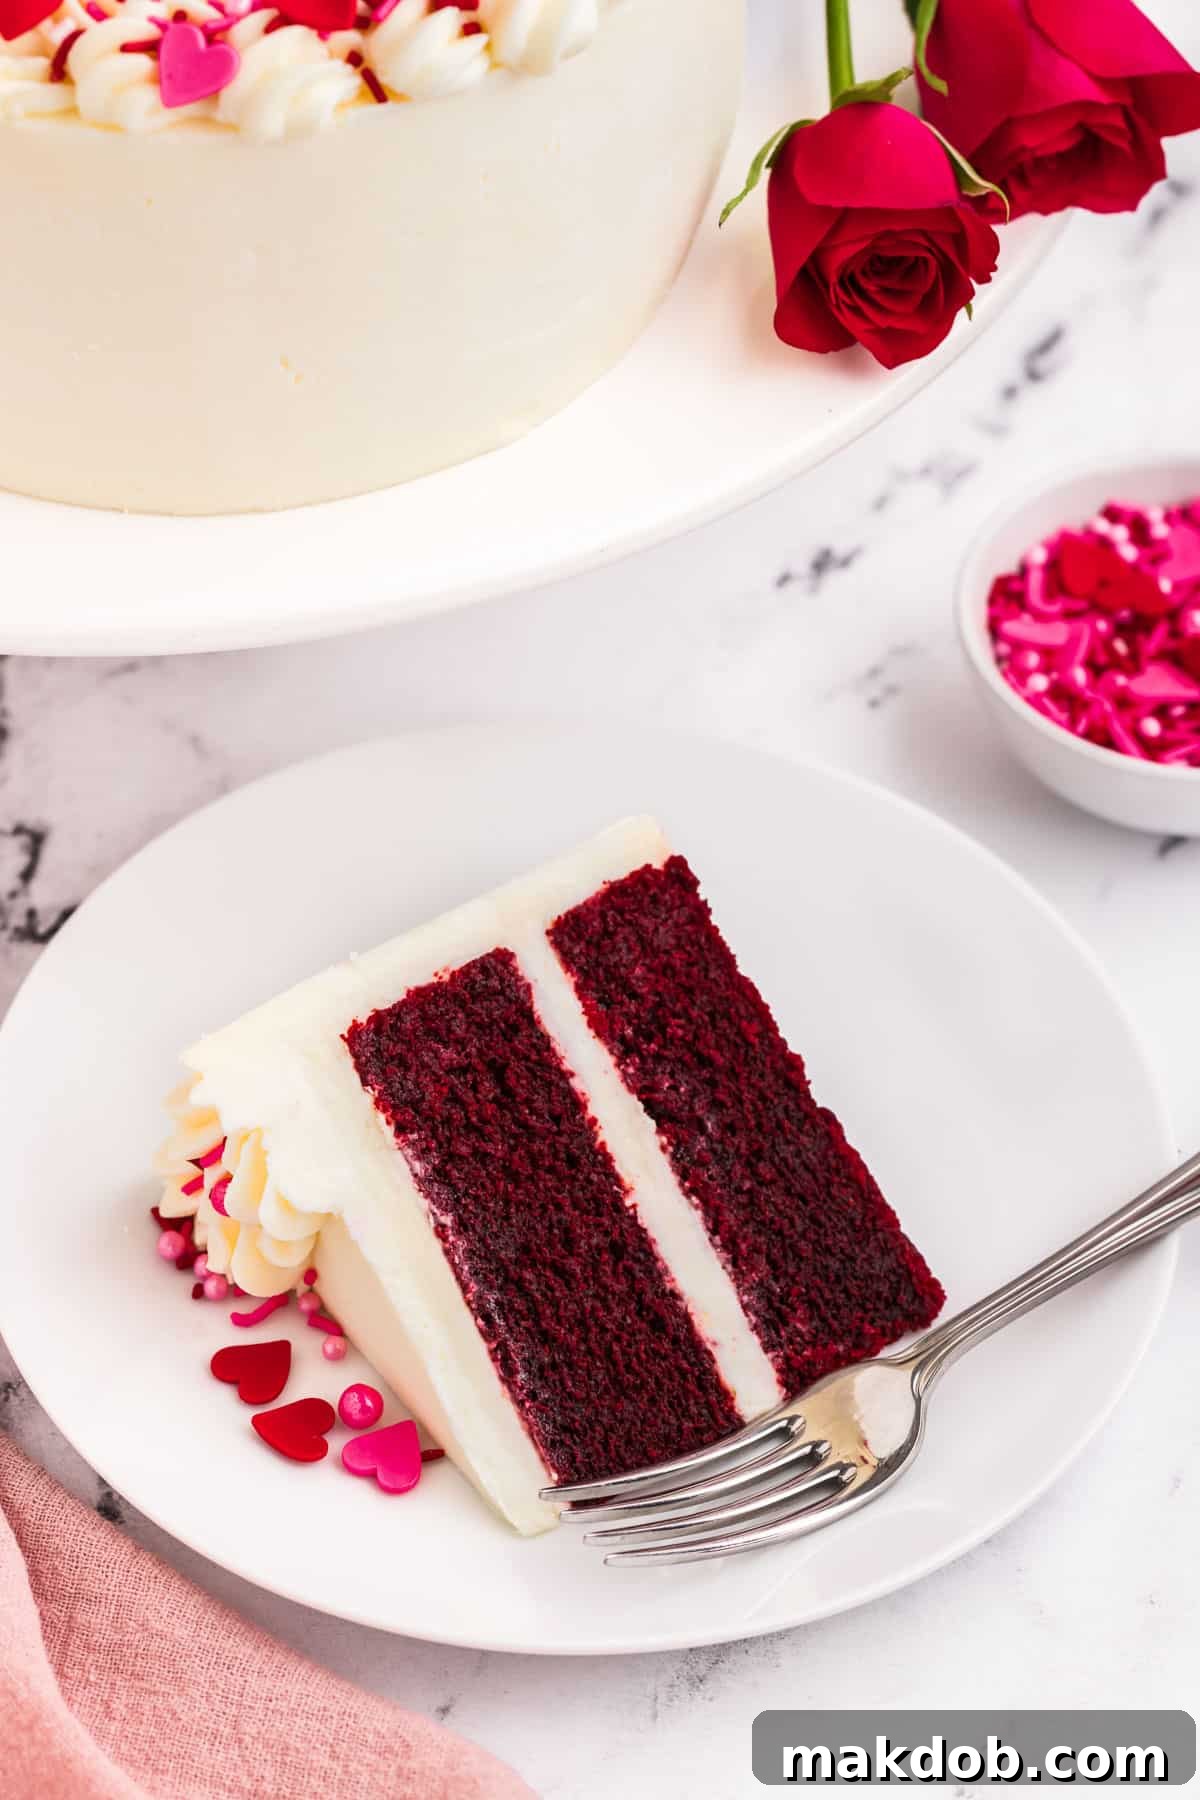
- **Serving and Storage:** Because the delectable cream cheese frosting contains dairy, it’s vital to keep the cake refrigerated. It will stay fresh for **up to 3 days**. For the best flavor and texture, allow the cake to come to room temperature for one to two hours before serving. This softens the frosting and enhances the cake’s moistness.
- **Lump-Free Frosting:** To ensure your cream cheese frosting is luxuriously smooth, always beat the cream cheese thoroughly in a separate bowl until it’s completely free of lumps before incorporating it into the butter and powdered sugar mixture. This simple step makes a significant difference.
- **Even Cake Layers:** For a professional-looking cake with consistent layers, use a **kitchen scale** to accurately measure and divide your batter evenly between the two cake pans. This prevents one layer from being thicker than the other.
- **Efficient Mixing:** While a whisk works fine for combining wet ingredients, a hand blender can make the task even quicker and ensure a perfectly homogenous mixture for your batter.
- **Accentuate the Heart Shape:** After attaching the cake wedges to form the top of the heart, consider cutting a small ‘V’ shape in the center, between the two rounded mounds. This small detail can further **accentuate the heart shape**, making it even more pronounced and charming.
- **Ingredient Temperature:** Ensure butter, cream cheese, and eggs are at room temperature. This allows them to cream together smoothly and incorporate evenly into the batter and frosting, resulting in a superior texture.
- **Don’t Overmix:** When combining wet and dry ingredients for the cake, mix only until just incorporated. Overmixing develops gluten, which can lead to a dense, tough cake.
Quick Tip: Achieve Flat Cake Tops Effortlessly
For beautifully level cake layers every time, I highly recommend using cake baking strips. These ingenious strips wrap around the outside of your cake pans and are soaked in water before baking. They insulate the pan, allowing the cake to bake more evenly from the edges to the center, which helps to create flat top cakes that are much easier to stack and decorate without excessive trimming.
Recipe FAQs: Your Heart Cake Questions Answered
It’s surprisingly simple! Start with two evenly baked round cake layers. First, stack them with a layer of frosting in between. Then, score a cross on the top of the cake to guide your cuts. From the bottom point of the cross, cut two wedges diagonally to the horizontal points on each side. These two wedges are then rotated and attached to the top rounded part of the main cake with frosting, forming the distinct humps of a heart. This clever technique allows you to achieve a perfect heart shape using standard round pans.
Red velvet cake is renowned for its unique and subtle flavor profile, which beautifully bridges the gap between vanilla and chocolate. It incorporates cocoa powder, but in a significantly smaller quantity than a traditional chocolate cake, resulting in a milder, delicate chocolate hint. The addition of buttermilk and vinegar contributes a slight tanginess, which, when combined with vanilla and cocoa, creates its signature nuanced taste. The moist, tender crumb is also a defining characteristic, often perfectly complemented by a rich cream cheese frosting.
Absolutely! The cake layers can be baked 1-2 days ahead of time, wrapped tightly in plastic wrap, and stored at room temperature or even frozen for longer storage. The cream cheese frosting can also be made a day in advance and stored in an airtight container in the refrigerator. Just be sure to bring the frosting to room temperature and re-whip it slightly before assembling and decorating the cake. Assembled and frosted cakes should be refrigerated due to the cream cheese, but allowed to sit at room temperature for an hour or two before serving for the best taste and texture.
FOLLOW ME
Exciting Flavor and Decoration Variations
While this red velvet heart cake is stunning and delicious as-is, its versatility allows for numerous creative changes to truly customize it to your liking and suit any celebration. Don’t be afraid to experiment and make this recipe uniquely yours!
- **Frosting Adventures:** Beyond simply tinting the cream cheese frosting (though turning it a lovely pink for a romantic touch is always a good idea!), consider different flavor profiles. A hint of almond extract can add depth, or a touch of lemon zest can provide a bright, complementary flavor to the rich red velvet. If you’re not a fan of cream cheese, a classic vanilla buttercream or even a luxurious chocolate ganache can make for an equally delicious topping.
- **Creative Sprinkles & Toppings:** The possibilities for garnishing are endless! Instead of traditional sprinkles, try topping your cake with fresh, vibrant fruit like perfectly sliced strawberries, juicy raspberries, or even plump maraschino cherries for a burst of color and flavor. Chocolate curls, finely chopped nuts (like pecans or walnuts), or even edible flowers can elevate the elegance. For a holiday other than Valentine’s Day, swap the red and pink for appropriate seasonal sprinkles, such as green and red for Christmas, or pastel hues for Easter.
- **Alternative Cake Flavors:** While red velvet is classic, the heart-shaping technique works beautifully with other cake bases. Imagine a rich chocolate fudge cake, a delicate vanilla bean cake, or a zesty lemon cake all shaped as a heart! Adjusting the cake recipe is simple, and the frosting can remain cream cheese or be adapted to complement the new flavor.
- **Luscious Fillings:** Elevate your cake experience by adding a delicious filling between the layers. A homemade strawberry compote, a smooth chocolate ganache, a light whipped cream, or even a simple fruit curd can add an extra layer of flavor and texture, surprising your guests with every bite.
This red velvet heart cake is more than just beautiful; it’s a testament to thoughtful baking. Its rich flavor, delicate texture, and impressive presentation are sure to make it a huge hit with your sweetheart and anyone you share it with!
More Delightful Dessert Recipes
Chocolate Covered Strawberries
7 mins
Chocolate Pudding Cake
45 mins
Red Velvet Cookies
35 mins
Chocolate Hazelnut Cupcakes
50 mins
Fresh Strawberry Pie
1 hr 35 mins
Love This Recipe? Let Us Know!
If you’ve enjoyed baking and sharing this delightful heart cake, please consider leaving a 5-star 🌟🌟🌟🌟🌟 rating in the recipe card below and a thoughtful review in the comments section further down the page. Your feedback helps other bakers and is greatly appreciated!
Heart Cake
Pin
Time
Equipment
-
2 9-inch round cake pans
-
2 cake baking strips
-
1 stand mixer or electric mixer
-
1 whisk or hand blender
-
1 cake leveler or large serrated knife
-
1 cake stand I used a 14-inch stand
-
2 piping tips large round and large star
-
2 piping bags
-
1 cake scraper (optional, for smooth finish)
-
Parchment paper
-
Wire cooling rack
-
Kitchen scale (optional, for even layers)
Ingredients
For the cake
- 3½ cups all purpose flour
- ⅓ cup cocoa powder
- 1¼ teaspoons baking powder
- 1¼ teaspoons baking soda
- 1¼ teaspoons salt
- 2⅔ cups granulated sugar
- 1¼ cups buttermilk
- 1¼ cups vegetable oil
- 3 large eggs
- 2½ teaspoons vanilla extract
- 1¼ teaspoons distilled white vinegar
- 1¼ teaspoons instant coffee dissolved in ⅔ cup hot water
- 2 tablespoons red gel food coloring I used Americolor Super Red for vibrant results
- cooking spray
For the frosting
- 2½ cups unsalted butter cubed and softened to room temperature
- 2½ teaspoons vanilla extract
- 9 cups powdered sugar sifted, to prevent lumps
- 20 ounces cream cheese cubed and softened to room temperature
For garnish
- ½ cup sprinkles I used a festive blend of red and pink hearts, pearls, and jimmies
Instructions
For the cake
-
Preheat your oven to 325 degrees F (160°C). Prepare two 9-inch round cake pans by coating them thoroughly with cooking spray and then lining the bottoms and sides with parchment paper. Submerge your cake baking strips in water to prepare them.
-
In the bowl of a stand mixer, sift together the all-purpose flour, cocoa powder, baking powder, baking soda, and salt. Stir in the granulated sugar until all the dry ingredients are uniformly combined.
-
In a separate, large bowl, use a whisk or hand blender to thoroughly combine the buttermilk, vegetable oil, eggs, vanilla extract, distilled white vinegar, the instant coffee dissolved in hot water, and the red gel food coloring. You can add more food coloring at this stage if you desire a more intense red hue.
-
Turn your stand mixer to low speed. Slowly pour the wet ingredients into the dry ingredients, mixing just until the batter is combined and no dry streaks remain. Be extremely careful not to overmix the batter, as this can lead to a tough, dry cake.
-
Divide the cake batter evenly between the two prepared 9-inch pans. For precision, a kitchen scale can be used to ensure each pan receives the exact same amount of batter, resulting in perfectly even layers.
-
Gently squeeze out any excess water from the soaked cake baking strips and securely wrap them around the outside of each cake pan.
-
Bake the cakes for 60-65 minutes, or until the tops are springy to the touch and a toothpick inserted into the center comes out clean or with only a few moist crumbs attached.
-
Allow the baked cakes to cool in their pans for 20 minutes before carefully inverting them onto a wire cooling rack. Let them cool completely to room temperature before proceeding with frosting. This prevents the cake from breaking and the frosting from melting.
For the frosting
-
In the bowl of a stand mixer fitted with the paddle attachment, beat the softened unsalted butter and vanilla extract together on medium speed for 1-2 minutes, or until the mixture is light, fluffy, and noticeably pale in color.
-
Reduce the mixer speed to low. Gradually add the sifted powdered sugar, one cup at a time, allowing each addition to fully blend into the butter mixture before adding the next. Continue until all the sugar is incorporated and the frosting is smooth.
-
In a separate, clean bowl, beat the softened cream cheese until it is perfectly smooth and completely free of any lumps. This crucial step ensures a silky-smooth final frosting texture.
-
Add the beaten cream cheese to the butter and sugar mixture in the stand mixer. Beat on medium-low speed until all ingredients are just combined and you have a smooth, creamy frosting with a medium-thick consistency. Be careful not to overbeat. Set aside 1½ cups of this frosting in a separate bowl for later use as a decorative border.
For the heart shape
-
Once completely cooled, use a large, serrated knife or a cake leveler to carefully trim the tops off both cake layers, creating flat, even surfaces.
-
Place one cake layer onto your chosen cake stand or serving plate, positioning it slightly towards the bottom edge. Pipe a thin, even layer of your prepared frosting over this cake layer. Carefully place the second cake layer directly on top, aligning it perfectly.
-
To create the heart shape, use a large, serrated knife to gently score a cross on the top surface of the stacked round cake. This will guide your cuts.
-
On each side of the cake, make a diagonal cut from the bottom point of your scored cross up towards the horizontal point on each side. This will create two triangular cake wedges.
-
Turn these two cake wedges onto their sides, so the cut edge is facing upwards. Pipe a generous amount of frosting onto these cut sides. Carefully press each frosted wedge onto the top rounded part of the main cake, effectively forming the two rounded “humps” of a heart. For an even more defined shape, you can gently cut a small ‘V’ into the center where the two wedges meet.
-
Using an offset spatula, apply a thin, even layer of frosting all over the entire heart-shaped cake. This is your essential crumb coat, which locks in any loose crumbs and creates a smooth base. Chill the cake in the refrigerator for at least 30 minutes (or 15 minutes in the freezer) to allow the crumb coat to firm up completely.
For the decorating
-
Once the crumb coat is firm, pipe or spread more of the remaining cream cheese frosting onto the top and sides of the cake. Use a cake scraper to achieve a beautifully smooth and polished final coat of frosting.
-
Fit a piping bag with a large star nozzle. Fill the bag with the 1½ cups of frosting you previously reserved for the border.
-
Starting at the top of one of the heart’s rounded mounds, pipe a small, firm bulb of frosting. Ease the nozzle back diagonally to create a delicate tail. Position the nozzle slightly lower than your first bulb and repeat the process, forming another bulb and tail. Continue piping this border pattern around the entire top edge of the cake, ensuring each piped bulb just touches the previous one to create a continuous, elegant design. Repeat on the other side of the heart.
-
Finally, decorate your stunning heart cake as desired with your chosen sprinkles. Cut into generous slices and serve to delighted friends and family!
Notes
- Since the frosting contains cream cheese, it’s essential to keep the cake refrigerated. Store it in an airtight container for up to 3 days. For optimal flavor and texture, remove the cake from the refrigerator one to two hours before serving, allowing it to reach room temperature.
- To achieve a flawlessly smooth frosting finish, chilling the cake at intervals (after the crumb coat and after the final frosting layer) in the refrigerator or freezer is highly beneficial. If you prefer a more rustic aesthetic, you can easily create a beautiful textured finish with an offset spatula.
Nutrition
Tweet
Pin